The Restaurant Inventory Items screen allows you to define inventory unit, purchase unit, location, par level, vendor information, and bar code information for master inventory items used by a specific restaurant.
Note: To add or create items, use the Master Inventory Items screen or the Inventory Item Wizard. The Restaurant Inventory Items screen should only be used to add restaurant-specific information. While you can delete items from this screen, it only removes the restaurant-specific information from the master item. Master items can be removed only on the master screen.
The "Add Items to Restaurant Inventory" security setting (under Setup > Security > Groups > Screen Access tab > Restaurant Inventory Items list) determines whether each user can select master inventory items to add to the restaurant inventory items. If this security option is not selected for the group to which a user belongs, that user will not be able to select items from the Master Inventory to add to the restaurant inventory. Also, access to each individual tab of this screen can be turned on or off for the group.
To find a particular item, use the search functionality in the main toolbar. You can alternatively view either all of the items in inventory or only the items for a your restaurant by toggling between Show All Items and Show This Entity's Items Only at the top of the screen.
![]() Visit the Compeat Support
Website for additional information on this topic and more.
Visit the Compeat Support
Website for additional information on this topic and more.
![]() Click to view/hide picture.
Click to view/hide picture.
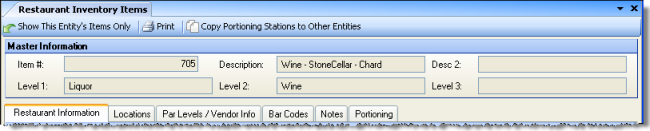
The screen header— the top portion of the screen— provides basic information about the selected item, read from the Master Inventory Items record, and cannot be modified in the Restaurant Inventory Items screen. To change the master information values, go to the Master Inventory Items screen.
![]() Click to view/hide picture.
Click to view/hide picture.
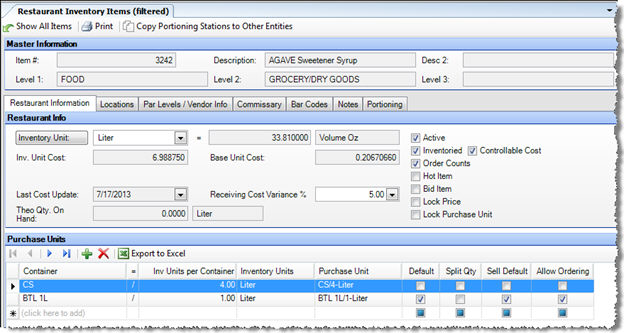
Inventory
Unit: variable
= x
variable Base Units
Select the inventory unit that you will use to count this item in
your restaurant. If you have security access
to the Standard
Unit of Measure screen, you can click on the Inventory
Unit button to go directly to that screen to define new inventory
units.
If you wish to assign an item class not available from the drop-down
list, you may have to create a conversion class in the master inventory
item.
![]() For more information on item units in
Compeat, see Item Units in Compeat on the Compeat
Support website.
For more information on item units in
Compeat, see Item Units in Compeat on the Compeat
Support website.
Inv. Unit
Cost Enter the cost per inventory unit. When a voucher containing
a price for the inventory unit is posted, this field fills in automatically
with the posted price.
This field can be manually entered on initial setup, but will be overwritten
by the first AP invoice posting.
Base Unit Cost This is a read-only field that displays the cost of a base unit based on the base unit of the inventory unit selected and the inventory unit cost. It is calculated as Inv. Unit Cost/# inventory units.
Stnd. Inv.
Unit Cost This field only appears if using standard costs.
Standard costs are never updated by vouchers—
they can only be updated here, manually. To use standard costs, check
the "Use Standard Costs" field under Setup > Other Definitions
> Other Tab. If standard costs are in use and this field is left
blank for an item, the item will be costed normally (by the last posted
voucher price).
![]() For
an in-depth discussion on some of the uses for Standard Costs, see
Standard Costing in the Reference section
of the Compeat Support website.
For
an in-depth discussion on some of the uses for Standard Costs, see
Standard Costing in the Reference section
of the Compeat Support website.
Std. Base Unit Cost This is a read-only field that displays the standard cost per base unit based on the base unit of the inventory unit selected and the standard inventory unit cost. It is calculated as Stnd. Inv. Unit Cost/# inventory units.
Last Cost Update Displays the invoice date of the last voucher posted for this item. This field is automatically updated as vouchers are posted.
Receiving Cost Variance Enter the percentage change (up or down) in price that will trigger a warning when this item is received on the AP Invoices and Manual Checks screens with a variance in purchase price from its previous purchase price of more than this percent. If you also check the "Lock Price" box, Compeat will not allow the item price to be changed. You can set global cost variances (overridden for individual items by using this field) using the Set Cost Variance screen. By checking the validate cost variances by vendor button in other definitions, the price that is used can be the quote from the vendor, rather than the previous posted purchase.
Theo Qty On Hand Displays the number of inventory units that are available. Compeat increases this value as items are bought and decreases it as items are sold (from the POS sales mix).
Many items are not sold directly, but are ingredients in menu items and prep items. For example, bottles of wine are often sold directly, but butter typically is not; butter is usually an ingredient in a menu or prep item. For items that are ingredients, when a menu item containing it is sold, or a prep item is created, the theoretical quantity on-hand is decreased by:
(number sold x amount of the ingredient in the recipe) / recipe unit to inventory unit conversion factor.
For example, assume there are 2 ounces of butter in the menu item grilled tuna, there are 10 grilled tunas sold in a day, and that butter is inventoried by the pound. The theoretical quantity on-hand decreases by (10 x 2) / 16 (16 ounces per pound) = 1.25 pounds.
Note: When an inventory count is posted, Compeat will update the theoretical quantity on-hand with the posted count. However, if the inventory count post date is not the current date, Compeat will automatically make adjustments for any sales or receipts of the item that have occurred since the post date. For example, if you enter a count of 10 for ABC item on July 1, then on July 2 sell 3 units of ABC item, when the count is posted on July 3, the theoretical quantity on-hand will be updated to 7 (10 from the count – 3 sold), not 10.
The theoretical quantity on-hand is also decreased for items that are portioned; the whole item’s quantity is decreased, while the portioned items’ quantities are increased.
Active Uncheck if this item should not be active for this restaurant. An inactive item cannot be entered on invoices, orders, or manual checks. If an item that was previously active is made unavailable on the Master Inventory Items screen, it will automatically become inactive on each restaurant inventory item record. To see a list of which items are active in which restaurants, see the Inventory by Restaurant screen.
Note: Permission to change this check box can be granted or denied using the "Allow Changing Active/Inactive Item Status" checkbox in the Restaurant Inventory Items section under Setup > Security menu > Groups screen > Screen Access tab.
Inventoried If this box is checked, this item will be listed in Valuation Counts and reports. You should typically leave this checked, unless this is an item that you do not inventory, but do order using the Compeat ordering capabilities.
Order Counts If this box is checked, this item will be listed when doing Order Counts (unless the Order Count is for hot items only).
Hot Item Check this box if this item is one that you wish to count more frequently than the rest of your inventory. You can flag items as hot, then produce Order Counts for hot items only.
Bid Item If an item is checked as a bid item,
then the Suggest
Orders by Par Levels and Suggest
Orders by Shopping List screens will suggest a vendor to order
from based on which vendor has the lowest price as defined on the
Vendor Price Maintenance
screen.
![]() For a general discussion of bidding
in Compeat, see the Bidding article on the
Compeat Support website.
For a general discussion of bidding
in Compeat, see the Bidding article on the
Compeat Support website.
Note: Preferred vendor (Par Levels/Vendor Info) is overridden by lowest price for bid items when using Suggest Orders by Par Levels and Suggest Orders by Shopping List.
Lock Price Check if you want to prevent this item's price from changing when orders are made or vouchers received with new prices. If checked, the price cannot be updated without first unchecking this box. An exception is made if you also use a cost variance percent with this item: if the price change is within the specified percent, it will be updated even though the price is locked. This will not prevent a price from expiring if the price has an expiration date (included in the Vendor Price Maintenance table).
Lock Purchase Unit Check to prevent automatically changing the current default purchase unit when invoices are received (you can still change the purchase unit manually when this box is checked). This can be useful for items that are frequently received in different pack sizes, and you want to have a consistent purchase unit for counting purposes.
Controllable Cost This will control if the item will appear on your Inventory Count Variance Report or your Controllable Cost of Goods Report. Non-controllable inventory items can be excluded from variance reporting if you are not able to calculate a theoretical on hand. Examples of non-controllable inventory items would be condiments on tables that are not included as part of any Compeat menu item recipes.
Container From the drop-down list of previously defined containers, choose one that your vendors use to deliver this item. For multiple vendors, containers, or number of inventory units, use multiple line item definitions. If you have appropriate security access, you can add containers by simply typing the new container name into the field.
Inv Units per Container Enter a number of inventory units that belong in the container you are defining. If you need to correct an error in this definition after the item has been included in a posted voucher, you can fix this inventory conversion factor on selected vouchers.
Inventory Units This field is tied to the "Inventory Unit" field.
Purch Unit This field displays the container-to-inventory-units definition you have defined in the previous three cells. It appears in the form you have specified in the Purchase Unit Options screen.
Default Sets the default purchase unit to be used for the item. As you enter invoices into Compeat, if you pick a new purchase unit for an item, this check box will change to reflect this choice. You have the ability to override the last used purchase unit (the selected unit) here.
Split Qty This checkbox is only applicable to electronically transmitting purchase orders. Some vendors, like Sysco, require that split quantities be transmitted in a separate field from case quantities. If your vendor requires this, you can use this checkbox to specify which purchase units represent split packs.
Sell Default (Commissary only) Sets the default purchase units for selling items to other restaurants and outside customers. Please Note: This checkbox is required for items to pre-fill in a purchase order to the commissary. If this is box is not checked, the item will not pre-fill when creating a purchase order, although it can be added.
Allow Ordering (Commissary only) Check this for each purchase unit that is to be available for inside and outside orders.
Note: If the item is a Catch Weight item as defined on the Master Inventory Items screen, you need to define a container identical to the inventory unit (container = 1 inv unit), in addition to the normal "container = x inventory units" purchase unit definition. This allows you to receive the inventory unit; and this second purchase unit definition— which has a ratio of 1 that Compeat seeks when receiving Catch Weight items— will appear on AP Invoices and Manual Check screens.
Example
You might order cheese by the wheel, even though it is priced by the pound.
Each wheel has a different weight, so how can you receive it by the pound?
After checking the "Catch Weight" box in the Master
Inventory Items screen, define Wheel=5
Lb and Pound=1 Lb here
on separate lines (assuming the inventory unit is Lb)
to effectively make a container conversion factor. When you order cheese,
you can place your order for 2 wheels of cheese. When the order is received,
Compeat will automatically convert it to a quantity of 10, of the purchase
unit definition Pound=1 Lb, on
the AP Invoices or Manual Checks screen. If no "container
= 1 inv unit" definition for the catch weight item is found,
Compeat will prompt you to create one. You can then change the quantity
to, say, 11.25 pounds, if that is the actual weight of the two wheels,
and thus account for it properly.
![]() Click to view/hide picture.
Click to view/hide picture.
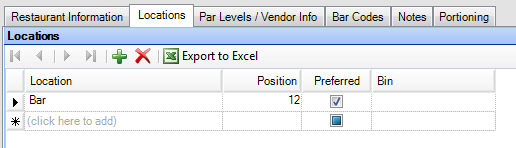
Each restaurant can define an unlimited number of locations within the restaurant for each inventory item. Locations are helpful in streamlining the process of performing an inventory count when it comes time to count your inventory.
Location
Select the locations where
the inventory item is kept in your restaurant. This is used for grouping
in the inventory count worksheet. You can specify multiple locations
for a particular item; if so, that item will appear in the inventory
count worksheet for each location. This field is required if you have
selected the "Inventoried" checkbox on the Restaurant Information
tab. If you have appropriate security access, you can add new locations
by simply typing a new name into the field.
The top location in the list is the default location for the item,
used in reports like the commissary Picking
Tickets screen. If you want to change the default location for
the item, change the first or topmost location in the list. Note that
locations store unposted inventory counts, so deleting a location
would delete unposted counts at that location.
Position Enter a number that represents the relative position of the item at the location where it is stored. For example, if you have a bar that is always stocked with bottles in the same positions, specify the item's number in the bottle order within the bar. The position is used for sorting the inventory count worksheet. This helps speed up your physical counts. If you do not wish to enter positions here, you can instead use the Inventory Positions feature to quickly and easily sort items into their positions for each location. This field is optional.
Note: An item can be at multiple positions in the same location. For example, if Scotch is at positions 15, 45, and 81 in your bar, you would add a location of BAR with position 15, another location of BAR with position 45, and a third location of BAR with position 81. Now, when you go to count your bar, Scotch will appear three times at the specified locations. When you post your counts, Compeat will automatically add all the quantities together for you.
Preferred (Optional) Check to mark a location as the preferred location when multiple locations are defined. The preferred location is used for sorting in features such as the Prefill New Orders.
Bin (Optional) Add a bin number or name to further define the sorting capabilities of the count screen. If you use numbers, be sure to add zeroes before them so that they sort correctly. So instead of 1 enter 001. Instead of 10, enter 010.
Note: You can also set positions or bins in the Inventory Positions screen. This screen allows you to view location and positions of all items together. To assign bins in the Inventory Positions screen, right click on an item and click ‘Assign Bin’.
![]() Click to view/hide picture.
Click to view/hide picture.
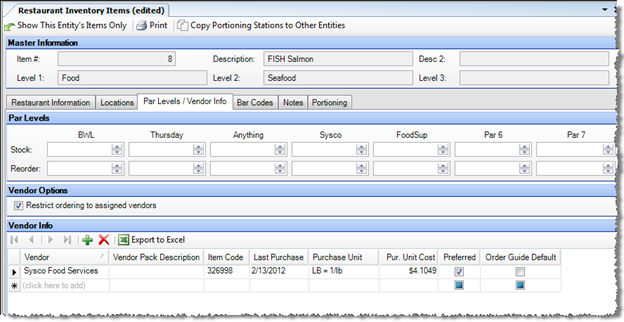
Compeat can suggest orders based on par level. A suggested order will include all of the items with any defined par values— even a stock or reorder level of zero— for the specified par level.
However, only those items whose reorder level is greater than the theoretical quantity on-hand will have a quantity included on the suggested order. You can edit any of the quantities on the suggested order. Then, when a suggested order is saved, only the items with a quantity will be included— items with a zero quantity will be removed at this point.
Stock (Par 1– 7) The optimal stock level for the inventory item for this par level. Specify a quantity using the inventory unit (not the purchase unit).
Reorder
(Par 1– 7)
The level at which the inventory item should be reordered for this
par level. Specify a quantity using the inventory unit (not the purchase
unit). When an item’s theoretical quantity on-hand falls below the
reorder level, it will be flagged, and then when a suggested order
is generated for this item, Compeat will automatically suggest a quantity
to order that is the difference between the theoretical quantity on-hand
and the stock level.
When an order is generated, Compeat automatically converts the inventory
unit to the appropriate purchase unit for the preferred vendor. For
more information on how Compeat uses par levels to suggest orders,
see Create
a Suggested Order.
Note: If you are defining par levels for all of your inventory items, you might find it easiest to use the Par Maintenance feature instead of opening each Restaurant Inventory Item and entering the par levels here.
Depending on your business needs, you may not use all seven of the available par levels. The descriptions of the par levels are customizable for each restaurant from the Setup menu > Other Definitions screen > Other tab.
If you add a vendor record here, new orders for this vendor will pre-fill with this item (when "Prefill New Orders" is checked in the Vendors setup screen).
You do not have to explicitly add the vendor information for each item; Compeat will automatically update this as vouchers including the inventory item are entered or as new vendor prices are added through Vendor Price Maintenance. However, if you have yet to process any vouchers, and want Orders to be pre-filled with vendor information, you can enter it here.
Vendor Name Select each vendor from whom you purchase this item; there can be one or more vendors.
Vendor Pack Description This is an optional field that can be used to enter a vendor pack size. It can be populated by importing invoices, if the field is defined in the template.
Item Code Enter the code that the vendor uses to identify this item. This field is optional; it is used when entering orders.
Last Purchase Displays the invoice date of the last voucher that included this item that was entered for this vendor. Compeat automatically updates this as vouchers are entered.
Purchase Unit The unit of measure used to purchase this item from this vendor. The drop-down list for this field displays the purchase units defined for the item on the Restaurant Information tab of this screen. If you purchase the same item from the same vendor in different purchase units, each different purchase unit will show as its own vendor line item. In order to get correct cost information, you must also enter a valid conversion factor to inventory units for this item for the purchase unit.
For example, assume you typically buy and inventory cooking oil by 5 gallon cans. 5 gallons is both your inventory unit and your purchase unit; the conversion unit is 1. If one day, your vendor can only provide 1 gallon cans, when you enter the voucher, you will need to add a new purchase unit (1 gallon) and a new conversion factor (0.20).
Pur. Unit Cost Displays the amount per purchase unit paid on the last voucher entered for this vendor.
Note: This field will update automatically when you import an order guide with a new price for this item or update through Vendor Price Maintenance.
Preferred Specify which vendor Compeat should use when automatically generating an order for this item (termed suggested orders) when its reorder level is reached. For information on suggested orders, see the section Create a Suggested Order.
Order Guide Default When matching items after importing an order guide or invoice, if any of the items on the this screen are checked as default(s), only those items will appear in the Find Match dialog. If no items were checked, all possible matches are shown. Use this feature if you have two items with the same item code. If one is marked as default and the other not, this resolves the ambiguity and makes an exact match with the item marked as Order Guide Default.
Note: Checking more than one item (with the same item code) will result in ambiguity between the two.
![]() Click to view/hide picture.
Click to view/hide picture.
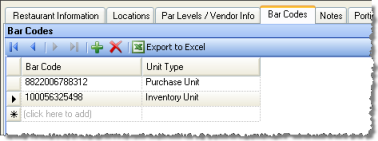
Enter bar codes if you plan to use an electronic bar code scanner for inventory. If not, this information is unnecessary.
Most products are available from a number of different suppliers (e.g., milk can come from many suppliers, so you may have multiple bar codes). The Bar Code Tab allows you to enter as many bar codes as are needed to count inventory.
If there is only one supplier for an item (e.g., Stoli Vodka is only produced by one company), you can enter a Universal Product Code in the UPC field of the Master Inventory Items screen.
Optionally enter any notes associated with the item.
![]() Click to view/hide picture.
Click to view/hide picture.
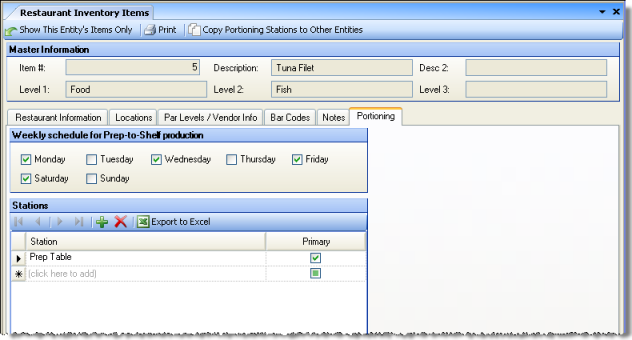
This tab allows you to set schedules and stations for portioned items that are used in Prep-to-Shelf calculations. Entering portioning information for an item will enable you to include portioned items in the Prep-to-Shelf Worksheet when "Include Portioned Items" is checked on that screen.
![]() Click to view/hide picture.
Click to view/hide picture.
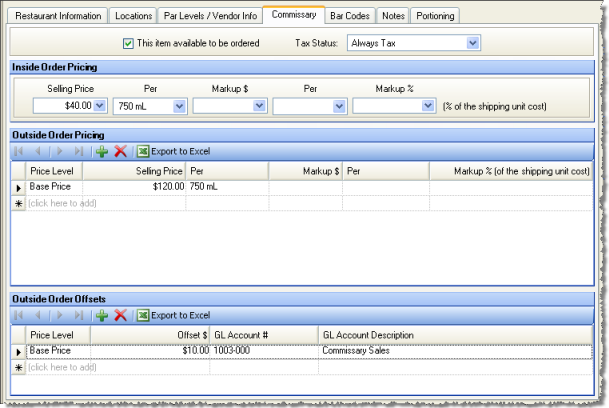
Check the "This item is available to be ordered" checkbox if you want the item to appear on the list of items that can be ordered from the commissary. Restaurants and customers can only order items from your commissary if they are marked as available to be ordered either here or on the Commissary Items screen.
Note: An item must have a purchase unit defined under the commissary entity before it can be selected as available to order.
Choose either Never Tax, Always Tax, or Depends on Customer as the sales Tax Status of this item. If the third category (Depends) is chosen, the item will only be taxed for customers who have a sales tax defined on their A/R Customers screen.
Commissaries can establish a selling price or mark-up the cost of any restaurant inventory item differently depending on whether it is an Inside Order or an Outside Order. For either kind of order— you cannot do both— entering a fixed Selling Price overrides any markup data you may enter.
Outside orders use the Base Price assigned to the item. Outside Orders can use any defined Price Level, depending on the Price Level definition assigned to the particular A/R Customer.
Selling Price
Specify a fixed Selling Price as a dollar amount (in the first box) per
inventory unit (selected in the second box). Items will post to the accounts
specified on Levels
screens.
Markup
You can mark up the item cost by a dollar value, by a percentage of shipping
unit cost, or both. On the first line, specify any dollar amount (in the
first box) per inventory unit (selected in the second box) you wish to
mark up the item.
If defined, these offsets will be subtracted from the sales amounts when the Outside Orders are posted and credited to the GL accounts specified. For example, if an item has a selling price of $10 and an offset defined to a freight account for $1, the item will be sold to the customer for a total of $10. When the order is posted, $9 will go to the sales account and $1 will go to the freight account. You can define multiple offsets per price level for each item.