Use the Valuation Counts screen to enter Counts Worksheet information from the physical inventory; posting the information and the created inventory journal entries updates actual, costed quantities. The valuation method used is displayed in the title bar of the screen.
Note: If you are using the FIFO method of valuation, this screen will use a weighted average of what is in the FIFO table for each item, and posting the count affects the Inventory Count Variance report the same way. These are the only times the FIFO principle of using the oldest item cost is abridged.
Compeat allows multiple users in the same restaurant to enter inventory into the Valuation Counts screen at the same time, but does not allow the posting or unposting of inventory counts if more than one user has the Valuation Counts screen open. See Multiple Users Editing for more information.
Note: The Valuation Counts screen may take a few seconds to load if the "Always re-calculate costs on inventory counts screen" box of the Setup menu > Other Definitions screen > Other tab is checked. This is the same tab where you choose your Inventory Valuation Method, which dictates how the actual cost calculations are performed, as seen on the Pre-Post Report and the after-posting Inventory Valuation report.
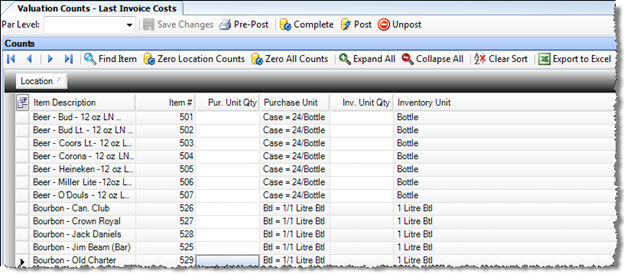
The items that appear on the Valuation Counts screen are those that have the "Inventoried" box checked on their Restaurant Inventory Items screen. The Valuation Counts screen sorts items by position within location.
![]() Click to view/hide picture.
Click to view/hide picture.
To speed data entry and help ensure accuracy, the counts screen displays in the same order as your counts worksheet. Users may click any column header to apply a sort as desired. Click the Clear Sort button to return items to their original location position order.
Note: Items with no value specified will retain their pre-posting item quantity. If you wish to set a quantity to zero, you must enter a zero.
Enter the Purchasing Unit Quantity or the Inventory Unit Quantity or both. If you click on the row of a prep item, the Purch Unit Qty column head changes to Prod Unit Qty, signaling that you can enter the Production Unit quantity (instead of or as well as the inventory unit quantity), unless the prep item is supplied by commissary. Additionally, the Purch/Inv Unit column head changes to Prod/Inv Unit when a prep item is highlighted, reflecting the conversion factor defined for the prep item.
Note: If you want to sort items by bin number, select the field chooser from the top left of the grid, and check the ‘Bin’ checkbox. A Bin column will appear in the grid, and you can sort your count screen by Bin.
If there is an item that you did not count, and you want the quantity on-hand to remain unchanged, leave that item’s quantity field blank; if you enter a zero, that will set the item’s quantity on-hand to zero.
You can set all items in a selected location to zero quantity by clicking the Zero Location Counts button, or set all counts in all locations to zero by clicking the Zero All Counts button. If an item quantity is left blank, the system will default to theoretical quantity on-hand. The zero counts buttons allow you to set everything to zero prior to entering your counts, so that when a quantity entry is omitted, it will be zero instead of the theoretical quantity. You can have the system default all blanks to zero by checking Assume zero on-hand for blank valuation quantities under Other Definitions.
You can use the "Par Level" drop-down at the top of the screen to limit the items that display to a particular par level.
Note: You can customize the appearance of a list by using
the Field Chooser to select which data columns to display. Simply click
on the Field Chooser icon ![]() in the upper left corner
of the list and select the fields that you would like to display. The
system will remember your preferences for next time. To reset to the default
settings, right-click anywhere on the data and select Restore Default
Settings.
in the upper left corner
of the list and select the fields that you would like to display. The
system will remember your preferences for next time. To reset to the default
settings, right-click anywhere on the data and select Restore Default
Settings.
Quick Tip: If there is a field that you would like to see that is not visible in a list, open the Field Chooser to see if it is an option.
When you are ready, you can double-check your data entry of each quantity on-hand by clicking the Pre-Post Report button.
Note: You can control access to the Pre-Post Report by unchecking its box in the Screen Access tab of a group security definition.
![]() Click to view/hide picture.
Click to view/hide picture.
On the Pre-Post screen, besides using filters to limit your item view, use one of the following three options:
Print by Inv
Level, Detail One way to verify that your inventory is correct
is to run the Pre-Post report using the "Print by Inv Levels,
Detail" option. This will sort your inventory by level categories
and show the total on-hand cost for each category. This report allows
you to check for anomalies in category cost. For example, if someone
accidentally counted some bar items by the bottle instead of the case,
your liquor category costs would be inordinately high. You could then
go back and correct the particular liquor item problem before posting
your inventory data.
The Detail report is sorted
in the same order as the Inventory
Valuation Report. It looks like this.
Print by Inv Level, Summary If you select "Print by Inv Level, Summary," each inventory item will be listed only once, with the total quantity from all locations (presuming the "Location" box is blank). It looks like this.
Print
by Location Another way to verify that your inventory is correct
is to produce a report by location. Select the "Print by Location"
option.
This will produce a report that is sorted in the same order as the
Valuation Counts screen—
that is, by position within location—
but with the quantity on-hand values and calculated cost per item.
It looks
like this.
Print by Inv Level, Bin, Detail This will sort your report by Inventory Level, then bin, then detail.
Print by Location, Bin Same layout as by Location, but with the Bin sorting taking precedence over position sorting.
When your Valuation Counts screen data appears correct, click the Post button to post your data (you must have posting permissions under the Security > Groups > Screen Access tab).
Note: You can also select the Complete button to finish the valuation count and subsequently post multiple completed valuation counts from the Transactions > Batch Posting > Inventory Counts screen.
This commits the quantity-on-hand amounts and the costs. The results of that transaction can be viewed by selecting Inventory > Inventory Counts > Valuation Report.
Note: If you are not sure that your inventory is correct, but you have new invoices to enter, you should go ahead and post your current inventory. This locks in the prices for the current inventory so that new invoices do not affect it. If you do not post, and then proceed with entering new invoices, your cost per item could be incorrect.
When a Valuation Count is completed or posted, the quantities and costs immediately update your Order Count/Hot Count table. For example, if a hot count is being entered daily and a Valuation Count is entered every Sunday, the hot count does not need to be entered on Sunday. When the Valuation Count is completed or posted, that information will copy into your hot count automatically.
Item cost can initially be entered in the Restaurant Inventory Items screen (Inv. Unit Cost). However this field will be overwritten by the cost used in the first posted AP Invoice. Therefore, on setup, if you wish to take an initial inventory using the unit cost that was initially entered, then post the count prior to entering any invoices.
Each time you post Valuation Counts, journal entry records are created for the inventory accounts. These can be viewed on the Inventory JE screen, and should be posted from there to complete Inventory processing of an inventory count.
Unlike with other journal entries, these Valuation Count journal entries are not posted automatically. The reason is to provide an opportunity to set the desired ending balance in the inventory account, an extremely unusual eventuality.
It is possible to unpost the most recently posted Valuation Count in order to change a quantity. The act of unposting does not create a journal entry. When the "unposted" count is subsequently posted, a journal entry will be created that represents the net change in inventory value since the last posting. It is therefore necessary to post all inventory journal entries in order for the General Ledger to reflect the correct inventory balance and Cost of Goods Sold.
If you make multiple Valuation Count postings, you should post each resulting Inventory JE, rather than delete any of the journal entries, as each inventory count posting is netted against the previous one in the journal entries.
Note: You can post inventory counts and journal entries for a period after it has closed by defining a grace period for each action on the Setup menu > Other Definitions screen > General Ledger tab.
For information on posting inventory journal entries, see Inventory JE.
If you need to make adjustments to your inventory quantities after posting, go to any date after the posting you want to change, and select the Unpost button from the Valuation Counts screen. Compeat will unpost the previous posting, and you can make corrections and then re-post. (Note that after unposting, prices will reflect any new invoices dated in the valuation count period.) You can repeat the post/unpost process as many times as needed, until it is time to enter your next inventory count.
Note that an unpost will only bring back up the last counts; for counts previous to that, you will not be able to get the count values to pull back up on the count screen, yet you can unpost what was posted.
Important: If you believe an Inventory Unit per Container purchase unit description may be erroneous, resulting in an erroneous Pre-Post Report or Valuation Report, see Adjust Posted Vouchers.
Also see Valuation Cost Adjustments.