The Prep Items screen allows you to define the recipes and ingredients for prep items. Prep items are ingredients, such as sauces and salad dressings, that go into menu items or other prep items.
Note: Prep Items are like other inventory items in that you can track their quantities. However, since prep items are not purchased, the Produce Prep Items screen and the Prep Item Production Register must be used to track their quantity. Quantities of prep items are automatically decreased by Compeat using the imported sales mix data from the POS.
Quick Tip: If you want to create another item that is similar to one already defined, you can duplicate all of the information except for the Item # by clicking the Clone Item button, and then making any changes needed to define your new item.
![]() Click to view/hide picture.
Click to view/hide picture.
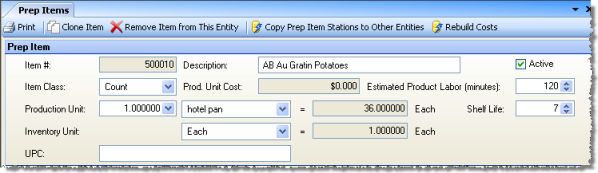
Description of fields:
Item #
You can assign an item number to a new prep item. Because you might
already have a numbering system in place, Compeat will not automatically
assign a sequential number. However, if you want Compeat to assign
the next sequential number available, leave this field blank when
you save the item.
If you enter an item number that has already been used, you will receive
an warning message and you must select a new item number. Once an
item number has been assigned, it cannot be changed.
Note: The prep items and the Master Inventory Items share the same item numbering system. Therefore, you cannot assign a number to a prep item that is already been used for a Master Inventory Item.
Description Enter text that describes and names the prep item. This field is required.
Active Unchecking this box allows you to mark an item that is no longer produced while still maintaining data that is linked to the item. An inactive item cannot be produced, ordered, or invoiced. You might want to make an item inactive if, for example, you stopped using it. Because items that are linked to other data in Compeat cannot be deleted, you cannot simply delete it if it has been used before.
Item Class Specify the measurement class of the finished prep item, whether Volume, Weight, or Count.
Prod. Unit Cost Displays the amount it costs to produce an inventory unit of this prep item. If the "Supplied by Commissary" box is checked on the Inventory Info tab, this cost is automatically calculated by Compeat using the last invoice costs for the inventory items that make up this prep item. If unchecked, the cost of the prep item will come from the invoice of the entity where it was produced. This value is specific to whichever restaurant you are logged into.
Note: When a prep item is changed, the cost is updated in all restaurants that use that prep item. You can update any changes that have been made to the cost since opening the screen by clicking Rebuild Costs on the screen toolbar.
Production Unit = n X n Base Units You can enter a factor by which to multiply a selected production unit to come up with a batch size for this prep item. Simply select a predefined production unit from the drop-down list, and then enter the factor in the first box of the row. The production unit of measure must have at least as many base units as the Inventory unit of measure.
Inventory Unit = n Base Units Select an inventory unit for the prep item from the list of all units of measure that have been defined for the selected Item Class (above). After selecting an inventory unit, the equivalent number of the class's base units will be displayed in the read-only field to the right.
Estimated Product Labor Enter the time (in minutes) you estimate the production of a batch of this prep item should take. The Prep Item Production Worksheet will compute how much labor should be required for each proposed prep production.
Shelf Life Specify the number of days after preparation that the prep item can still be used. This is used for Compeat's Prep-to-Shelf features, as well as for general information about the item.
UPC Optionally enter a master (enterprise-level) Universal Product Code (UPC) in this field. Entity-level UPC's can be entered in the Bar Codes tab.
![]() Click to view/hide picture.
Click to view/hide picture.
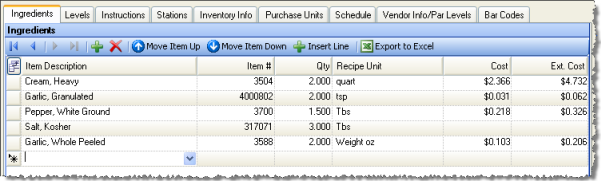
This tab allows you to specify the ingredients used to create your prep item.
Item Description/Item # Select an inventory item from the drop-down menu. You can also enter the item number in the item number field. For any item, you see its base class listed, as well as a static check box to inform you if it is a prep item. When you specify one field, the other populates automatically.
Qty Enter the amount of the item used in the recipe. This uses the recipe unit selected in the next field.
Recipe Unit Select the recipe unit for this ingredient from the drop-down list, which contains all units of measure of the same class(es) as the one(s) defined for this inventory item. (A cross-class conversion factor, enabling the use of a Conversion Class different from the Item Class, can be defined for the item on its Master Inventory Items screen. If so, then both class UOM lists will appear in this drop-down list.)
Cost
Displays the cost per recipe unit for each ingredient. Compeat automatically
calculates this using the last invoice cost. This value is specific
to whichever restaurant you are logged into.
The cost information displayed varies depending on the restaurant you
are currently logged into. This is because the cost information is
determined from the last entered voucher for each ingredient in the
prep item’s recipe, and vouchers are restaurant-specific.
Ext. Cost Displays the extended cost of each ingredient. Compeat automatically calculates this by multiplying the cost per recipe unit times the quantity used in the recipe. Each ingredient’s extended cost is summed to determine the total Prep Item Cost. This value is specific to whichever restaurant you are logged into.
![]() Click to view/hide picture.
Click to view/hide picture.
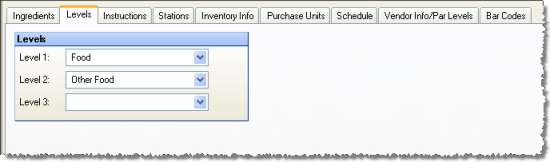
Assign the item to a Level 1 category. Other levels can be assigned as needed. The levels can be used to group prep items when performing inventory counts.
![]() Click to view/hide picture.
Click to view/hide picture.
This tab allows you to enter preparation instructions for the item. Instructions can be printed with the prep item in the Recipe Book report.
Enter a valid URI in the External Link field to direct your users to an external link of your choosing. For example you could link to a document on your file server or to a website with video instructions.
![]() Click to view/hide picture.
Click to view/hide picture.
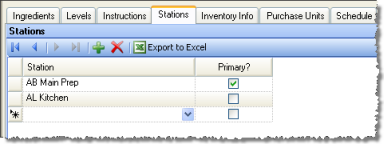
Assigning a station to an item helps organize like items so they can be prepared more efficiently. For example, you would probably want to do all of your meat carving in a batch to consolidate cleanup, or all of your deep frying in a batch to reuse oil. Typical stations might be along the lines of salads, carving, and fryer.
You can define multiple stations for any prep item, and you can then send the station list to all the other restaurants that use that prep item. Choose from the list of Stations defined in Inventory Definitions.
Primary Station
Choose one station to be the primary station where the prep item production
will take place. If you don't designate a station as primary, the prep
item will not show up on the Produce Prep Items screen or worksheet.
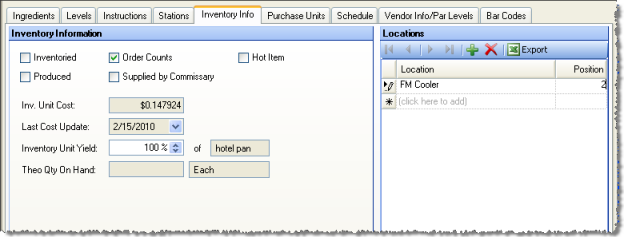
This tab allows you to specify basic information about how the item is inventoried. All of the options set here are restaurant-specific.
![]() Click to view/hide picture.
Click to view/hide picture.
Inventoried Specify whether to include this item in inventory valuation counts and reports. Because prep items are not purchased, in order to track their quantity, the Produce Prep Items feature must be used.
Order Counts Specify whether this item is to be counted for the purpose of making orders. These items appear on the Order Counts screen whether or not they are inventoried.
Note: In order to appear on the Produce Prep Items screen and the Prep-to-Shelf Counts screen, a prep item must be marked as either Inventoried or Order Counts.
Hot Item Specify whether this item is one that you to wish count more frequently than other inventory items. You can flag this item as a hot item, then produce Count Worksheets and Order Counts for hot items only.
Produced
If this box is checked, the ingredients for the prep item will be
depleted by using the Produce Prep Items screen, and the prep item
itself will be depleted from the POS sales mix data. If unchecked,
the prep item's ingredients will be depleted by POS sales mix data,
but not the prep item itself.
Prep items that are marked as Produced
get their costs from posted prep item productions, except in the case
when a prep item is actually produced, in which case the cost is derived
by adding up the costs of the ingredients.
This field is mutually exclusive with "Supplied by Commissary"
since the same item would generally not be produced on-site and supplied.
Supplied by Commissary Check if the item is supplied by a commissary entity instead of produced in-house. By default, a prep item's cost is calculated based on the ingredients used in it. Checking this box will cause the cost of the prep item to come from the invoice of the entity where it was produced. Checked items will not show up in the Produce Prep Items screen for the entity.
Inv. Unit Cost Displays the new inventory unit cost, factoring in the yield, if different from 100%.
Last Cost Update Shows the date when the prep item cost was last updated.
Inventory Unit Yield This percentage is used to adjust the inventory unit cost of the prep item. The yield gets computed automatically when you enter Inv Qty values on the Produce Prep Items screen. The yield is expressed as a percentage of production units.
Theo Qty On Hand Displays the estimated number of inventory units of the prep item that are in stock. Compeat increases this value as prep items are created using Produce Prep Items, and, if the "Produced" box is checked, decreases them as menu items containing the prep item are sold (from the POS sales mix data).
Location
Select the locations from
the drop-down list where the prep item is kept in your restaurant.
This is used to sort the Counts Worksheet. You can have multiple locations
for a particular prep item; if so, that item will appear on the Counts
Worksheet for each location. If you have selected the "Inventoried"
checkbox, you must also select a location.
The top location in the list is the default location for the item,
used in reports like the Commissary Picking Tickets report. If you
want to change the default location for the item, change the first
or topmost location in the list. Note that locations store unposted
inventory counts, so deleting a location would delete unposted counts
at that location.
Position Enter the relative position at the location where the prep item is kept. The position determines the order of items on the Counts Worksheet for each location. This helps speed up your physical counts. If you do not set positions here, you can instead use the Inventory Positions feature to quickly and easily sort prep items into their positions for each location. This field is not required.
Note: If the position information is unknown, it can be entered at a later time.
![]() Click to view/hide picture.
Click to view/hide picture.
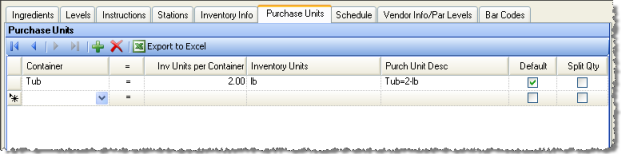
Use the Purchase Unit tab to create as many purchase unit descriptions (shipping containers equal to x number of prep item inventory units) as you need. This will let you both order and invoice prep items, if you allow it on the Other tab of the Setup menu > Other Definitions screen. The tab works exactly like the Detail Area of the Restaurant Inventory Items screen's Restaurant Information tab.
For each line of purchase unit definition, fill in the following detail area columns:
Container Select the container type used for the item. For multiple providers, containers, or number of inventory units, use multiple line item definitions.
Inv Units per Container Enter a number of inventory units that the selected container holds. If you need to correct an error in this definition after the item has been included in a posted voucher, you can fix this inventory conversion factor on selected vouchers.
Inventory Units Displays the inventory units as specified in the header. This cell changes only if you change the inventory unit field (above the detail area on this screen).
Purch Unit Desc This cell displays the container-to-inventory-units definition you have defined in the previous three cells. It appears in the form you have specified in the Purchase Unit Options screen.
Default Specifies the default purchase unit for the item. As you enter invoices into the system, if you pick a new purchase unit for an item, this checkbox will change to reflect this choice. You have the ability to override the last used purchase unit (the selected unit) here.
![]() Click to view/hide picture.
Click to view/hide picture.
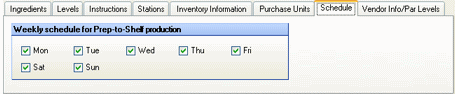
Use the Schedule tab to schedule the prep item's weekly prep-to-shelf production. The day(s) you check indicate the initiation of the batch's shelf life. If you check the "Prep-to-Shelf Counts" field of the Prep-to-Shelf Worksheet and select a checked day of the week as the worksheet date, you can see what the prep-to-shelf counts were on the previous four instances of that day of the week.
Use the Prep-to-Shelf Production Schedule screen to review and edit the production schedule of multiple prep items at once.
![]() Click to view/hide picture.
Click to view/hide picture.
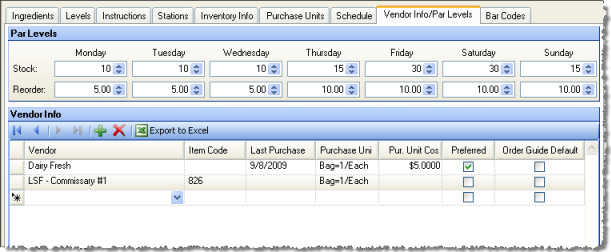
Suggested ordering in Compeat is done by par level. A suggested order will include all of the items with any defined par values— even a stock or reorder level of zero— for the specified par level. Set par levels for a prep item only if it is ordered from a commissary entity; for items made in-house, you would just produce more.
However, only those items whose reorder level is greater than the theoretical quantity on-hand will have a quantity included on the suggested order. You can edit any of the quantities on the suggested order. Then, when a suggested order is saved, only the items with a quantity will be included— items with a zero quantity will be removed at this point.
Par 1-7 Stock Level The optimal stock level for the inventory item for this par level. Specify a quantity using the inventory unit (not the purchase unit).
Par 1-7
Reorder Level The level at
which the inventory item should be reordered for this par level. Specify
a quantity using the inventory unit (not the purchase unit). When
an item’s theoretical quantity on-hand falls below the reorder level,
it will be flagged, and then when a suggested order is generated for
this item, Compeat will automatically suggest a quantity to order
that is the difference between the theoretical quantity on-hand and
the stock level.
When an order is generated, Compeat automatically converts the inventory
unit to the appropriate purchase unit for the preferred vendor. For
more information on how Compeat uses par levels to suggest orders,
see Create
a Suggested Order.
Note: If you are defining par levels for all of your inventory items, you might find it easiest to use the Par Maintenance feature instead of opening each Restaurant Inventory Item and entering the par levels here.
Depending on your business needs, you may not use all seven of the available par levels. The descriptions of the par levels are customizable for each restaurant on the Other tab of the Other Definitions screen.
You do not have to explicitly add the vendor information for each item; Compeat will automatically update this as vouchers including the inventory item are entered. However, if you know the information, you can enter it here.
Vendor Name Select each vendor from whom you purchase this item; there can be one or more vendors.
Item Code Enter the code that the vendor uses to identify this item. This field is optional; it is used when entering orders.
Last Purchase Displays the invoice date of the last voucher that includes this item that was entered for this vendor. Compeat automatically updates this as vouchers are entered.
Purchase
Unit The unit of measure that you use to purchase this item
from this vendor. If you purchase the same item from the same vendor
in different purchase units, each different purchase unit will show
as its own vendor line item. In order to get correct cost information,
you must also enter a valid conversion factor to inventory units for
this item for the purchase unit.
For example, assume you typically buy and inventory cooking oil by
5 gallon cans. 5 gallons is both your inventory unit and your purchase
unit; the conversion unit is 1. If one day, your vendor can only provide
1 gallon cans, when you enter the voucher, you will need to add a
new purchase unit (1 gallon) and a new conversion factor (0.20).
Purch Unit Cost Displays the amount per purchase unit paid on the last voucher entered for this vendor.
Note: This field will update automatically when you import an order guide with a new price for this item.
Preferred Specify which vendor Compeat should use when automatically generating an order for this item (termed suggested orders) when its reorder level is reached. For information on suggested orders, see the section Create a Suggested Order.
Order Guide Default When matching items after importing an order guide, if any of the items on the this screen are checked as default(s), only those items will appear in the Find Match dialog. If no items were checked, all possible matches are shown. Use this feature if you have two items with the same item code. If one is marked as default and the other not, this resolves the ambiguity and makes an exact match with the item marked as Order Guide Default.
Note: Checking more than one item (with the same item code) will result in ambiguity between the two.
Enter entity-specific bar codes in this tab. You can enter multiple bar codes for a single item. Alternatively, for items that only have a single bar code, you can enter a master bar code in the UPC field in the header of this screen.
Some items, such as Stoli Vodka might consistently have the same bar code throughout the country, whereas milk might have different bar codes in different regions, or from different suppliers. For something like Stoli, you could define a single, master UPC. For something like milk, you would generally define the bar code at the entity level based on the bar code used by your local supplier.
Note that Compeat provides tools for creating and printing bar codes using the Bar Codes report.
![]() Click to view/hide picture.
Click to view/hide picture.
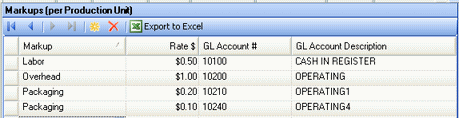
The Prod. Markups tab allows you to add markup for costs related to production. You can specify a rate in dollars per production unit, as well as an associated GL account number, for the prep item's related costs in three categories: packaging, labor, and overhead. (You can modify these categories under Prep Item Production Markups.) These account numbers will be used when you post data on the Produce Prep Items screen.
For prep items with these costs specified, a credit will be made to the associated GL account, and a corresponding debit will be made to the purchase account defined in the inventory level (Level 1 or Level 2) for that prep item. Also, the packaging, labor, and overhead rates will be applied by the production unit of the prep item, not the inventory unit.
You can have multiple costs and markups for the same category; for example, you may have a packaging cost for both aluminum foil and plastic bags for the same item. All individual markups are added together for the total production markup.
![]() Click to view/hide picture.
Click to view/hide picture.
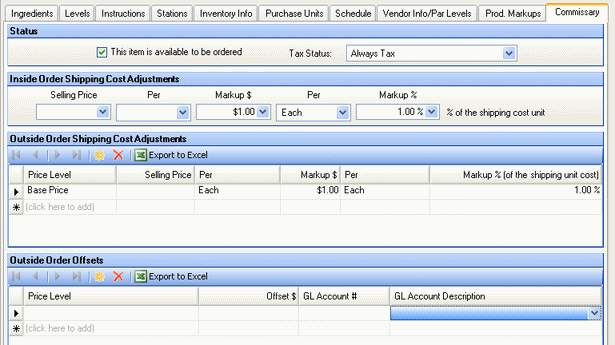
Check "This item is available to be ordered" if you want the item to appear on the list of items that can be ordered from the commissary. Restaurants and customers can only order items from your commissary if they are marked as available to be ordered either here or on the Commissary Items screen.
Note: An item must have a purchase unit defined under the commissary entity before it can be selected as available to order.
Choose either Never Tax, Always Tax, or Depends on Customer as the sales Tax Status of this item. If the third category (Depends) is chosen, the item will only be taxed for customers who have a sales tax defined on their A/R Customers screen.
Commissaries can establish a selling price or
markup the cost of any restaurant inventory item differently depending
on whether it is an Inside Order or an Outside Order. For either kind
of order, you can enter either a fixed selling price or a markup, but
not both. The GL profit account number specified on the Level screen will
post the difference between the cost of each prep item and the selling
price.
Outside orders can use any defined Price Level, depending on the Price Level definition assigned to the particular A/R Customer.
Selling Price Specify a fixed Selling Price as a dollar amount (in the first box) per inventory unit (selected in the second box).
Markup You can mark up the item cost by a dollar value, by a percentage of shipping unit cost, or both. Specify any dollar amount (in the first box) per inventory unit (selected in the second box) you wish to mark up the item.
Offsets allow you to divert money from the sales amount of an item to various accounts to cover costs such as freight. This allows you to display a single amount on the order and then divide the amount for your internal accounting purposes.
If defined, these offsets will be subtracted from the sales amounts when the outside orders are posted and credited to the GL accounts specified. For example, if an item has a selling price of $10 and an offset defined to a freight account for $1, the item will be sold to the customer for a total of $10. When the order is posted, $9 will go to the sales account and $1 will go to the freight account. You can define multiple offsets per price level for each item.