Time & Attendance > Time Worked > Time Entry
Deleting a Range of Time Entries
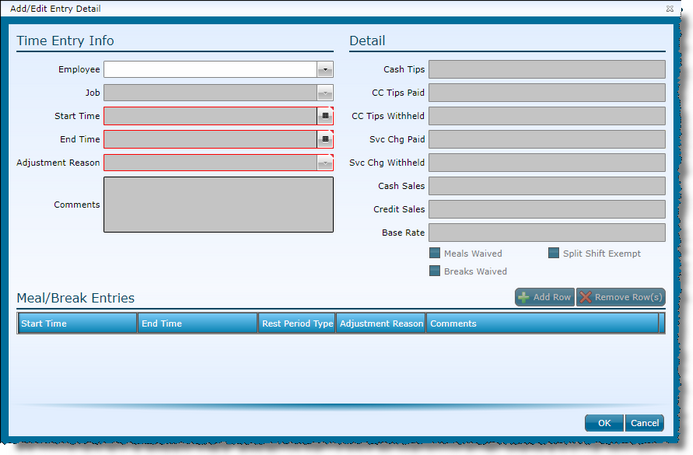
Users can either edit time for data that has already been polled or previously entered or, they can manually add it using the time entry screen.
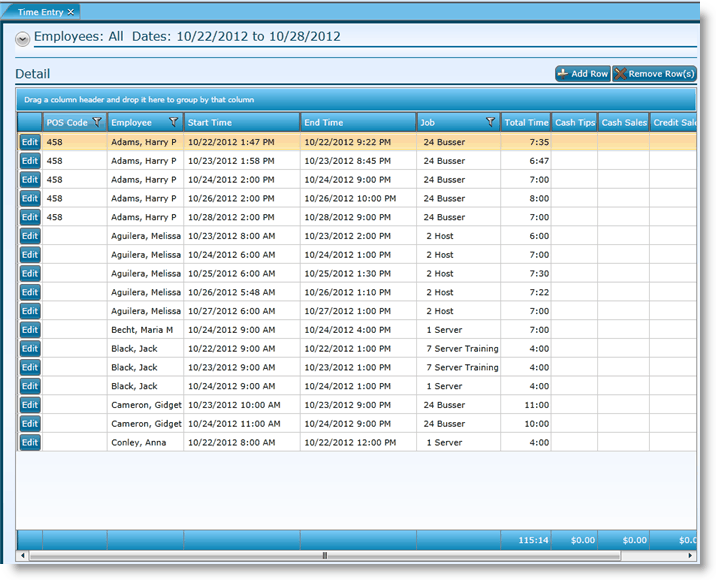
Note that only open time entry records will appear here. Once exported, the records will no longer appear in this screen.
1.Click on Add Row.

2.Select the employee name from the drop-down.
3.Select the job the employee performed.
4.Enter the Start Time of the shift.
5.Enter the End Time of the shift, if available.
6.Select an adjustment reason, if applicable. Note that adjustment reasons may be required. To edit whether an adjustment reason should be required or not, please visit the default labor definitions for the enterprise or the labor definitions for the entity.
7.Enter a Comment for the adjustment, if applicable. Note that comments may be required. To edit whether a comment is required or not, please visit the default labor definitions for the enterprise or the labor definitions for the entity.
Note: These fields are not required.
8.Enter Cash Tips, if applicable. This field may or may not be applicable depending upon how your labor definitions are setup for the entity.
9.Enter CC Tips Paid, if applicable. This field may or may not be applicable depending upon how your labor definitions are setup for the entity.
10. Enter CC Tips Withheld, if applicable. This field may or may not be applicable depending upon how your labor definitions are setup for the entity.
11. Enter Svc Chg Paid, if applicable. This field may or may not be applicable depending upon how your labor definitions are setup for the entity.
12. Enter Svc Chg Withheld, if applicable. This field may or may not be applicable depending upon how your labor definitions are setup for the entity.
13. Enter Cash Sales, if applicable.
14. Enter Credit Sales, if applicable.
15. If the Rate should be different than what is set in the employee record for the job, enter it here. Note that the user making this adjustment must be in a group that has the ability to Override Base Rate in the Time Entry category under the Security Settings tab.
16. If the default status for meal waiver for an employee needs to be modified, select or deselect the checkbox for Meals Waived. This overrides the specific time entry only.
17.If the default status for break waiver for an employee needs to be modified, select or deselect the checkbox for Breaks Waived. This overrides the specific time entry only.
18. If the shift is exempt from split shift rules, check the Split Shift Exempt box.
Note: These fields are not required.
15. Click on Add Row.
16. Click in the Start Time field and enter the time.
17. Click in the End Time field and enter the time.
18. Indicate if the rest period is a break or a meal.
19. Enter an adjustment reason, if applicable.
20. Enter a Comment, if applicable.
21. Click the OK button.
22. Click the Save button.
1.Fill in the date range, employee name or both.
2.Click the Retrieve Data button.
3.Click on the corresponding Edit button for the record you want to edit.
4.Make edits.
5.Click the OK button.
6.Click the Save button.
1.Highlight the record you wish to remove by clicking in any of the fields once.
2.Click the Remove Row(s) button.
3.Click the Save button.

For information on how to group the grid data, visit the Grouping Grid Data screen in the Tools section.
To delete time entries for a specific or consecutive number of days, use the Delete Time Entries screen.
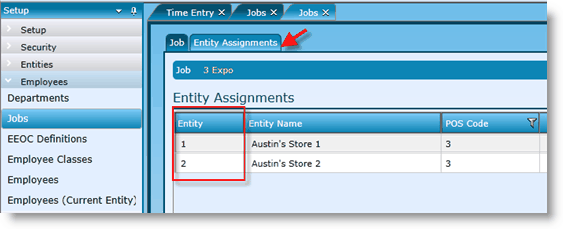
1.Don't see any employees when you attempt to add a record?
oTypically, this will be an issue with setup. Make sure the job of the employee for whom you are adding the record is assigned to the entity.

Send feedback on this topic.