Labor Admin > Security > Groups
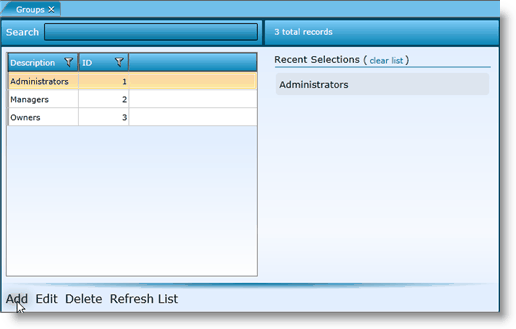
The Groups screen allows you to define and manage security.
If you use Advantage, your groups may already be established. This setting is shared between Advantage and Workforce. Therefore, if you add, change or delete any group information in one application, the information is automatically updated for the other.
In Workforce, a user's group defines which features they have access to within the menu, as well as:
oIf they are able to post schedules.
oIf they can edit forecasts.
oIf they can override unavailability.
oIf they can modify restaurant station headers.
oIf they can modify restaurant station assignments.
oAccess to wage information.
oWhat departments they can access.
When a user belongs to multiple groups, the features available to those groups is cumulative. That is, the user has access to each feature any one of his group definitions allows.
The only default group in Workforce is Administrators. Administrators have access to everything.
1.Click on the Add link.


2.Fill in the following fields:
oDescription - Provide a description. Here you can make define the group role.
oSecurity Level - Select the security level that should be applied to the group. Visit the security levels section for more information on security levels and how to set them up.
3.Add users to the group:
For more information on how to select items, visit the Selecting Setup Items screen in the Tools section.
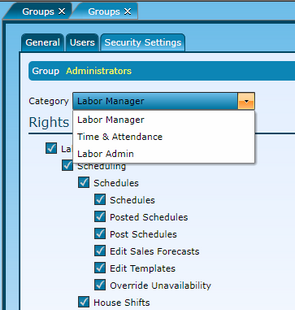
8.Grant or restrict security for the user based on menu feature.

Category selection will provide a tree-view list of features available within that menu area. Checking the box will grant the users within the group access to the feature. Note that if there are several items a scroll bar will appear on the right side. Slide it down to see the rest of the list.
Some additional security settings are available which apply within menu features. These are defined below.
Category: Labor Manager
oScheduling > Schedules > Post Schedules - Check this box if users in this group should have access to post schedules. Anyone with a Workforce login and access to the schedules feature will have the ability to create and edit schedules, but only users in a group with this permission will be able to post and send out the schedule.
oScheduling > Schedules > Edit Sales Forecasts - Check this box if users in this group should have access to edit forecasts.
oScheduling > Schedules > Edit Template - Check this box if users in this group should be able to edit schedule templates.
oScheduling > Schedules > Override Unavailability - Check this box if users in this group should have the ability to override the unavailability of employees while making schedules.
oEmployees > Employees > Add Employees - Check this box if users in this group should be allowed to add new employees.
oEmployees > Employees > Edit Images - Checking this box will allow users in the group to Add, Insert, and Delete uploaded images from the employee record. If unchecked, users in the group will only be able to view images.
oEmployees > Employees > Edit Existing Pay Rates - Check this box if users in this group should be allowed to update or modify the rate of pay on the assigned jobs for an employee.
oEmployees > Employees > Access Payroll Setup Information - Check this box is users in this group should be able to view tabs associated to Payroll in the Employees screen.
▪Users without access to payroll tabs will be restricted from adding the Compeat Payroll Employee staff type. Instead, the Compeat Payroll New Hire staff type will be available. This staff type allows a user to enter an employee intended for Compeat Payroll without completing the full payroll validation process. Compeat Payroll will require the full setup to be completed prior to processing payroll for any new hire staff types.
Category: Time & Attendance
oTime Worked > Time Entry > Override Base Rate - Check this box if users in this group should be allowed to override the pay rate when manually entering time in the Time Entry screen.
Category: Labor Admin
oScheduling > Restaurant Stations > Edit Global Setup - Checking this box will allow users in the group to edit the restaurant station Description or Schedule Abbreviation fields.
oScheduling > Restaurant Stations > Edit Station Assignments - Checking this box will allow users in the group to edit the shift assignments within the restaurant station.
9.Click the Save button.
1.Either highlight the group you want to edit by clicking on it and then hit the Edit link or, simply double click on the group you want to edit.
2.Make edits.
3.Click the Save button.
1.Highlight the group you want to delete by clicking on it and then click the Delete link.
2.Click the Save button.
Send feedback on this topic.