Labor Admin > Labor Definitions > Labor Definitions
Populating Labor Definition Fields
Labor definitions can be set for any single entity. When creating a new labor definition, initially all of the definitions set in default labor definitions will be populated. To customize the labor definitions, select the entity name and make any changes to the default labor definitions that are pulled in.
1.Click the Add link.
2.Identify the entity for which you are defining labor definitions from the drop-down.
3.Edit or populate fields accordingly. Please see the default labor definition section for a list of available fields.
4.Click the Save button.
When initially populating an entity specific labor definitions, the definitions currently setup in default labor definitions will be the default.
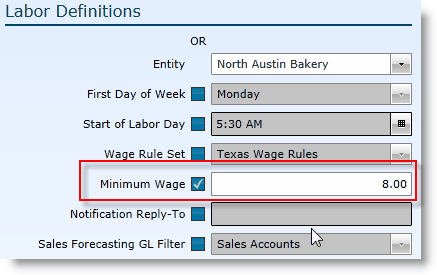
Example: The default labor definition for the Minimum Wage field is $7.25.
To change the minimum wage for the North Austin Bakery:
1.Check the box next to the minimum wage field. The grayed out box will turn white and will then allow you to change the field.
2.Enter the minimum wage for the North Austin Bakery entity.
3.Click the Save button.

Note that each field in this section has two check boxes. The check box on the left indicates that the default labor definition should be overridden with what is set here, in the labor definitions screen. If the check box on the left is checked, then the setting for the field will be determined by the state of the check box on the right.
Example: The default labor definition for the Automatically Generate Employee Rest Periods field is checked. Therefore, whenever a user makes or edits a schedule, the rest periods will automatically generate. This shows through on the Labor Definitions screen as a grayed out check in the right check box.

To change the Automatically Generate Employee Rest Periods field for the North Austin Bakery:
1.Check the left box in order to override what is set in default labor definitions. This setting will ensure that the rest periods will NOT automatically generate.

2.Click the Save button.
If you then check the box on the right, the rest periods will automatically generate again.

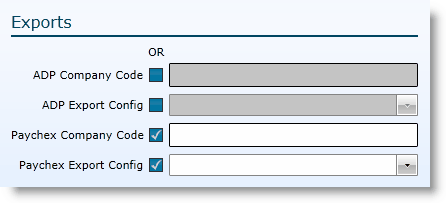
If you use ADP or Paychex to handle your payroll, set the company code and identify the export configuration.

To create an export for ADP:
1.Check the box next to ADP company code.
2.Enter the ADP company code in the field.
3.Check the ADP Export Config box.
4.Choose the ADP Export Config from the drop-down.
5.Click the Save button.
To create an export for Paychex:
1.Check the Paychex Company Code box.
2.Enter the Paychex company code in the field.
3.Check the Paychex Export Config box.
4.Choose the Paychex export config from the drop-down.
5.Click the Save button.
1.Either highlight the record you want to edit by clicking on it once to highlight it, then click the Edit link or double click on the record to open it.
2.Edit or populate fields accordingly. Please see the Default Labor Definition section for a list of available fields.
3.Click the Save button.
To delete a labor definition, highlight the record by clicking on it once, then click on the Delete link. Make certain that the labor definition isn't currently tied to any records. If associated to records, it may not be deleted.
Send feedback on this topic.