Employees Setup |
  
|
Employees Setup |
|
Labor Manager > Employees > Employees
Uploading Images to Employee Record
Adding Federal Tax Information
Assigning Payroll Items to an Employee
Adding a Direct Deposit Account
Adding Vacation and/or Sick Pay
Anyone setup as an employee will have access to the MyWorkforce portal. Therefore, in order to enable Workforce users to access the MyWorkforce portal in addition to their access to Workforce, they too must be setup as employees.
Note: A user will be limited to viewing employees who are assigned only to jobs below the security level associated with their security group assignment.
If user is assigned to multiple security groups with varying security levels, the highest level takes precedence.
1.Click on the Add link.
2.Visit the applicable tabs below. Note that the Personal, Entities and Jobs tabs are required.
3.Click the Save button at the bottom of the page.
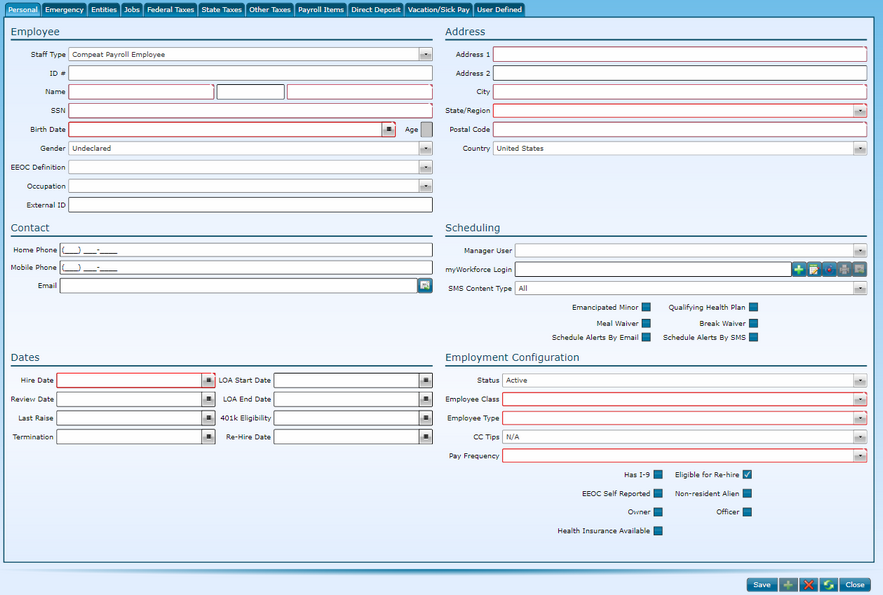
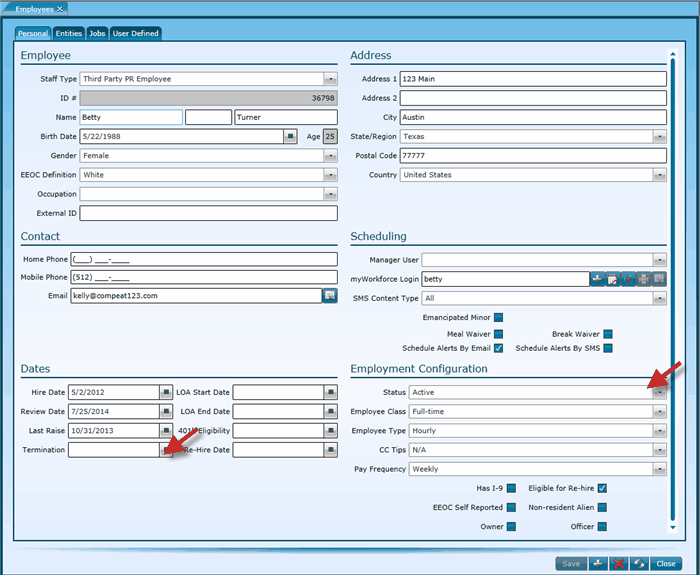
Fill in the following fields:
Note: To fill in any date with today's date, place your cursor in the field and hit the Space bar on your keyboard. The date will automatically fill in.
|
|
There are four different values for this field. If the employee's records should be shared with Compeat Payroll for payroll processing, choose Compeat Payroll Employee or Compeat Payroll New Hire. The Compeat Payroll New Hire option is available for users without Payroll Setup Information access in order to facilitate scheduling and time entry. If an external party is used for payroll processing, choose Third Party PR Employee. If the employee is a contract worker and their wage detail records should not be exported, choose Schedule Only. Note that the Staff Type selection will determine other available and required fields. |
|
The ID is a unique identifier and is automatically assigned by the system. Although you can search by it, you are not provided the option to choose or define it. |
|
Enter the employee's name. |
|
Enter the employee's social security number. This field will only be applicable for those with a staff type of 'Compeat Payroll Employee'. |
|
Enter the employee's birth date. |
|
Enter the employee's gender. |
|
Enter the appropriate EEOC definition. |
|
This field will only be applicable to customers who also use Compeat Payroll. Occupation definitions are initially populated within Compeat Payroll. If applicable, choose the appropriate occupation from the drop-down list. |
|
If there is a need to reference this employee for processes or systems outside of Compeat's suite of software, enter the external number here. |
|
Enter the employee's home phone number. |
|
Enter the employee's mobile phone carrier here. |
|
Enter the employee's mobile phone number here. |
|
Enter the employee's email address here. |
|
Enter the date the employee was hired. |
|
Enter the employee's review date here. |
|
Enter the date of the employee's last raise. |
|
If terminated, enter the termination date. |
|
If on a leave of absence, enter the start of the absence. |
|
If the employee was on a leave of absence, enter the end date here. |
|
Enter the date the employee is eligible to contribute to a 401k. |
|
If re-hired, enter the date here. |
|
Enter the address for the employee. |
|
If needed, continue the address here. |
|
Enter the city for the employee. |
|
List the state/region for the employee. |
|
Enter the postal code for the employee. |
|
Enter the country for the employee. |
|
If the employee is a manager and has a Workforce ID. Find their Workforce ID from the drop-down. This will allow them to use the same login and password for both Workforce and MyWorkforce. |
|
If the employee does not have a Workforce ID, enter a login here. Note, if a login generation method has been established in enterprise options. |
|
|
This button will automatically generate the MyWorkforce login ID if a method has been defined in the enterprise options section. |
|
To set a portal password, click on this icon and enter the password twice. |
|
If you prefer that the system set a password, click on this icon. |
|
After the login and password have been generated, you can click this icon to print the new employee's credentials. Note that you must print this before you save your changes. |
|
After the login and password have been generated, you can send the login credentials to the employee by clicking on this icon. Note that the employee must be set up to receive alerts via email or text (SMS). If you elect to send the user their credentials via an alert, make sure to click on the icon before you save your changes. |
If they have opted to receive SMS (text) messages, the employee may elect to have the entire message delivered, the message without any URLs (web addresses) or URLs only. The default is All which will allow the entire message and any URLs to be delivered. |
|
If the employee is an emancipated minor, check this box. |
|
If the employee has a qualifying health plan and resides in a state where overtime calculations are affected by this, check this box. See Daily Overtime Rule QHP thresholds for further configuration. |
|
If the employee has signed a meal waiver, check this box. |
|
Schedule Alerts By Email |
If the employee wants to receive alerts via email, check this box. |
If the employee has signed a break waiver, check this box. |
|
Schedule Alerts by SMS |
If the employee wants to receive alerts via SMS (text message), check this box. |
Indicate if the employee is 'Active', 'Inactive' or on a 'Leave of Absence'. •Active - The employee currently works in the store. •Inactive - When an employee is set to 'Inactive', a Termination Date will be required. Upon saving, a Termination Code will be required. The user will be made aware of any shifts scheduled after the termination date and will be prompted to move the shifts to the Unassigned category. If the user elects to not move the shifts to the Unassigned category, they will not be able to save the employee record with an 'Inactive' status. The future shifts will need to be reassigned before the employee is set to 'Inactive'. •Leave of Absence - The employee is considered an 'Active' employee, but is 'Inactive' for the dates indicated in their Leave of Absence Start Date through their Leave of Absence End Date. When the Leave of Absence End Date expires, the employee will automatically be set to an 'Active' status again. |
|
Indicate if the employee is hourly or salary. |
|
Indicate if the employee is tipped and, if so, how they are paid out. |
|
Indicate how often the employee receives a paycheck. |
|
Has I-9 |
Indicate if there is an I-9 on file. |
EEOC Self Reported |
If the employee self-reports to the EEOC, check this box. Checking this box indicates the employee self-identified race/ethnicity definitions. This setting can only be viewed here and is not used anywhere else in the application. Note that this field is only applicable for customers who also use Compeat Payroll. |
***Owner |
Indicate if the employee is an owner. |
***Health Insurance Available |
Indicate if the employee is eligible for health insurance. |
Eligible for Re-Hire |
If terminated and re-hired, indicate the re-hire date here. |
Non-resident Alien |
Indicate if the employee is a non-resident alien. |
***Officer |
Indicate if the employee is an officer of the company. |
* Required
** Required for Compeat Payroll Employees Only
***Not applicable to Compeat Payroll Employees
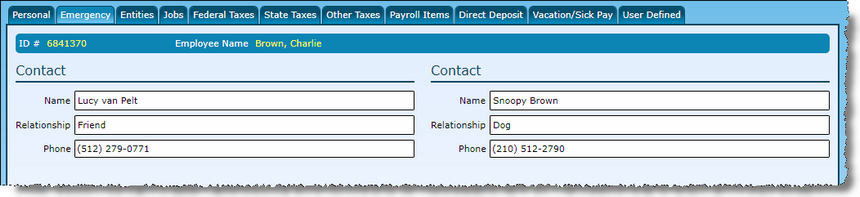
Add up to two Emergeny Contact records. Enter a Name, Relationship, and Phone. All fields are optional. These fields can be maintained by an employee from MyWorkforce also.
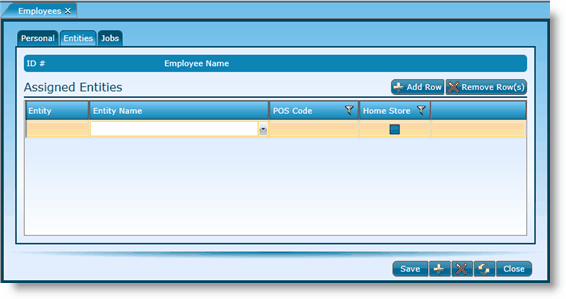
Add any entities the employee works in.
1.Click on Add Row.
2.Click on the Entity Name drop-down and select the entity for this employee.
3.Next, click in the Entity field. This should populate automatically if you have already set the Entity Name field.
4.Click in the POS Code field and enter the POS code for the entity. If you are using Employee Exports, leave POS Code blank to force a new record to be created on your POS.
5.If this is the employee's home store, indicate this by placing a check in the check box. Note that each employee can have only one home store.
6.If the employee works in more than one entity, add a row for each entity.
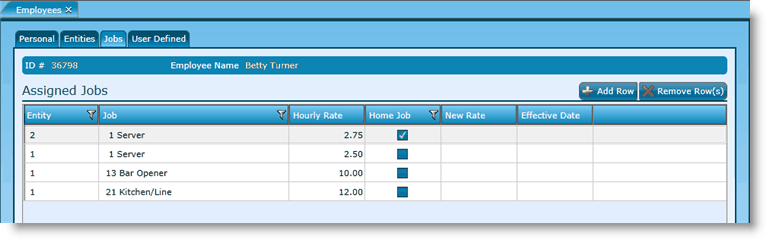
Add any jobs the employee works in.
1.Click on Add Row.
2.Click on the job drop-down and select the job for the employee. Only jobs with the corresponding entity assignment will be available.
3.Indicate the entity associated to the job.
5.If this is their home job, indicate this by placing a check in the box. Note that employees can only have one home job.
6.Enter all jobs for each entity an employee works.
7.Click the Save button.
If you also use Compeat Payroll, the Federal Taxes tab may be available to you. Your ability to see this tab will depend on the Security Settings for the group you are in. This data can either be added or edited via Workforce or Payroll as this data is shared between the two applications.
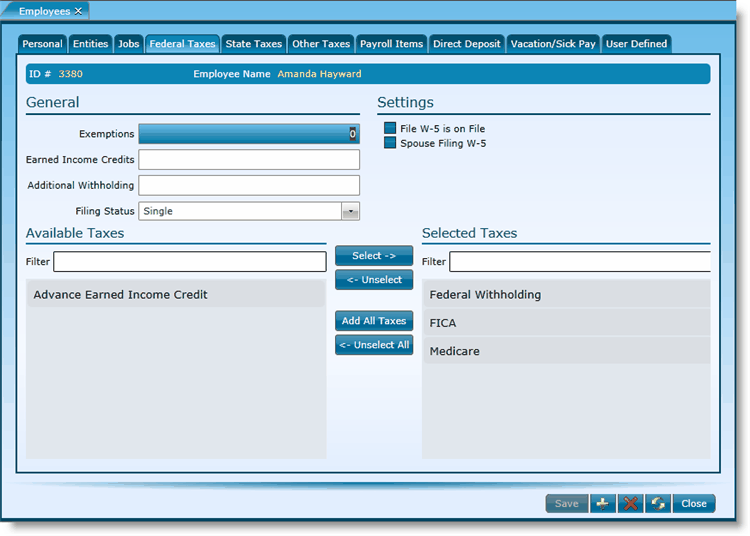
Use the Federal Taxes tab of the Employees screen to record federal tax specifications about your employees. Compeat defaults all new employees to having all federal taxes.
It is imperative that taxes are setup properly in the employee record. If taxes are not assigned to an employee, the employee’s wages that are processed in normal payroll runs will not be included on the employee’s W-2 or employer’s 941. Essentially, the wages would not be considered subject to FWT, FICA, or Medicare.
For the employee selected at the top of the screen, fill in the federal tax information from Forms W-4 and W-5, available at www.irs.gov.
Images may be attached to any of the following tabs on an employee record: Personal, Federal Taxes, State Taxes, Other Taxes, Payroll Items, Direct Deposit, and User Defined.
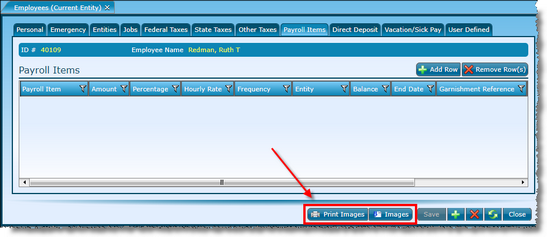
Each of the applicable tabs contain a "Print Images" and "Images" as shown. Clicking "Print Images" will open the Scanned Employee Documents Report for the current employee and tab.
Clicking on "Images" will open a window to View, Add, Insert, and Delete images. Options to Add, Insert, and Delete are limited to users assigned to Security Groups with privileges to modify images.
Portions copyright for image rendering:
Copyright (c) 2008-2011, Bit Miracle
1.Fill in the exemptions directly from the employee's Form W-4. Note: Enter "99" in Exemptions if no Federal tax is desired. To deduct a fixed Federal income tax amount, enter "99" in the Exemptions box and the desired federal withholding amount, per pay period, in the Additional Withholding box.
2.Enter the earned income credits from the employee's W-5.
3.Enter any additional withholding.
4.Select the employee's filing status from the drop-down.
5.Move any applicable taxes to the Selected Taxes section. For more information on how to select items, visit the Selecting Setup Items screen in the Tools section.
If you also use Compeat Payroll, the State Taxes tab may be available to you. Your ability to see this tab will depend on the Security Settings for the group you are in. This data can either be added or edited via Workforce or Payroll as this data is shared between the two applications.
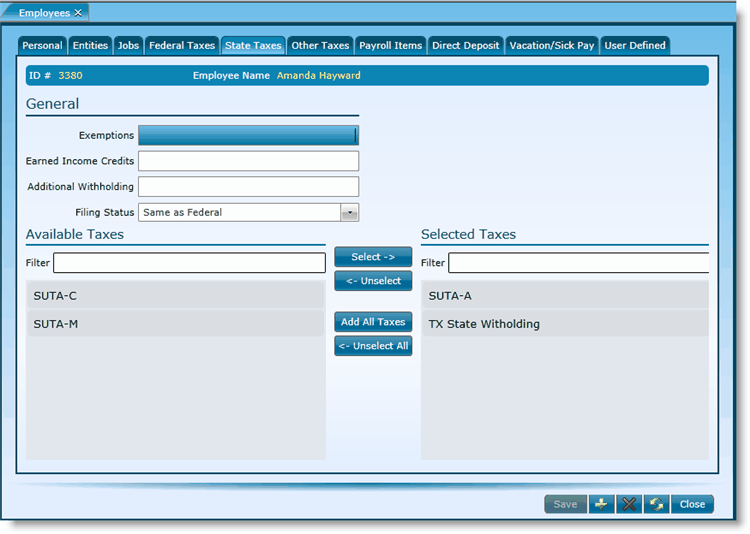
1.Fill in the exemptions directly from the employee's Form W-4. Note: Enter "99" in Exemptions if no Federal tax is desired. To deduct a fixed Federal income tax amount, enter "99" in the Exemptions box and the desired federal withholding amount, per pay period, in the Additional Withholding box.
2.Enter the earned income credits from the employee's W-5.
3.Enter any additional withholding.
4.Select the employee's filing status from the drop-down.
5.Move any applicable taxes to the Selected Taxes section. For more information on how to select items, visit the Selecting Setup Items screen in the Tools section.
If you also use Compeat Payroll, the Other Taxes tab may be available to you. Your ability to see this tab will depend on the Security Settings for the group you are in. This data can either be added or edited via Workforce or Payroll as this data is shared between the two applications.
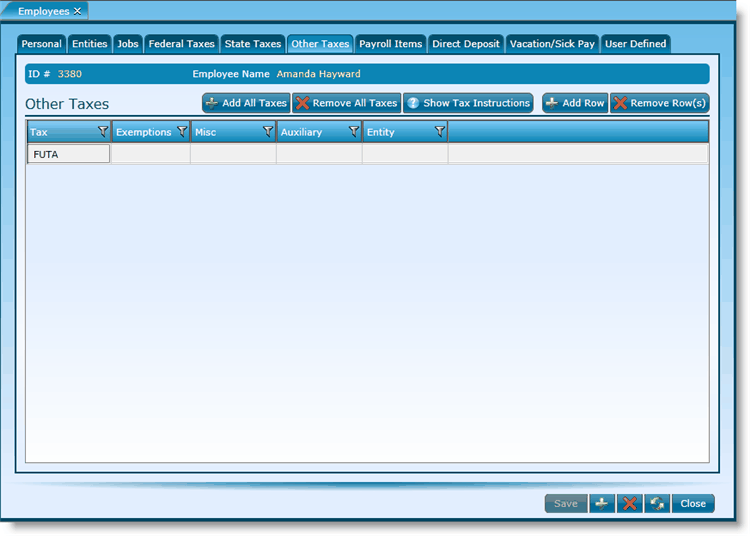
Use the Other Taxes tab of the Employees screen to record other tax specifications about your employees. This section can be used to customize specific local and county taxes according to the specific rules in each county. The Federal Unemployment Tax payroll item should also be assigned on this tab. Because FUTA is not a pre-defined Payroll Item, you must create this tax and assign it to this tab of the employee record.
If you do not see any information when this button is clicked, tax instructions were not provided by your locality.
1.To add all 'other' taxes, click the Add All Taxes button and skip to step 3. To add one tax, click on the Add Row button.
2.Tax - Select the tax from the drop-down.
3.Exemptions - Enter the number of exemptions.
4.Misc - Add any miscellaneous tax data.
5.Auxiliary - Add any auxiliary tax data.
6.Entity - Choose the applicable entity from the drop-down.
7.Click the Save button.
To remove all taxes, click the Remove All Taxes button. ![]()
To remove a specific record, click on the record to highlight it and click on the Remove Row(s) button. ![]()
If you also use Compeat Payroll, the Payroll Items tab may be available to you. Your ability to see this tab will depend on the Security Settings for the group you are in. This data can either be added or edited via Workforce or Payroll as this data is shared between the two applications.
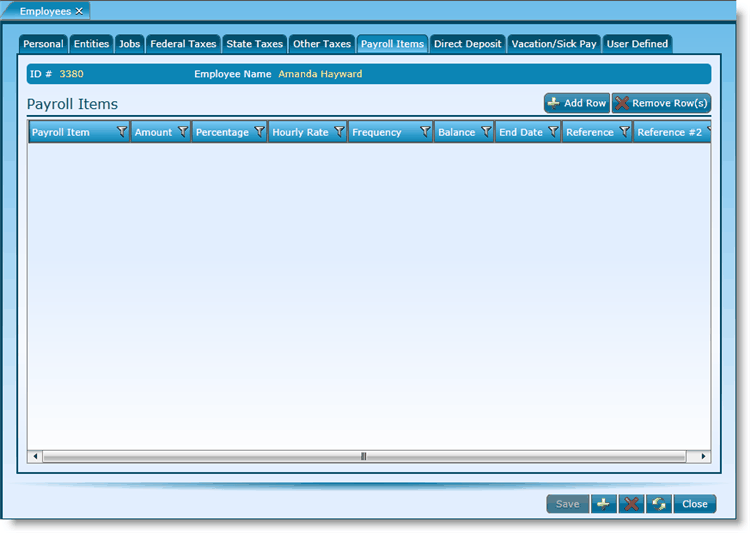
1.Click on the Add Row button.
2.Payroll Item - Select the Payroll Item from the drop-down.
3.Amount -If the amount is a specific dollar amount, enter it in the Amount field. Note that either the Amount or Percentage field should be filled in, not both.
4.Percentage - If the amount is a percentage of the employee's wages, enter it in the Percentage field. Note that either the Amount or Percentage field should be filled in, not both.
5.Hourly Rate - This will apply the specified amount to the payroll item for each hour worked. For example, if you enter "$1.00" in Hourly Rate for an employee bonus, $8.00 will be applied for an 8 hour work day.
6.Frequency - Indicate the frequency the amount should be withheld.
7.Balance - Use this field for Deduction tracking types Employee Loans or either Garnishment only. Enter a dollar amount at which the recurring assignment events will stop.
8.Ending Date - Enter a date upon which recurring assignment events will stop.
Highlight the record you wish to delete by clicking on it once, then click the Remove Row(s) button. To remove multiple rows, hold down the CTRL key while highlighting items.
If you also use Compeat Payroll, the Direct Deposit tab may be available to you. Your ability to see this tab will depend on the Security Settings for the group you are in. This data can either be added or edited via Workforce or Payroll as this data is shared between the two applications.

Use the Direct Deposit tab of the Employees screen to record direct deposit specifications for your employees. This tab appears only if you have checked the 'Enable Direct Deposits' box on the Setup menu > Payroll Definitions screen > Direct Deposit tab in Payroll.
For the employee selected at the top of the screen, fill in their bank account setup and distribution information using as many line items as necessary.
1.Click on the Add Row button.
2.Account Type - Select either checking or savings account.
3.ABA Routing Number - Enter the bank's unique identifying nine digit number, which directs electronic deposits to the proper banking institution. The routing transit number entered here is for the employee’s financial institution.
4.Bank Account # - Enter the employee’s bank account number for the account that will receive the deposit.
5.Contribution - You can specify a dollar amount, or percent for contributions to multiple accounts. If you only use one account, simply assign 100% to that account. If you assign a dollar amount to an account, you must have another account with no contribution defined to pick up the difference between the total and the specified dollar amount. If you assign percentages to multiple accounts, the total percent must add up to 100%.
6.% Contribution - Enter the pay percentage that this account will receive. The total percentages from all line items must add up to 100%.
7.$ Contribution - If you want to have a specific amount deposited in an account, enter the dollar amount in this field. You must also define another account to route the remainder to, and the amount left over will be deposited into this account.
8.Primary Account - Check this box to designate this account as the primary account. The primary account is the only account used if the 'Place all direct deposits into the primary acct' Processing Option is selected on the first screen of the Process Payroll Wizard in Payroll.
If you also use Compeat Payroll, the Vacation/Sick Pay tab will be available to you. Your ability to see this tab will depend on the Security Settings for the group you are in. This data can either be added or edited via Workforce or Payroll as this data is shared between the two applications.
Use the Vacation/Sick Pay tab of the Employees screen to manage the vacation and sick pay data of your employees.
Settings specified here are enacted by Process Payroll runs, which allows for vacation/sick time to accrue for employees except those making less than minimum wage (typically the tipped positions).
Note that the fields for adding vacation or sick pay are the same. To add information for vacation accrual, fill in the fields under the Vacation Pay section. To add information for sick pay accrual, fill in the fields under the Sick Pay section.
1.Start Date - Enter the date that the accrual should start. Typically, this is the hire date or date that the employee became eligible for vacation and/or sick pay.
2.Days Per Year - Specify the rate, in number of days per year, at which the employee accrues vacation pay.
3.Accrual Frequency - How often do vacation hours accrue? Choose one of the six categories of frequency with which vacation pay is added at the accrual rate.
4.Accrued Vacation Hours Per... - This field displays the accrual rate in another form (an 8 hour workday, and 260 workdays/year are assumed). Note that this field is not editable. It will calculate depending upon the Days Per Year and Accrual Frequency fields.
5.Max # of Hours - Specify the number of vacation hours beyond which accrual stops.
6.Available Time - This field displays the amount of vacation or sick time, in days and hours, available to an employee.
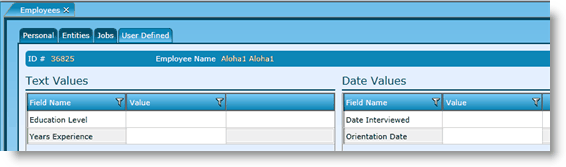
If you have fields that are not included on the Personal tab, you can add them. To do this, visit the user defined text fields and user defined date fields in the Common tab under enterprise options.
1.Highlight the record by clicking on it once.
2.Click on the Remove Row(s) button.
3.Click on the Save button.
To view or edit an employee, either double click on the ID, name or status or, highlight the record by clicking on it once then click on the Edit link.
Typically, you will not delete employees unless there is an issue on setup. Instead, you would want to make them inactive. By making them inactive, you will keep their past information in the system for future store projections. To deactivate an employee:
1.Search for the employee record and open it.
2.Enter a termination date.
3.Set the status to 'inactive'.
4.Click the Save button.
You will only want to delete an employee if there is an issue upon setup. Otherwise, you will want to deactivate any employees who have existing records in the system. To delete an employee:
1.Highlight the employee record by clicking on it once.
2.Click on the delete link at the bottom.
3.A window will pop up asking if you are sure. Choose 'Yes'. If an error message pops up after that, you will not be able to delete the employee. You should, instead, deactivate them.
Send feedback on this topic.