The Menu Items screen allows you to define all items sold at all restaurants, including, where appropriate, the recipe and presentation of the item. Menu item locations are defined in Menu Item Station Positions.
Frequently, menu items are maintained at one site, and restaurants are granted security permission to view only their menu items. You can use the Security menu > Group screen > Screen Access tab to grant access to Menu Items options.
Quick Tip: If you want to create another item that is similar to one already defined, you can duplicate all of the information except for the Item # by clicking the Clone Item button, and then making any changes needed to define your new item.
Some menu item definitions apply globally— that is they are used for all restaurants or entities— while others are entity-specific. Cost information, which can vary from location to location depending on vendor pricing, is entity-specific; most other definitions are global.
The menu items list should correspond to the items defined in your POS system for sale to customers— each menu item number must match its entity-specific POS code.
Compeat automatically gathers daily sales mix information from the POS system using the POS codes defined for each menu item. This allows Compeat to update theoretical quantities on-hand for the ingredients that make up the sold menu items. For example, if a bottle of wine is sold through the POS, Compeat will be able to decrease that inventory item’s theoretical quantity on-hand because a menu item was defined in Compeat using the same code as the POS.
Because each menu item consists of inventory items (which are in turn linked to items purchased using AP Invoices or Manual Checks), cost information for each ingredient of the menu item can be automatically calculated. This ingredient cost is summed to provide a total theoretical cost and cost percentage of the sales price for each menu item. You can also target a cost percentage you'd like to see, and view the percent by which the theoretical cost varies from it.
When you view the screen, the cost information displayed varies depending on the restaurant you are currently logged into. This is because the cost information is determined from the last entered voucher for each ingredient in the recipe, and vouchers are restaurant-specific.
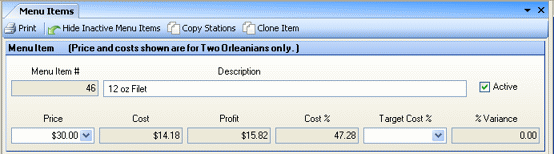
General information about the menu item is contained in the screen header fields, at the top of the screen.
![]() Click to view/hide picture.
Click to view/hide picture.
Description of fields:
Menu Item # When creating new menu items, you can define a menu item number that is global to your entire enterprise. Alternatively, if you leave this field blank, Compeat will automatically number the menu item with the next available number. The menu item number will be used for most reports.
Description Enter text describing the menu item. Compeat allows duplicate menu item descriptions. Menu item descriptions apply globally, i.e., to all entities in an organization.
Active Making a menu item inactive allows you to filter it out of certain lists and reports. You might use this, for example, if you had not sold the item in a long time and did not want to view it with other items. When inactive, an item can be filtered from the Menu Items screen by clicking the Show/Hide Inactive Items button in the screen toolbar. Inactive items will not show up on Menu Items Listing reports. The active/inactive status of an item is entity-specific.
Price Enter the selling price of the menu item. Selling price is entity-specific.
Cost Displays the amount it costs to produce this menu item, and represents a total of all line item Costs on the Ingredients tab. This cost is calculated by Compeat using the last-entered voucher costs for the inventory items that make up this menu item. This value is specific to whichever entity you are logged into.
Profit Displays the current calculated profit for this menu item. The profit is calculated by subtracting the Cost from the Price.
Cost % Displays the cost as a percentage of the sales price for the menu item. This is calculated by dividing the cost of the item by the price of the item. A lower value for this percentage indicates a higher profit margin on this item. This value is specific to whichever restaurant you are logged into.
Target Cost % Enter a value that you have
determined to be the target cost percentage you would like to achieve
for this item. Target cost is entity-specific.
This allows you to run the Menu
Item Contribution/Theoretical Cost report to compare the target
percent cost to the actual cost % (theoretical cost %).
% Variance Displays the variance percentage between the Cost % and the Target Cost % (Cost % minus Target Cost %, divided by Target Cost %).
Note: Base unit costs of all items are carried to six decimal places. Because of the rounding that occurs for the Cost and % fields that each have only two decimal places, the calculations may appear slightly off— rest assured though that the underlying calculations are correctly made based on full use of decimal places.
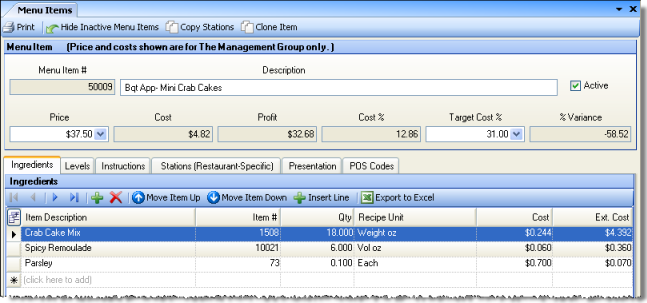
The Ingredients tab displays the list of ingredients for the menu item.
![]() Click to view/hide picture.
Click to view/hide picture.
Enter the inventory items that make up the menu item recipe as follows:
Item Description/Item # Select an inventory item from the list of items.
Qty Enter the amount of the item used in the recipe. This uses the recipe unit selected in the next field.
Recipe Unit Select the recipe unit for this ingredient from the drop-down list, which contains all units of measure of the same class(es) as the one(s) defined for this inventory item. (A cross-class conversion factor, enabling the use of a Conversion Class different from the Item Class, can be defined for the item on its Master Inventory Items screen. If so, then both class UOM lists will appear in this drop-down list.)
Cost Displays the cost per recipe unit for each ingredient. Compeat automatically calculates this using the last invoice cost. This value is specific to whichever entity you are logged into.
Ext. Cost Displays the extended cost of each ingredient. Compeat automatically calculates this by multiplying the cost per recipe unit times the quantity used in the recipe. Each ingredient’s extended cost is summed to determine the total Prep Item Cost. This value is specific to whichever entity you are logged into.
![]() Click to view/hide picture.
Click to view/hide picture.
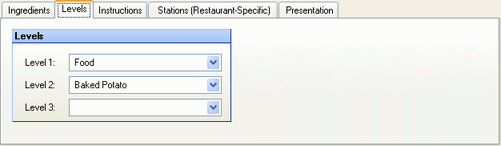
Assign the item to at least a Level 1 Menu Item Levels category. Other levels can be assigned as needed. Menu item levels can be used on the Sales Mix report to group menu items. All level definitions are global, i.e., applied to all entities in the organization.
![]() Click to view/hide picture.
Click to view/hide picture.
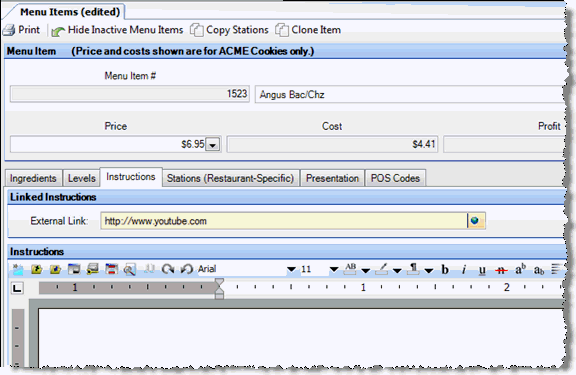
The Instructions tab can be used to enter instructions for preparing the menu item. Instructions can be printed with the menu item in the Recipe Book report.
Enter a valid URI in the External Link field to direct your users to an external link of your choosing. For example you could link to a document on your file server or to a website with video instructions.
This tab is optional. When used, instructions are applied globally.
![]() Click to view/hide picture.
Click to view/hide picture.
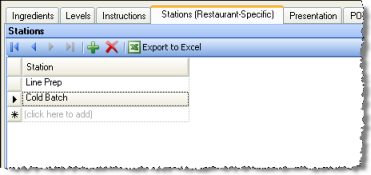
Select the Stations where this menu item is prepared within the restaurant you are currently logged into (you can subsequently copy station assignments to all other restaurants). You can specify a station for each restaurant. Stations can be used on the Recipe Book report to group menu items.
This tab is optional. When used, stations definitions are entity-specific.
![]() Click to view/hide picture.
Click to view/hide picture.
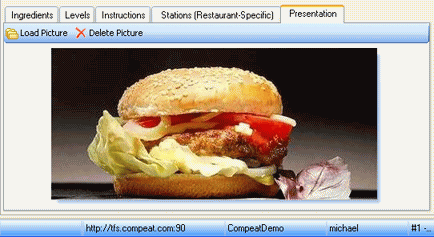
This tab can be used to show the correct presentation of a dish, using a digital image. The presentation can optionally be printed with a Menu Item Report or Recipe Book report.
To add a presentation image, click Load Picture, and then browse for the desired image file. Compeat accepts most common image formats, but will save the image in JPEG format to optimize file size.
Note: To conserve disk space, you should avoid loading
images that are unnecessarily large. Images with a vertical dimension
of around 300-400 pixels are generally sufficient to show detail and fit
well in reports.
Images should be no wider than 770 pixels (to fit within the margins of
a report). Compeat will automatically resize images (maintaining aspect
ratio) for reports when their dimensions exceed the report margins.
There are no image editing capabilities in Compeat, so you should edit
the image as needed before loading it into Compeat.
Compeat also allows you to retrieve images from the database and save them in a new location, incase you need to modify or share the image and don't have access to the original. To do this, simply click the Save Image to File button and specify where you would like to save it.
Presentation is applied globally to all entities in the organization.
Enter the code from your point of sale (POS) system for this menu item. This code is specific to each restaurant. Once a POS Code has been assigned, it cannot be changed; to change it you must delete and re-enter the menu item. Compeat uses the POS Code when importing sales mix data from each of your restaurants, in order to update the inventory theoretical quantity on-hand for each ingredient (prep item or inventory item) in each menu item.
If you have multiple codes defined in your POS system for a single item, you can associate as many POS codes with an item as needed in Compeat. However, as a best practice, it is generally best to remove multiple codes for a single item from your POS system.