Bills and credit memos received by the restaurant and paid using either Manual Payments or Computer Payment Processing (computer-printed checks) are processed using the AP Invoices screen to record the accounting.
Invoices and credit memos should be entered within the restaurant they apply to, even if the home office is paying them, in order for the inventory processing calculations to be correct. If you enter a restaurant’s invoices in an accounting entity or another restaurant, you will not be able to enter line item detail, and the restaurant’s inventory information will not be updated. Also, when a check is printed for a vendor, the restaurant’s account number with that vendor (defined under Setup > Vendors > Entity Access tab) prints on the check stub. This is another reason it is best to enter invoices and credit memos within the restaurant they apply to.
Note: Information about invoices applies to both invoices and credit memos.
To process invoices, go to Transactions menu > AP Invoices. A list of existing batches will display, where you can either select a batch to edit or create a new batch.
Quick Tip: You can use Scan Document to scan original invoices into Compeat to associate them with the invoice record.
![]() Click to view/hide picture.
Click to view/hide picture.
Enter the invoices to pay. They can either be:
Entered manually by creating a new invoice, or by searching to find an existing invoice to modify.
Converted from Orders by clicking Convert Order. This will open a list of orders from which you can select the order you want to convert.
If an Inter-Store Transfer is converted into
an invoice, a ![]() button may appear if the Enterprise
Definitions setting Disable modifications
when receiving IST is selected. Read more about Inter-Store
Transfers for more information on this feature.
button may appear if the Enterprise
Definitions setting Disable modifications
when receiving IST is selected. Read more about Inter-Store
Transfers for more information on this feature.
The Batch Code and Voucher # fields are assigned automatically. Specify the Apply Date, which is the date for this invoice entry to be recorded on the financial statements (see Transaction Dates for more information).
Note: We recommend that you write the assigned Voucher Number on the invoice to make it easier to track the voucher in the Compeat system.
Additionally, specify the following fields:
Apply Date Enter the apply date of the invoice.
Doc Type Specify whether the document is an invoice or a credit memo.
Invoice Amt. Enter the amount to be paid or credited. Always enter the amount as a positive number; do not enter a negative amount. If the Doc Type is credit memo, this field is labeled CM Amount, and the entered dollar amount displays in red.
Non-Disc Amt. Any amount on the invoice that is not subject to vendor discounts. For example, if you are charged for freight, perhaps this charge cannot be discounted; if so, enter the freight amount into this field. This field is optional.
PO # Enter any Purchase Order number that may be associated with the invoice or credit memo. If you convert an order into an invoice, the purchase order number is displayed in this field.
Vendor Code & Vendor Name You can enter a vendor for an invoice using either the vendor code or vendor name; whichever you use, the other will be automatically filled in. Tab to either field, then start entering either the code or name as defined in the Compeat Vendors setup. Compeat displays the first code that matches the characters you type. Select the correct vendor from the displayed list.
Note: If a vendor does not exist, you must use the Compeat Vendors setup to define it. Your commissary and restaurant entities can be defined as vendors and thus added to this list by using the Vendors screen's Entity "# this vendor will represent" field.
Vendor Group This field will always default to the group for the vendor you select. If you choose to override it, that new choice will be used when selecting invoices for payment and printing any report in the system that filters by vendor group.
Invoice # Enter the document number for the invoice or credit memo being entered. If you have enabled "Allow duplicate invoices" under Setup > Other Definitions > Invoices & Check Settings, you can specify duplicate invoice or credit memo numbers for the same vendor; otherwise you cannot.
Tips
and Tricks
If a bill does not have an invoice number, it will typically have an invoice
date. In this case, we recommend you enter the invoice number as the invoice
date (formatted YYMMDD) plus the restaurant number. For example, a phone
bill dated November 15, 2009 for restaurant 201 might be coded with an
invoice number of 091115-201.
Invoice Date Enter the invoice or credit memo date. To minimize data entry errors, Compeat displays a warning if the date you enter is not within the current period; however, it will allow you to save that date. The invoice date is not the financial statement date (the apply date is), but it is the date used for aging purposes.
Due Date Compeat adds to the Invoice Date the number of Due Days defined in the Vendor Terms associated with this vendor to get this due date. If necessary, you can change the due date.
If you enabled "Enter line item detail" in the Setup menu > Other Definitions screen > Invoice & Check Settings tab, you can enter detailed information for each item on the invoice. Otherwise, enter only the GL account codes and amounts.
When entering invoices without line item detail, the entry section is similar to the following:
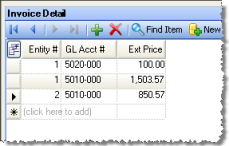
Description of fields:
Entity # The entity number that will be charged for this item. If you are working in an accounting entity, processing payables for individual restaurants, specify the restaurant number associated with the payable. If you are not in the accounting entity, you cannot change this field.
GL Acct # Specify the GL account code for the item.
Ext. Price Enter the total charge for the account.
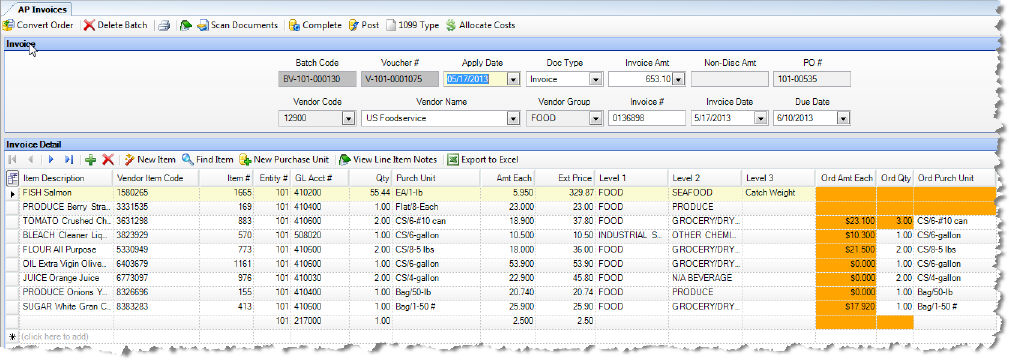
When entering invoices with line item detail, the entry section is similar to the following:

Description of fields:
Item Description/Vendor Item Code/Item # You can enter the item using the item description or item #, or the vendor item code; whichever you use, the others will be automatically filled in. Tab to one of the fields, then start entering either the description or number as defined in the Master Inventory Items screen. Compeat displays the item that matches the characters you type. Select the correct item from the displayed list.
Entity # Specify the entity number that will be charged for this item. If you are working in an accounting entity processing payables for individual restaurants, specify the restaurant number associated with the payable; otherwise accept the default. For more information, see Inter-Company.
GL Acct # Displays the GL account code associated with the item as defined previously in the Master Inventory Items setup. If desired, you can specify a different account code.
Qty Enter the quantity (of Purchase Units) of the item being received or credited.
Purch Units Compeat will display the purchase units used for the last purchase of this item for the current entity. Change the purchase units by clicking in the Purch Units field and choosing from the drop-down list containing all purchase unit descriptions defined for the item. This field is required if the Inventoried box is selected in the Restaurant Inventory Items setup for this item.
Amt Each This field is calculated after the Ext. Price is entered, and cannot be changed. It is the product of dividing the extended price by the quantity. The amount shown is the cost per Purchase Unit.
Ext. Price Enter the total cost of the item.
Note: You cannot delete line items from invoices that have been converted from inter-store transfers or the commissary system. If no items were received, simply enter a zero quantity and the difference will go to the Fulfillment Variance account (see GL Accounts).
If you enter an item that is not defined in the Restaurant Inventory Items, you will be asked if you want the item to appear on cost reports.
Select Yes if the item will be inventoried (that is, included in Valuation Counts), and the Restaurant Inventory Items setup screen will automatically display. The Inventoried checkbox is automatically selected; you must specify an inventory unit, a purchase unit description, and at least one location.
Select No if the item will not be counted.
This allows you to build up your Restaurant Inventory on the fly.
With this feature, you can allocate freight and tax costs across line item detail. Costs are applied across the line items weighted by the extended price. This option can be turned on through the group security screen. Clicking the 'Allocate Costs' button opens this window:

After entering the tax and freight amounts for the invoice, press 'Allocate'. The amounts on the invoice will change to reflect the tax and freight allocation:

The 'Clear Totals' button allows the running total to be reset. It does NOT affect already allocated amounts.
If a user wishes to reverse an allocation, they should enter a new negative allocation amount that will be applied against the current state of the invoice detail:
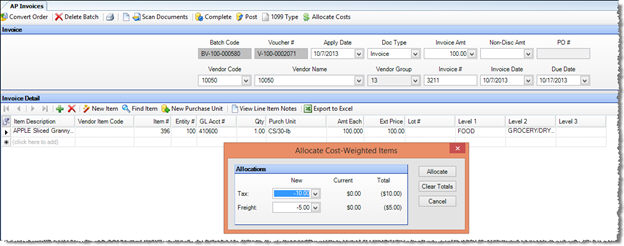
Clicking 'Allocate' will apply the negative amounts, reversing the previous allocation.

When you have entered
all of the line item detail, click Save
Changes ![]() . Once your invoice
has been saved, you have several options to continue processing payables;
you can print a report of the open invoice, complete or post the invoice
(see Completing and Posting),
edit the existing, or start a new batch. Or you can simply exit the record
and come back at a later time to complete it.
. Once your invoice
has been saved, you have several options to continue processing payables;
you can print a report of the open invoice, complete or post the invoice
(see Completing and Posting),
edit the existing, or start a new batch. Or you can simply exit the record
and come back at a later time to complete it.
Note: You can add notes either at the line item level or
to the record. To add a note, click on the Notes icon (![]() ).
To view a line item note, you must have that line item selected when you
click "View line item notes."
).
To view a line item note, you must have that line item selected when you
click "View line item notes."
Invoice data is tracked by Compeat for 1099 reporting based on the configurations made on the Vendors screen. For vendors who are configured to receive 1099 forms, the 1099 type and box will inherit the defaults defined in the Vendors screen. However, you may need to override the default settings for certain orders. You can do that from this screen by clicking the 1099 Type button in the toolbar and specifying the type and box.
If you are viewing an imported invoice, and chose to reconcile it with an order, the AP Invoices screen will show three extra columns containing the results of the reconciliation: