Labor Admin > Scheduling > Restaurant Stations
Copying a Restaurant Station Assignment
Copying a Restaurant Station Assignment to Another Entity
Establishing restaurant stations can be helpful when writing schedules. By creating restaurant stations, you can identify a physical location and day of the week when specific jobs should be scheduled. These restaurant stations appear as place holders for jobs that should be scheduled.
Once setup and applied, restaurant stations will show on schedules or any reference to a scheduled shift that has a restaurant station assigned.
Let's assume your restaurant is divided up into five sections of tables. Each day of the week requires a different set of jobs at different times to cover each station. Perhaps some sections are closed for part of or the entire day. You can setup a structure of the minimum shifts that need to be assigned. Note that if you set up restaurant stations, you are not restricted to scheduling only those stations established. You still have the freedom to either add more shifts or you may decide not to fill all predefined restaurant station shifts.
1.Click the Add link.
2.Click in the description field and name the station.
3.Click in the Schedule Abbreviation field and enter a code for the station. Note that schedule abbreviations should not exceed three characters. The reason for this is so that this field can be displayed when space is limited. This is what will appear on employees' schedules and any reports.
4.Click the Add Row button.
5.Select the job for the first record.
6.Assign the day of the week.
7.Enter the start time of the shift.
8.Enter the end time of the shift.
9.Add as many rows as needed for the station.
10. Click the Save button.
Make sure to enter the shift for each day of the week the station should be filled. Note that you do not necessarily have to populate each cell using the drop-down. If you begin typing in a cell, it will begin to automatically fill from the options available. In the Start Time and End Time fields, there is no need to type the entire time. For example, to fill in 2:00 PM, you can simply type, '2P' and the time will fill in. Some practice will help familiarize you with this feature. Hitting the Tab key will advance you to the next cell. To add another row after the End Time cell, hit the Enter key. This can save time when adding multiple records.
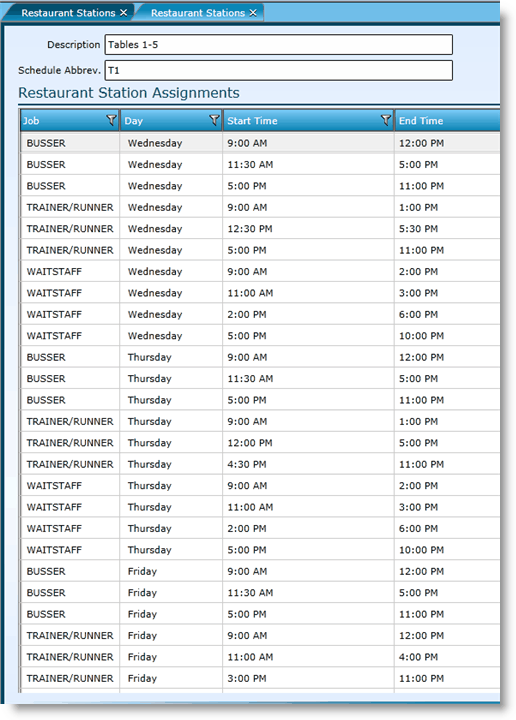
In the example below, the restaurant station of 'Tables 1-5' has been setup. The station is open Wednesday through Friday and requires the jobs of Waitstaff, Busser and Trainer/Runner. Each shift has been setup to cover the times necessary.

You may find it easier to copy a station and edit it when setting up additional stations. For instance, the station of 'Tables 6-11' is the same or similar to the station already setup for the station of 'Tables 1-5'. Instead of typing out the entire list of jobs and shifts, you can easily copy the 'Tables 1-5' station and edit it (if needed) for the station of 'Tables 6-11'.
1.Click on the Copy button in the bottom right of the screen.
2.Enter a description for the new restaurant station.
3.Enter a new schedule abbreviation for the new restaurant station.
4.Click in and edit any cells.
5.If applicable, add any new records by clicking on the Add Row button.
6.If applicable, delete any records by clicking on the row once to highlight it, then click the Remove Row(s) button in the upper right of the screen. To delete multiple rows, click on each row while holding down the CTRL button on your keyboard.
7.Click the Save button.
You may want to copy a station to another entity.
1.Open the restaurant station you want to copy to another entity by either double clicking on it or highlighting it by clicking on it once and then clicking on the Edit link at the bottom of the screen.
2.Click on the Copy Restaurant Assignments button in the top right of the screen.
3.To select an entity, click on the Search button, select an entity and click the OK button.
4.If copying to another store group or store filter, select it from the appropriate drop-down.
5.Click the OK button.
6.Type, 'Yes' in the textbox and click OK.
1.Click in the field you want to edit and type over the current definition(s).
2.Click the Save button.
To delete a restaurant station, highlight the record by clicking on it once, then click on the Delete button. If associated to current or historical records, it may not be deleted.
Once restaurant stations have been established, next assign them to a restaurant station set, then apply the restaurant station set in labor definitions.
Send feedback on this topic.