Edited Time Entries Report |
  
|
Edited Time Entries Report |
|
Time & Attendance > Reports - Time & Attendance > Edited Time Entries Report
Creating an Edited Time Entries Report
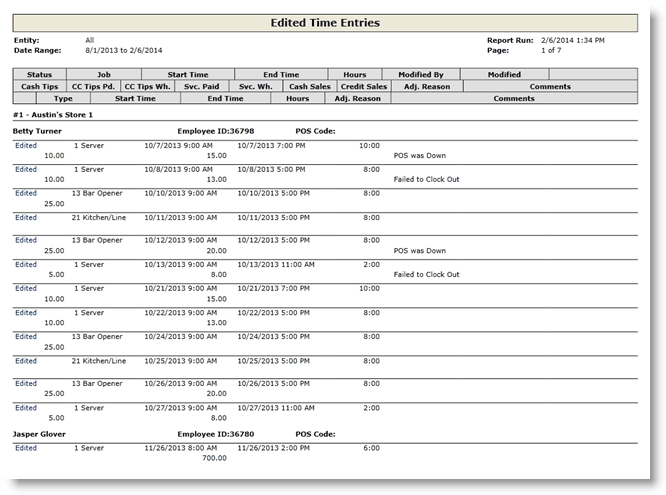
The Edited Time Entries Report shows employee time records that have been modified, deleted or created since the data was last polled. The report includes: the employee name, Employee ID and POS code, the status of the entry, the job they performed, the start and end times of the shift and the total time of the shift. If available, the Edited Time Entries Report will also display: who modified the record and when it was modified, cash tips, CC tips, service charges, cash sales, credit sales, the time adjustment reason and any comments. The last line available for each record details any rest periods.
To expand any history of the record being changed, click on the Edited or Deleted link to drill into the history of the punch.
Note: Data will only populate for this report based on the Enterprise Option to retain Time Entry History for specified number of months. If this field in Enterprise Options is left blank, no detail of edits on time entries will be retained and only the Audit Log will show an edit to the time entry. Setting the Time Entry History (months) is not retroactive and will only capture edits made beyond the point at which it was configured.
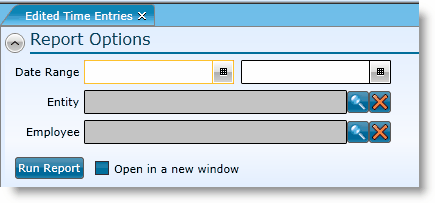
1.Select the date range for the data you want to see. This is the only required field.
2.To restrict the a specific entity, click on the magnifying glass, choose the entity from the grid and either double click on the entity or click on the record once and then click the OK button.
3.To restrict the a specific employee, click on the magnifying glass, choose the employee from the grid and either double click on the employee name or click on the record once and then click the OK button.
4.Click the Run Report button.
If after running the report, you want to change the criteria, click on the downward pointing arrow in the upper left of your screen and the filter fields will expand.
For information on the report icons and how to print or export the report, please visit the Report Icons section under Tools.
Send feedback on this topic.