Commissaries |
  
|
Commissaries |
|
Labor Admin > Entities > Commissaries
Commissary entities will only be applicable if you also use Advantage.
A commissary is a vendor within your organization that produces menu or prep items, such as pies, pizza dough, sauces, etc., and ships them to restaurant entities within the organization or sells them retail.
When you define a commissary, you must choose a shipping method for your commissary products; either 'Centralized Shipping' from the commissary (the default), or 'Departmental Shipping' from your commissary departments. In the first case, a commissary menu containing shipping reports and screens will appear on the Compeat menu bar of that commissary entity. In the second case, a commissary menu will appear on the menu bar of each department, but not the commissary.
If you will use a commissary, you can add or edit the commissary entity information in Workforce.
To view a commissary entity, either double click on the Entity ID or Description or, highlight the record by clicking on it once then click on the Edit link.
1.Click on the Add link.
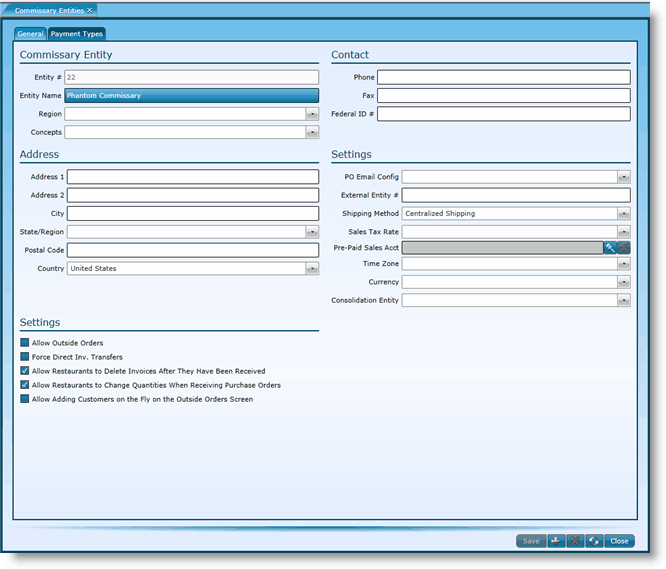
2.Fill in the following available fields:
This number is unique to the commissary entity. You may either enter a number or have the Workforce system auto-assign it. This field is required. |
|
Provide a name for the commissary entity. This field is required. |
|
If you have established a store group 1 category, select the appropriate sub-category from the drop-down. Click the appropriate link for more information on naming store groups or for adding sub-categories. |
|
If you have established a store group 2 category, select the appropriate sub-category from the drop-down. Click the appropriate link for more information on naming store groups or for adding sub-categories. |
|
Provide the commissary's address. |
|
If needed, a second line is provided for continuation of the address. |
|
Provide the city for the commissary entity. |
|
Provide the state for the commissary entity. |
|
Provide the postal code for the commissary entity. |
|
Provide the country for the commissary entity. |
|
Provide the phone number for the commissary entity. |
|
Provide the fax number for the commissary entity. |
|
Provide the federal ID number of the commissary entity. |
|
PO Email Config |
If there is an email configuration for purchase orders, select it from the drop-down. Note that any new PO email configs will have to be added or edited in Advantage. |
If there is a need to reference this commissary entity for processes or systems outside of the Compeat suite of software, enter the external number here. |
|
Select a shipping method from the drop-down. |
|
Indicate the sales tax rate. |
|
Select the pre-paid sales account. |
|
Provide the time zone of the commissary entity. |
|
If you also use Compeat's Advantage software and this commissary records transactions in a foreign currency (not U.S. dollars) and it is desired to do financial reporting in U.S. dollars using eXcellent Financial Functions, specify the currency used by this commissary. The desired currency must first be defined in Currencies in Advantage. |
|
From the drop-down list, select the consolidation entity. The consolidation entity is the one that reports in U.S. dollars. Only accounting entities flagged to be consolidation entity will be displayed. |
* Required
Also included at the bottom of the screen are check boxes. Placing a check in the associated box allows for the feature to be turned on.
oAllow Outside Orders
oForce Direct Inventory Transfers
oAllow Restaurants to Delete Invoices After They Have Been Received
oAllow Restaurants to Change Quantities When Receiving Purchase Orders
oAllow Adding Customers on the Fly on the Outside Orders Screen
Add the payment types available for paying purchase orders.
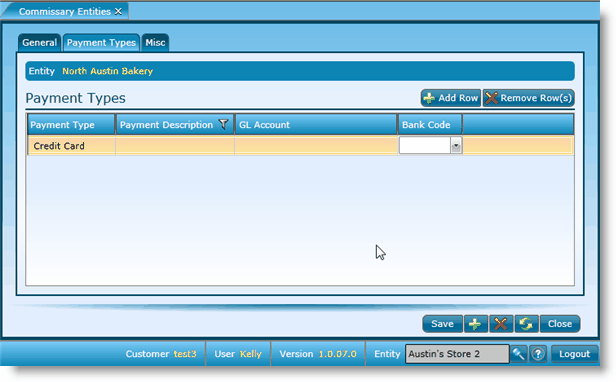
1.To add a new payment type, click the Add Row button.
2.Select the payment type.
3.Add a description.
4.Identify the GL account.
5.Select the bank code.
6.Click the Save button.
To edit a payment type, simply click in the field you wish to edit. After editing, click the Save button.
To remove a payment type, click on one of the fields to highlight the record. With the record highlighted, click the Remove Row button.
Send feedback on this topic.