Schedules |
  
|
Schedules |
|
Labor Manager > Labor & Scheduling > Schedules
Adding an Additional Shift for the Same Day
Hot Keys (Keyboard Shortcuts)
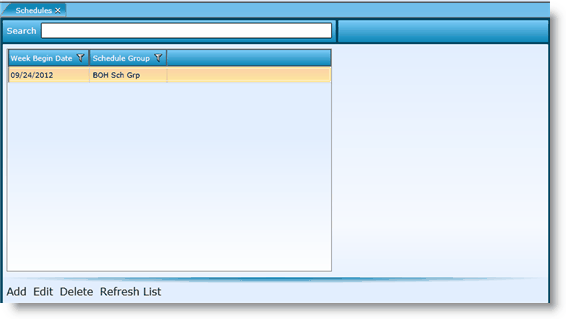
All new schedules will be created in the schedules screen. Any schedules that have been created, but not yet been posted will be listed here. After a schedule has been posted, it can be found in the Posted Schedules screen.
All schedules are identified by a combination of the week begin date and the schedule group.
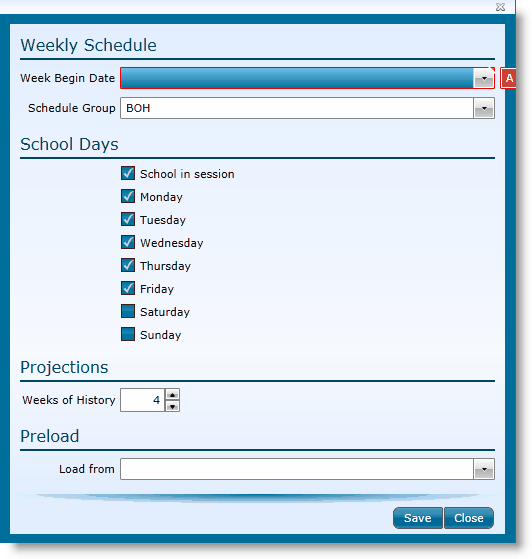
2.Select the week begin date for the schedule you want to create. Note that available weeks include weeks between the current week and eight weeks into the future. This field is required.
3.Choose a schedule group. This field is also required.
4.If applicable, identify school days for the week. To determine which days of the week will be affected by any minor rules you have established, you can indicate if school is in session for the workweek by checking the School in Session box or you can choose specific days individually. When making the schedule, you will be warned if you attempt to schedule a student on a school day or a non-school day that conflicts with any minor rules established.
5.Identify the number of past weeks you want to include in the future Projections. You can select how many weeks of data you want taken into account for producing forecasting figures. The default for this is defined in default labor definitions and labor definitions, but it can be changed for the schedule currently being created.
6.If you want to create a schedule using a previous schedule as a guide, you can pull the old schedule in the Preload section and edit it to fit the week you are currently scheduling.
7.Click the Save button.
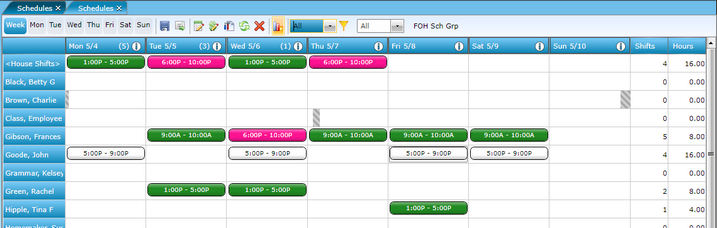
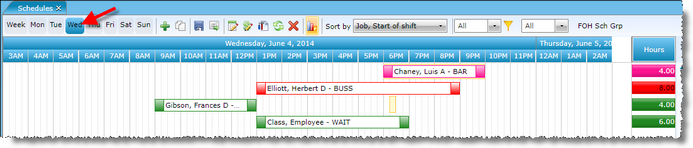
A newly created schedule defaults to the week view. You can switch to a day view by clicking on the day in the gray toolbar.

![]()
The first section of the toolbar provides buttons to view the week or any day of the week. To change the view, click on the text and you will be taken to the view for the corresponding day of the week. The current view title is highlighted in blue.
![]() Posts the schedule. When a schedule is posted, all employees scheduled who have elected to be notified via email or text are notified. After a schedule has been posted, it can be referenced in the posted schedules screen.
Posts the schedule. When a schedule is posted, all employees scheduled who have elected to be notified via email or text are notified. After a schedule has been posted, it can be referenced in the posted schedules screen.
![]() Allows you to edit which days of the week are to be considered school days.
Allows you to edit which days of the week are to be considered school days.
![]() Allows you to edit forecast data if you are in a group with that security setting.
Allows you to edit forecast data if you are in a group with that security setting.
![]() Allows you to edit the template if you are in a group with that security setting.
Allows you to edit the template if you are in a group with that security setting.
![]() Allows you to refresh the data in the current schedule.
Allows you to refresh the data in the current schedule.
![]() Deletes the current schedule. Warning - There is no way to retrieve a deleted schedule. Be certain before deleting it.
Deletes the current schedule. Warning - There is no way to retrieve a deleted schedule. Be certain before deleting it.
![]() Allows you to collapse or expand the labor bars/schedule summary bands at the bottom if they are enabled.
Allows you to collapse or expand the labor bars/schedule summary bands at the bottom if they are enabled.
![]() The filtering drop-down defaults to show all jobs in the current schedule group. By clicking on it, you can filter the available list of employees by selecting a specific jobs. To turn the filter off, click on the yellow funnel.
The filtering drop-down defaults to show all jobs in the current schedule group. By clicking on it, you can filter the available list of employees by selecting a specific jobs. To turn the filter off, click on the yellow funnel.
![]() The day-part filtering drop-down defaults to show all day parts in the day part set. By clicking on it, you can filter to a specific day part. All shifts that have any hours which fall within the defined day part will appear. Schedule summary bands will be updated to reflect the day part only.
The day-part filtering drop-down defaults to show all day parts in the day part set. By clicking on it, you can filter to a specific day part. All shifts that have any hours which fall within the defined day part will appear. Schedule summary bands will be updated to reflect the day part only.
![]() The schedule group of the current schedule is displayed in the far right side of the toolbar.
The schedule group of the current schedule is displayed in the far right side of the toolbar.
If events or special days occur, the information button for that day will be highlighted in yellow.

To view the event or special day that occurs on that date, hover your cursor over the information button. The window that pops up will include the name of the event or special day scheduled for that date.

To add an event:
1.Click on the information icon for the associated day.

2.Click on the Add Row button.
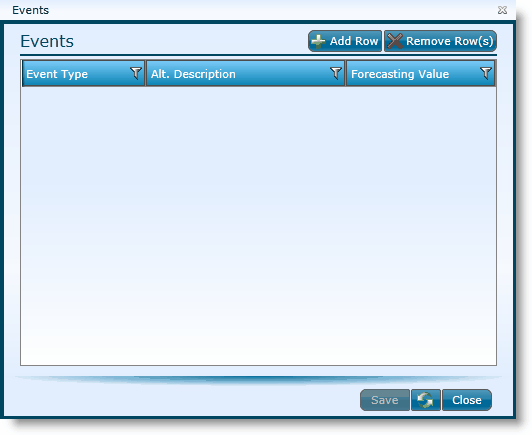
3.Select the Event Type from the drop-down.
4.Provide an Alternative Description. This description should identify the specific event.
5.After the Event Type is selected, the associated Forecasting Value should automatically populate. Note that the Forecasting Value can be edited here if the user is associated to a group with the security setting to do so.
6.Click the Save button.
1.Click on the information icon for the associated day.
2.Highlight the event you would like to remove. To highlight multiple records, hold down the CTRL key while clicking on each one.
3.Click on the Remove Row(s) button.
4.Click the Save button.
Most of the available icons, buttons and drop-downs are the same as the week view toolbar. The only exceptions are:
![]() The ability to add an employee or shift to the schedule.
The ability to add an employee or shift to the schedule.
![]() The ability to copy a day from the current or another schedule.
The ability to copy a day from the current or another schedule.
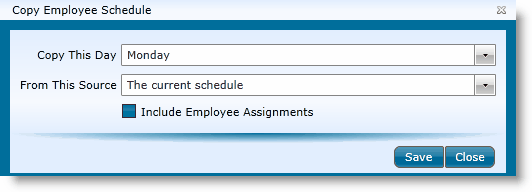
1.Select the day to copy.
2.Select the source of the day to be copied.
3.Indicate if employee assignments should be included. If checked, the employees will remain as they are on the day being copied. If unchecked, all shifts will be unassigned.
4.Click the Save button.
|
To change the sort order of the shifts, select an option from the Sort by drop-down. |
1.To add a shift to the week view, hover your mouse pointer over the cell that indicates the employee and the date for which you are scheduling until the Add Icon ![]() appears and click on it.
appears and click on it.
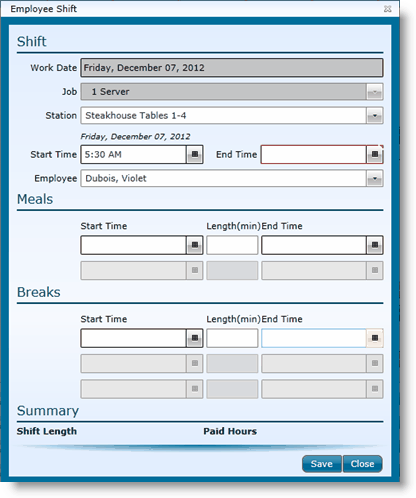
2.The employee shift screen appears. Since you clicked in a specific cell, the work date and employee fields will populate. Note that you can always change the employee the shift is assigned to in this window. The available job(s) will filter according to the job(s) available to the selected employee.
House Shifts - Note that if you wish to fill a shift, but do not want to assign it to a specific employee, the 'House Shift' option is available. A house shift is a scheduled shift without an employee assigned. House shifts are designed so that managers can either assign them to an employee later or advertise them to all available employees to pick up. How this will function depends on the options selected in labor definitions. To later assign the house shift to an employee, simply open the shift by double clicking on the color filled part of the shift and changing the Employee field. To advertise a shift, visit the House Shifts screen.
3.If the employee is eligible to work in more than one job, you will need to select the job you wish to schedule them for from the drop-down.
4.If a station should be assigned for the shift, select it from the drop-down.
5.Enter a Start Time and an End Time in the respective fields. Note that the summary at the bottom will populate as you enter hours and rest periods.
6.If applicable, add meal and/or break rest period(s). Note that if you have elected to automatically have meals or breaks populate, then these fields will be grayed out.
7.Click the Save button.
Once a shift has been entered, you can add another shift for the same day. To do this, hover over the shift until a button with a plus sign on it appears at the left of the cell. Click on the button and a new shift screen will appear.
You can save the schedule at any time, by clicking on the Save button. It is recommended that you save it periodically throughout the creation process.
When you are ready to post the schedule and send notifications to employees, click the Post button. Notifications will be sent to all employees who have elected to be notified. Once a schedule has been posted, it can be referenced in posted schedules.
The following keyboard shortcuts can be used to move shifts within a schedule.
• Move to House Shifts: Click on an existing shift to select it, then press H on your keyboard. The shift will be moved to House Shifts. (You may also right-click the shift to select this action.)
•Swap Shifts: Click one of the shifts to be swapped, then press Z on your keyboard. You will be prompted to confirm the swap. Select "Yes" and the shifts will be moved.
•Reassign Shift: Click on a shift to select it, then press S on your keyboard. You will be prompted to select an employee to which the shift should be assigned. Click "OK" to move the shift. (You may also right-click the shift to select this action.)
To edit a shift, double click in the colored part of the bar. The shift screen will pop up. Make edits to the applicable fields and click the Save button.
To delete a shift, place your cursor over the shift. A small button with an X on it will appear in the upper right corner of the cell. Click on the button, then confirm that you want to delete the shift by answering 'Yes'.
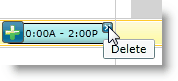
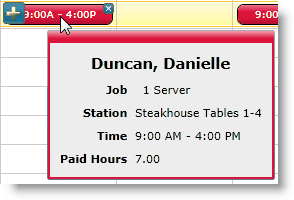
Hovering over a shift will display some of the shift details.
If an employee has been scheduled for unavailability, time off or is already scheduled in another schedule group, the time they are unavailable will be grayed out on the schedule. You will receive an alert if you attempt to schedule an employee during those times. To view the specific time they are unavailable, hover over the gray area.
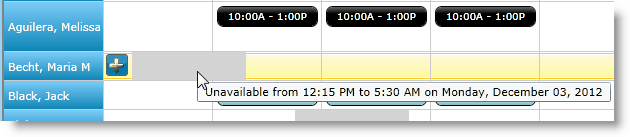
If time off or unavailability is scheduled as a full day, the gray box on the schedule that represents this span of time may look as if it expands over the end of one day into the next day. Note that this is affected by the time set as the start of labor day in either default labor definitions or labor definitions.
If the start of labor day is 5:00 a.m., then the work day will be from 5:00 a.m. until 5:00 a.m. the next day.
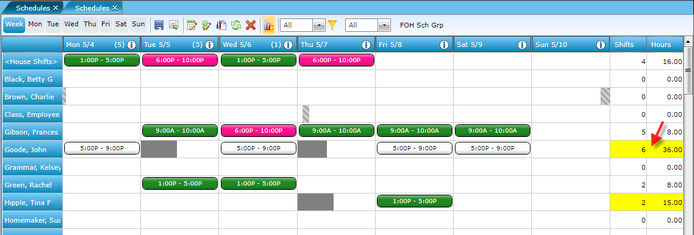
As you add shifts to the schedule, the count of shifts for each hourly employee will total in the far right column, Shifts. Note that if an employee is scheduled in another schedule group, those shifts will be included in the shift count and the cell will be shaded yellow.
As you add shifts to the schedule, the total hours for each hourly employee will total in the far right column, Hours. Note that if an employee is scheduled in another schedule group, those hours will be included in the total hours and the cell will be shaded yellow.
Summary bands will be included at the bottom of each schedule if you have elected to include them in enterprise options. Please visit the schedule summary bands section for a list of available bands and their definitions.
If you enter a shift for an employee that interferes with scheduled unavailability, scheduled time off or scheduled time in another schedule group, you will see an alert on the schedule. You will also see alerts if the shift exceeds any overtime rules. To gain specific information on each, hover over the yellow triangle with the exclamation point in it, ![]() .
.


1.Are you making a schedule, but don't see the expected employees available on the schedule? Make sure the job is associated to the entity.
oGo to Setup>Employees>Jobs and double click on the job you want to update.
oClick on the Entity Assignments tab.
oIf the entity is not listed, click the Add Row button and fill in the Entity and POS Code.
oClick the Save button.
Send feedback on this topic.
