Jobs |
  
|
Jobs |
|
Labor Admin > Scheduling > Jobs
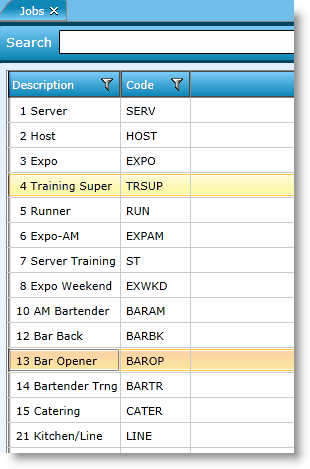
A job represents a specific duty or collection of duties someone performs for their company. In the restaurant industry, typical jobs are: Server, Line Cook, Busser, Bartender, etc.
1.Click on the Add link at the bottom of the page.
2.Fill in the following available fields:
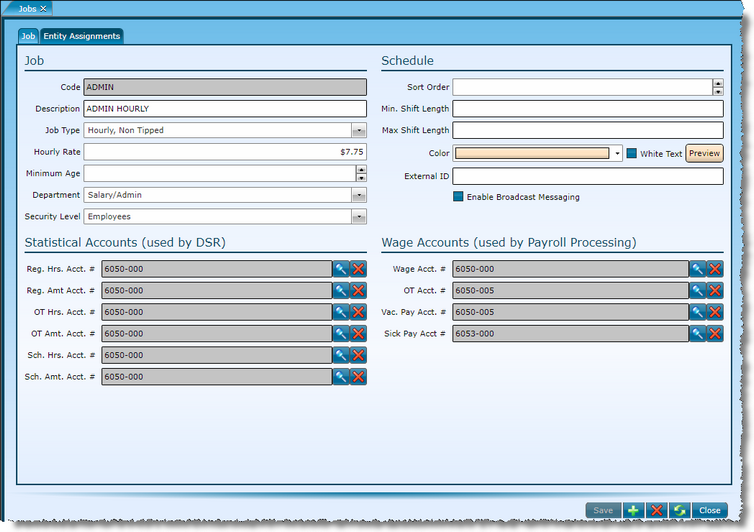
This should be a shorter (abbreviated) version of the job. Ex: SVR |
|
This is where you fill in the entire title for the job. Ex: Server |
|
Indicate if it is a salaried or hourly job. If hourly, is it tipped? If so, is it directly or indirectly? |
|
This is the base rate for the job. It will fill in as the default for employees with this job and will be used in statistical calculations when no employee is identified. |
|
The minimum age requirement for the job. |
|
The department the job is in. |
|
The security level that should be assigned to the job. |
|
If you also use Compeat Advantage, you will identify the various statistical accounts for: Regular Hours, Regular Amount, Overtime Hours, Overtime Amount, Scheduled Hours and Scheduled Amount. To do so, click on the magnifying glass, select the account and click the OK button. |
|
You can indicate where the job should be listed in the list of jobs available while scheduling. If you would like to see this job first, set the sort order to '1'. Set all other jobs accordingly. |
|
This is the minimum any shift should be for this job. |
|
This is the maximum any shift should be for this job. |
|
When making the schedule, it is easy to spot jobs by color. For this, you will need to assign a unique color to each job. Also note that there is an option to use white text (for darker colors). The Preview button displays what the color and text will look like. |
|
If you will be exporting this information and have a code for the job (outside of the Workforce defined code), define it here. |
|
If you want employees assigned to this job to have the ability to send messages to groups of employees from myWorkforce (rather than restricted to single recipient), check this box. Use this setting in conjunction with enabling myWorkforce Employee Messaging in Labor Definitions. |
|
If you use Compeat Payroll, you can also identify a Wage Account, an OT Account, a Vacation Pay Account and a Sick Pay Account. To do so, click on the magnifying glass next to the appropriate field, select the account and click the OK button. |
To view or edit a job, either double click on the description or code or, highlight the record by clicking on it once then click on the Edit link.
To delete a job, highlight the job by clicking on it once. Then, click on the Delete link. Note that you may not be able to delete the job if it is tied to existing records. Instead, you may want to disassociate it from its current department and schedule group.
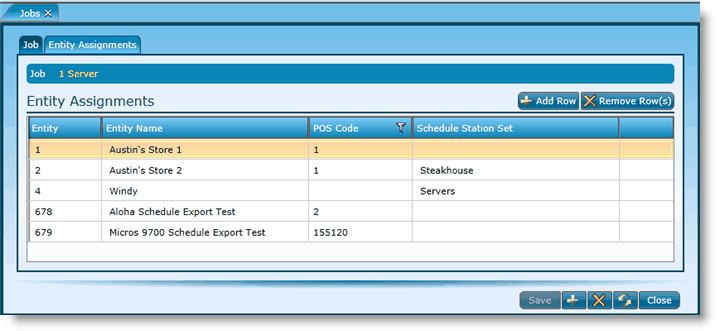
3.Click on Add Row.
4.Click in the blank field for Entity Name and select the correct entity from the drop-down.
5.Click in the blank field for entity. If the Entity Name is selected first, just clicking in the Entity field should populate the correct Entity Number for the Entity Name you have chosen.
6.Click in the blank field for POS Code and enter the POS code for the entity.
7.Click the Save button.
Note that each applicable entity will need to be added.
1.Click on any field and type over the current information.
2.To ensure that a department is active, make sure the associated box is checked. If unchecked, the department is inactive.
3.Click the Save button.
1.Highlight the entity assignment you want to delete by clicking on it and then hit the Delete link.
2.Click the Save button.
Send feedback on this topic.