This report allows you to generate a history of all invoice and manual check records that meet specified criteria. The report can be run by inventory item number (or a range) to see all of the vendors from whom you have purchased an item. If you include voucher detail, you can compare prices, and see how they have changed over time.
The report provides drill-down capabilities for Batch Code and Vendor Name.
Values for credit memos will show as negative numbers; there will be no dollar values displayed for zero-check-type manual checks.
By default the report only displays vouchers that have not been voided; optionally, you can select the "Show Voided Only" checkbox to view only those vouchers that have been voided.
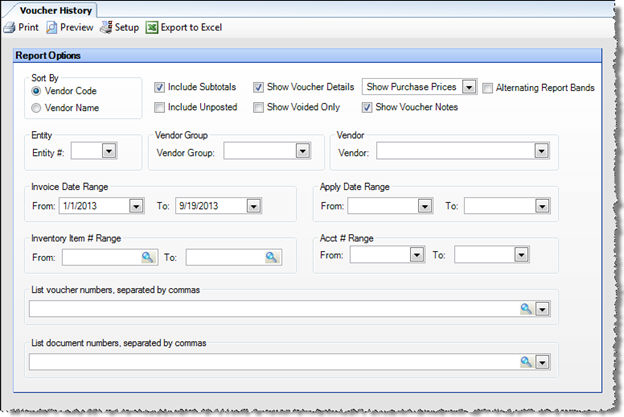
The options screen appears similar to the following:
Use the following options to customize your report:
Note: If you do not specify either an Invoice Date Range or an Apply Date Range, all vouchers that meet your criteria for all dates are included on the report.
Sort By Specify whether to initially sort the report by vendor code or vendor name.
Include Subtotals Specify whether or not to include subtotals in your report.
Included Unposted Specify whether or not to include unposted vouchers in your report.
Show Voucher Details Specify whether or not to include line item detail in your report. If you select this option, a new option to allow you to select the price to display appears just to the right.
Show Purchase Prices/Show Inventory Prices This option only appears when "Show Voucher Details" is selected. Specify whether you would like the report to display the price for each inventory item on the voucher as the cost per purchase unit, or to convert the purchase price to the cost per inventory unit. If you select Show Inventory Price, Compeat converts the purchase price entered with the invoice to the price per inventory unit, using the conversion factor that was in effect at the time the invoice was saved. With the purchase unit option, Compeat displays the purchase unit description on the report; for example, it might show "CS=24 bottles", if the container was CS, the conversion factor was 24, and the inventory unit was bottles.
Tips
and Tricks
This feature can help in tracking down incorrect purchase unit to inventory
unit conversions. For example, assume you purchase beer by the case, and
you inventory beer by the case, but you accidentally indicate a container
to inventory unit conversion factor of 24 (instead of 1). Then you purchase
a case of beer and enter the price as $18. Because the conversion factor
is incorrect, the price per inventory unit is incorrectly set to $18/24
= $0.75. When you enter an inventory count, each case of beer will have
a cost of 75¢ .
Obviously, this will throw off your valuations. Running the Voucher History
report with the Show Inventory Price
option should allow you to identify items with incorrect conversion factors.
Note: If you discover that a voucher has been entered with items that have incorrect purchase unit to inventory unit conversion factors, you will need to either fix or void each voucher. For more information, see the topics Adjust Posted Vouchers, Void Invoices/Credit Memos, Void Manual Checks, and Manual Checks.
Show Voided Only Check this box to show only voided vouchers on the report.
Show Voucher Notes Check this box to show any notes associated with the vouchers.
Alternating Report Bands Check this box to provide every other line shading on the report.
Entity # To generate the history of a particular entity, select an entity number from the drop-down list. Leave blank to generate a report including all entities.
Vendor Group To generate the history of a particular vendor group, select the vendor group from the drop-down list.
Vendor To generate the history of a particular vendor, select the vendor from the drop-down list. See Figure 1.
Invoice Date Range Specify a range of invoice dates to generate a history of all invoices processed during a specific time period. Either the invoice date range or apply date range is required.
Apply Date Range Specify a range of apply dates (the date of record for financial statement purposes) to limit the report to batches processed during a specific time period. Either the invoice date range or apply date range is required.
Inventory Item # Range To generate the history of a particular item, or for a range of items, enter the inventory number or range of numbers. See Figure 2.
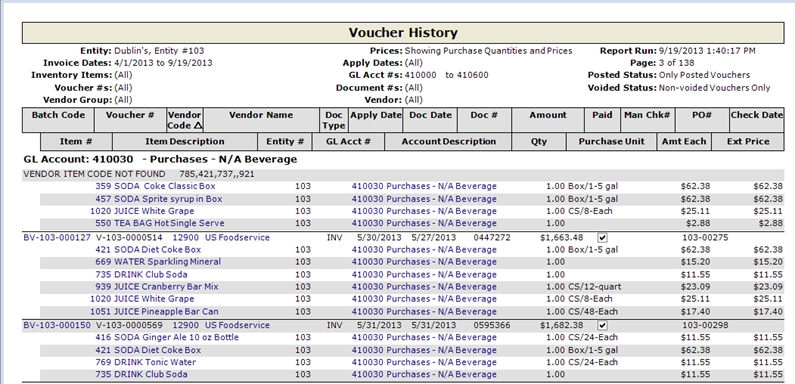
Acct # Range To generate the history of a particular account, or for a range of accounts, enter the account number or range of account numbers. This could help you pinpoint reasons why an account balance is different than expected. See Figure 3.
Enter a list of voucher numbers To generate the history for one or more particular vouchers by voucher number, specify the voucher numbers; you can also select them from the lookup box.
Enter a list of document numbers To generate the history for one or more vouchers by document number, specify the document numbers; you can also select them from the lookup box.
Note: The Export to Excel option is available directly from the Report Options screen. After selecting your options, click the Export to Excel button to create a flat file format of all report data.
You can generate a wide variety of reports depending on the options selected; Figure 1, Figure 2, and Figure 3 below show some examples.
Note: The Check # column in the examples below are empty because this column is only used by manual checks; other vouchers go by Doc #.
Figure 1. Voucher History (summary) for a Particular Vendor
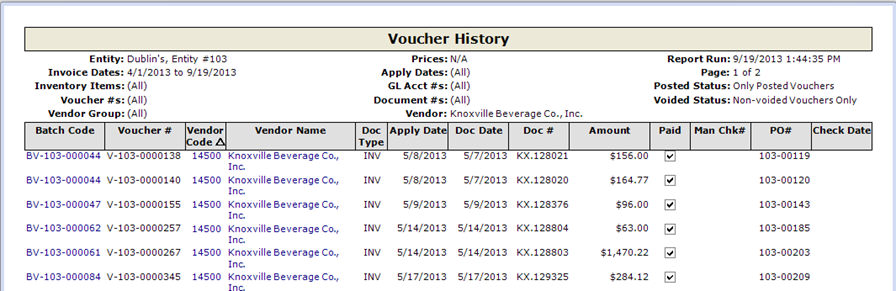
Figure 2. Voucher History (detail) for Particular Inventory Items
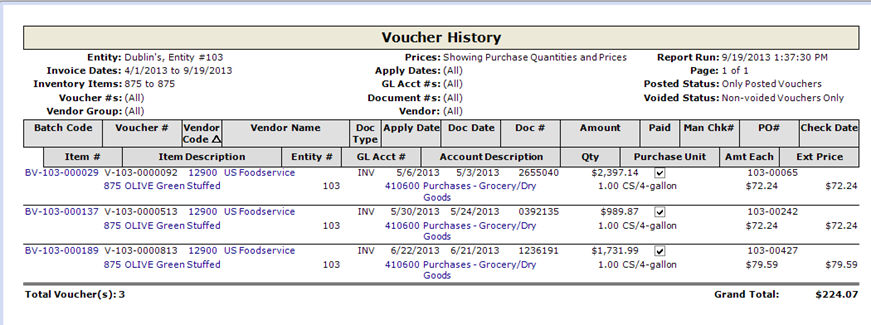
Figure 3. Voucher History for a Range of Accounts