Logbook Configurations |
  
|
Logbook Configurations |
|
Setup > Setup > Logbook Configurations
Adding a New Logbook Configuration
Editing a Logbook Configuration
The logbook is a tool that allows users to create a structure for and make notes regarding daily activities, statistics and employees. The entry types and categories available to each user are defined by the groups they belong to.
The logbook configurations screen allows you to define and manage logbook entry types. Entry types determine the category of information and detail required for each logbook entry. Examples of entry types include Facilities, Operations, Administrative, Time/Attendance, etc.
New entry types will be automatically assigned a unique ID, listed in the ID column. You can change the status of an entry type by checking or unchecking the active box. Inactive entry types will remain in the list but will not appear in the logbook entry screen.
The first time you access logbook configurations, you will be automatically prompted to create a new entry type. When creating an entry type, you are required to complete the Configuration and Advantage Groups tabs. The Categories tab is optional.
Some default entry types and Categories are included, however, you are welcome to add to these in order to customize this tool to fit your business.
1.Click the Add link.
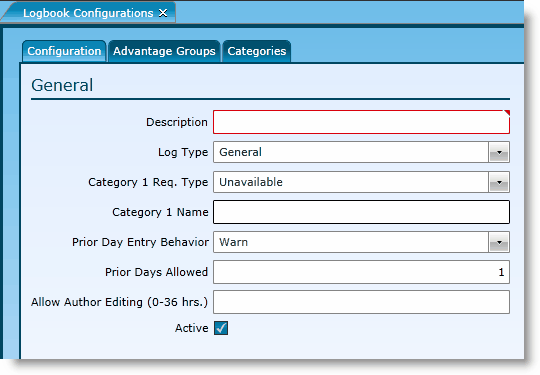
2.Enter a Description for the entry type. This field will populate the dropdown list when entering a new logbook entry.
3.Select the Log Type from the dropdown list. This will determine whether employee names are attached to the entry.
oGeneral - This log type should not pertain to specific employees, and will not give you the option of attaching them to an entry. Daily weather entries are a good example of a general log type.
oStaff - This log type will require one or more employees to be attached to an entry. For example, a Time/Attendance entry might include names of employees that were late.
Note: Once an entry type has been saved, the log type cannot be edited.
4.Category 1 Req. Type - Categories determine the details (optional or required) specific to the entry type. If a Category 1 will be created, indicate if the Category 1 should be Unavailable, Available or Required when entering a new note.
5.If a Category 1 should be established, enter the name in the Category 1 Name field.
6.Prior Day Entry Behavior - Indicate if you want to allow, warn or restrict a user if they are entering a note for a prior day.
7.Prior Days Allowed - Indicate how many days back you want to allow users to enter notes.
8. Author Editing - Indicate the number of hours any author has to delete or edit a Logbook entry. This only applies to initial entries and not additional comments. Also note that regardless of this setting, if anyone posts a comment to a logbook entry the original author may no longer edit or delete the logbook entry.
9. If the entry type should be active, make sure the Active box is checked. If unchecked, the entry type will not be available for new Logbook entries.
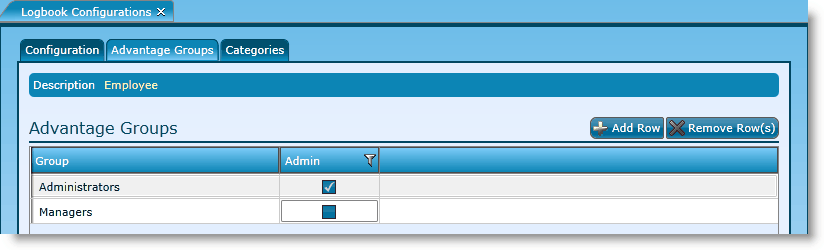
In the Advantage Groups Tab, define which groups should have access to the entry type.
11. Click in the Group field and choose the appropriate advantage group from the drop-down.
12. Indicate if the advantage group should be considered Administrators by checking the Admin check box. By allowing a group Admin rights, any user in the group will have author editing available.
Note: Groups marked as Admin are exempt from the author editing rule and may edit or delete any entries, regardless of the author. This includes any entries with comments or marked as read. However, they are still subject to the Prior Day Entry Behavior and may not create, edit, or delete any entries beyond the Prior Days Allowed.
Categories provide the details for your entry type, and are represented as drop-down boxes when creating a logbook entry. You may create up to three levels of detail, listed as Category 1, 2, and 3. Each level is nested within the one above it, only becoming available if the corresponding detail preceding it is chosen.
In the Categories tab you can set up cascading categories for the entry type. For example, the entry type of 'Facilities' can be broken down into Category 1 levels of 'Repairs and Maintenance' (R & M) and 'Miscellaneous' (Misc).
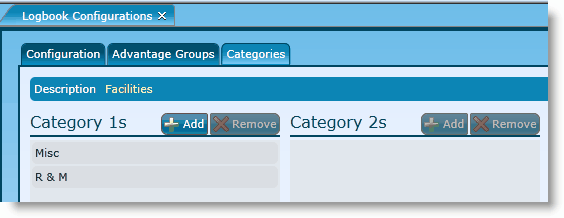
To add a Category 1 to Facilities:
13. Click the Add button in the Category 1s column.
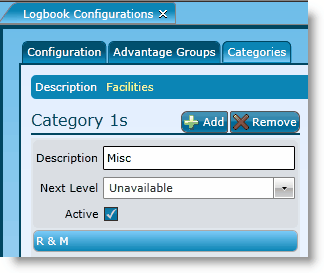
14. Enter a Description for the Category 1.
15. Indicate if the Next Level should be 'Unavailable', 'Available' or 'Required' when entering a new note.
16. To make the Category 1 active, make sure there is a check in the box.
17. If the Category 1 should be further broken down, click on and expand the appropriate Category 1, then click on the Add button in the Category 2s column and add the Description and Next Level.
18. If the Category 2 should be further broken down, click on and expand the appropriate Category 2, then click on the Add button in the Category 3s column and add the Description and Next Level.
19. Click the Save button.
To remove any Descriptions, Advantage Groups or Category levels, highlight the record you wish to remove by clicking on it. Then click on the Remove button. Note that some items may not be eligible for removal if they are tied to current or historical records. You may want to deactivate the item instead by unchecking the Active check box. Make sure to click on the Save button to complete your entries.
To view and edit a logbook configuration, either double click on the Entity ID or Description or, highlight the record by clicking on it once then click on the Edit link.
Send feedback on this topic.