Polling Configuration |
  
|
Polling Configuration |
|
Setup > Polling > Polling Configuration
Adding a Polling Configuration
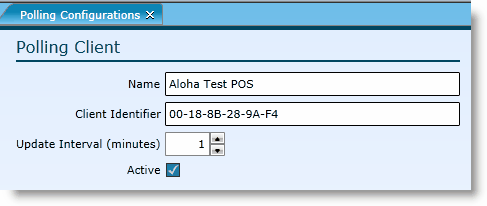
This is the primary screen for polling client configuration. It is subdivided into Client, Job, and Step sections. These are hierarchical in that a single client can have many polling jobs and a single polling job can have many steps, but each step belongs to only one polling job and each polling job belongs to a single client.
1.Click on the Add link.
2.Name the polling configuration.
3.Enter the Client Identifier. The client identifier is a unique identifier that the client will use during client requests to identify itself. The polling client product reports the first MAC address of any available network adapter as its unique identifier. This setting must match that reported by the client to successfully provided configuration information to the client.
4.Enter the Update Interval to indicate the time in minutes that the polling client will look for and push posted schedule data from Workforce to the POS. Keep in mind that any posting or re-posting of a schedule will force a push of data, however, records involving recent shift swaps, drops or pick ups will remain in a holding pattern until this Update Interval runs. This number should generally be set between 15 - 60 minutes in order to limit the frequency of traffic.
5.If the polling configuration should be active, leave the Active box checked.

1.To add a polling job, click on the Add Row button.
2.Click in the Description field and name the job will use in reporting and error logging.
3.Click in the Entity # field and enter the Compeat entity # that will receive the processed polled data.
4.Click in the Point of Sale field and enter it. The point of sale controls the POS specific configuration options, as well as step type availability.
5.Click in the Schedule field and select what polling schedule the Job should be associated to from the drop-down. New schedules can be created in the polling schedule screen.
6.Click in the Polling Time field and enter the time of day at which the client should execute, on server time.
7.Click in the Processing Time field and enter the time of day at which the client should execute, on client time. If client and server are in different time zones, and an offset has been entered to account for this, this field displays the polling time (server) + offset. If client and server are in the same time zone, no offset is needed and the polling time will be the same for both client and server.
8.Check the Enabled check box to enable the polling job and all of its child steps. Uncheck this box to disable the polling job and all of its child steps.
9.Check the A.P. Enabled check box to enable automatic processing of polled data. When the box is unchecked, polling processing must be done manually under Setup > Polling > Polling Processing in Compeat Advantage.
10. Click the Save button.
1.Highlight the polling job that should be removed by clicking on it.
2.Click on the Remove Row(s) button.
3.Click the Save button.
1.Highlight the polling job you want to add Steps to by clicking on it.
2.Click on the Add Row button in the Polling Steps section. Note that the options available will vary depending on the step Type selected.
3.Click in the Description field and enter the name of the step that will be used in logging and error reporting.
4.Click in the Schedule field and enter the date schedule on which the client should execute. New schedules can be created in the polling schedule screen.
5.Click in the Order field and assign the order in which the step should execute among the other steps.
6.Checking the Enabled check box enables the specific step. Uncheck this box to disable the step.
7.Click the Save button.
1.Highlight the Polling Job Step that should be removed by clicking on it.
2.Click on the Remove Row(s) button.
3.Click the Save button.
Send feedback on this topic.