Historical Time Entry |
  
|
Historical Time Entry |
|
Time & Attendance > Time Worked > Historical Time Entry
Editing an Historical Time Entry
Adding an Historical Time Entry
Historical time entry may become necessary if you need to view or edit time records that have already been exported. Note that this feature will typically be used infrequently, but is available should there be specific closed records you wish to edit without exporting.
1.Select the date range for the data you want to see. This is the only required field.
2.To restrict the a specific employee, click on the magnifying glass, choose the employee from the grid and either double click on the employee name or click on the record once and then click the OK button.
3.Click the Retrieve Data button.
4.Locate the record you want to view or edit and click on the Edit button.
5.Make edits to the appropriate field(s). For more information on the available fields, see the time entry section.
6.After all edits have been made, click the OK button.
7.Click the Save button.
8.Make sure to close the record(s) edited so they will not be exported. See the close time entry edits section.
1.Click on Add Row.
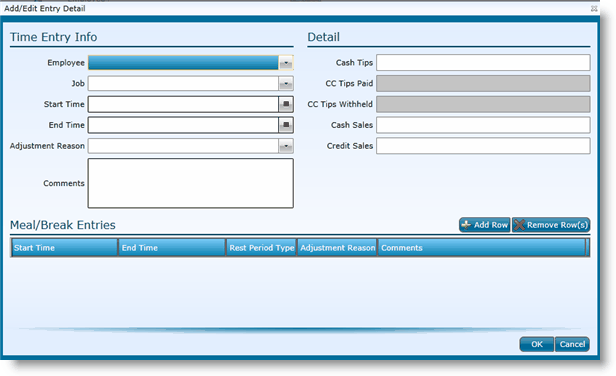
2.Enter the employee name from the drop-down.
3.Enter the job the employee performed.
6.Select an adjustment reason, if applicable. Note that adjustment reasons may be required. To edit whether an adjustment reason should be required or not, please visit the default labor definitions for the enterprise or the labor definitions for the entity.
7.Enter a comment for the adjustment, if applicable. Note that comments may be required. To edit whether a comment is required or not, please visit the default labor definitions for the enterprise or the labor definitions for the entity.
Note that these fields are not required.
8.Enter cash tips, if applicable.
9.CC tips paid and CC tips withheld are available for data that has been polled in, but cannot be added to a manual time entry.
10. Enter cash sales, if applicable.
11. Enter credit sales, if applicable.
Note that these fields are not required.
12. Click on Add Row.
13. Click in the Start Time field and enter the time.
14. Click in the End Time field and enter the time.
15. Indicate if the rest period is a break or a meal.
16. Enter an adjustment reason, if applicable.
17. Enter a comment, if applicable.
18. Click the OK button.
19. Click the Save button.
20. Make sure to close the record(s) edited so they will not be exported. See the Close Time Entry Edits section.
Send feedback on this topic.