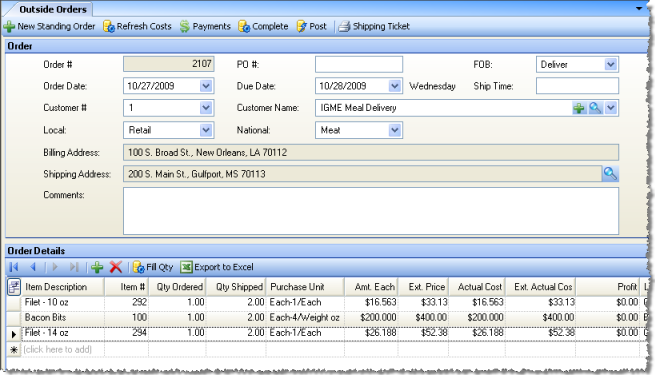
The Outside Orders screen allows you to enter orders for outside entities defined as Accounts Receivable Customers. You can create a regular one-time order, or choose from a list of standing orders if you have created any (see Outside Standing Orders).
Outside orders are posted from this screen rather than the Order Fulfillment screen.
Note: The GL posting for an outside order is like a regular commissary order except the Inventory in Transit account is replaced by the A/R Account, where a receivable is created for the accounts receivable customer.
The screen appears similar to the following:

Description of fields:
Order # This field is filled by a system-generated number assigned to the order after it is saved. This is a unique number that can be used to identify the order.
Order Date Enter the date the order was placed.
Customer #/Customer Name Select a customer name from the drop-down menu. Customers can be added to the list under the Customers screen.
Customer Group 1 & 2 If you have customer groups setup (under Enterprise Definitions, User Defined Fields), you can specify customer groups for the order. When you select a customer, these fields will automatically fill with the customer group(s) marked as default on the Customers screen. You can change the group to any of the groups assigned to the customer under the Customers screen. This will allow you to filter by customer group in the Commissary Sales Mix report.
PO # Enter a purchase order number, if desired.
Due Date Enter the due date for the order.
FOB (Freight On Board) This determines who pays shipping costs, and consequently affects tax calculations. You can select between Pickup or Delivery for this field. Pickup orders are taxed at the store's rate; delivered orders are taxed at the customer's rate.
Pickup Time/Ship Time Enter the time for shipping or pickup, depending on the FOB method selected above.
Comments Enter any notes you want to associate with the order. These comments will show up in the shipping ticket.
When you have a commissary order, the costs cannot be changed manually; they always come from the current costs of that commissary or commissary department. Click the Refresh Costs button to check those costs before you ship the order so you can make sure everything is correct.
Typically, you enter Qty Shipped amounts based on hand-written entries made to Picking Tickets; however, you can also click the Fill Qty button to have Compeat fill the Qty Shipped column with the Qty Ordered column amounts.
The Actual Cost and Ext. Actual Cost grid columns show the cost of each commissary item before any markups or selling price adjustments taken from its item definition (the Prep Item or Restaurant Inventory Items Commissary tab).
When you have entered values in the Qty Shipped column, click Save Changes to save your data, or you can click Post to select a Ship Date and then post the shipment.
Use the Shipping Ticket button to invoke the Shipping Tickets screen, where you can review and then print shipping tickets to accompany shipments.
Note: To customize item descriptions as they appear on the Shipping Ticket, turn on the option under the Commissary Definition screen for ‘Allow Users to modify line item descriptions on outside orders.’ In the Order Details of the Outside Order, there is an option for a column called ‘Invoice Description’. When a line item is entered, the item description will populate this column where it can be altered or text can be appended to it, and this altered description will display on the Outside Order’s Shipping Ticket/Invoice.
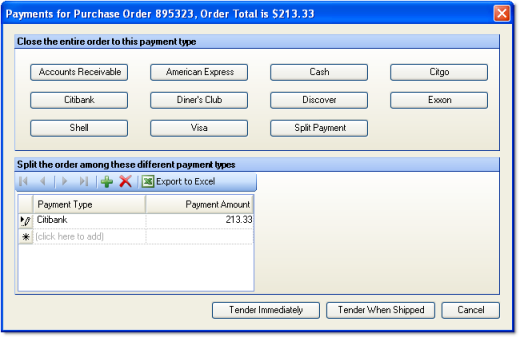
Before posting an order, you must select a payment type.
Click the Payments button on the screen toolbar to access payment options.

Select a single payment type using the buttons in the top panel, or split the payment between different types using the table in the lower panel. (The payment types available for an entity are defined under Setup > Entities > Commissary > Payment Types.)
To finish the payment, click Tender Immediately or Tender When Shipped, depending on whether you will receive the payment on the day of the order or when the order is shipped, respectively.
Accounts are hit in the following way depending on the option you choose:
Tender When Shipped:
debits the Payment Type; credits Sales/Profit
Tender Immediately:
debits the Payment Type; credits Pre-Paid Sales — when tendered
debits Pre-Paid Sales; credits Sales/Profit — when shipped