The Bank Accounts setup screen allows you to define your bank accounts. You can define as many bank accounts as necessary. Each bank account is associated with a unique GL account and entity number combination. You will need to have bank accounts defined in order to print computer checks or record manual checks. You will also not be able to use the Reconcile Bank Accounts screen until you associate the account to a bank code. If you post entries to a cash account before a bank code has been defined these entries will not be available for reconciliation unless you use the Load Open Items utility.
Note: In order for bank reconciliation to work properly, you should define only one bank code for each bank account used. For example, do not define a bank code for manual checks and another for computer checks, if both affect the same bank account.
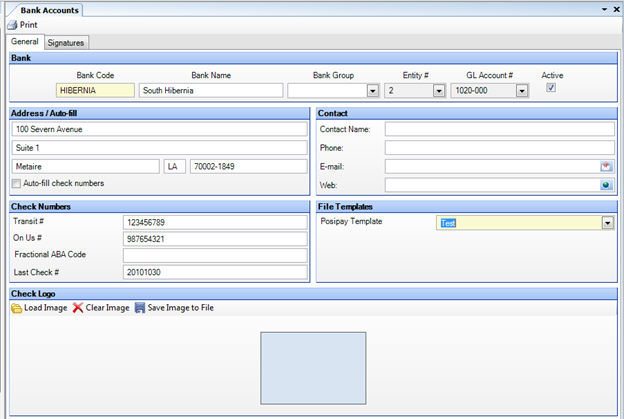
You can enter general information about the bank account. If you will not be printing checks with Compeat (see Check Printing below), the only required information is the Bank Code, Bank Name, Entity #, and GL Acct #.
![]() Click to view/hide picture.
Click to view/hide picture.
Bank Code The code you would like to use to identify this bank account. Up to 15 alpha-numeric characters can be used.
Bank Name The name of the bank.
Bank Group Optionally assign the bank to a bank group. This enables you to create positive pay files for multiple banks at once.
Entity # The number of the entity that uses this bank definition.
GL Acct
# The cash account number associated with this bank account.
Features in Compeat that require a cash account are defined with a
bank code, not a GL account number. This way Compeat can record cash
deposits (debits) and payments (credits) and can reconcile that activity
through the Bank
Reconciliation feature.
The GL account that will be debited or credited is the GL account defined
for a specific bank code.
Each bank account defined for a single restaurant must use a unique
general ledger account number. You can assign the same GL account
number to bank accounts used by different restaurants.
Active Uncheck to inactivate the bank account. This will preserve data relationships to the account, but will remove the account from drop-down lists and search dialogs in the application.
Address The address of the bank.
Auto-fill check numbers When checked, this bank code will pre-fill the next available check number on the Computer Checks, Manual Payments, and Manual Checks screens.
Enter the contact information for the bank here.
![]() Click to view/hide picture of check numbers.
Click to view/hide picture of check numbers.
Transit # Enter the transit number for your bank. This is typically a 9-digit code, sometimes also called a bank routing number. This field is required if you will use blank checks with Compeat (instead of pre-printed checks).
On Us # Enter the On Us # for your bank account. This is the bank account number. This field is required if you will use blank checks with Compeat (instead of pre-printed checks).
Fractional ABA Code This internal bank code will print at the top of all computer checks directly under the bank's name and address, if entered here.
Last Check # The last check number used by this bank account. When printing checks, Compeat will default to start with the next check number. This field is required if you will be printing checks using Compeat.
Select the positive pay template to use for this bank account.
This section allows you to upload a logo image to appear on printed computer checks.
![]() Click to view/hide picture of example check with logo.
Click to view/hide picture of example check with logo.
Logo graphics will appear in the upper left area of checks.
Logo images should be approximately 1.1" high and 1.6" wide (330 x 480 pixels at 300 dpi). A resolution of 300 dpi is recommended. Compeat will accept most common image formats, but will save the image in JPEG format to optimize file size.
To add an image, click Load Image and browse to the image file you would like to load.
Compeat also allows you to retrieve images from the database and save them in a new location, in case you need to modify or share the image and don't have access to the original. To do this, simply click the Save Image to File button and specify where you would like to save it.
You can remove an image from the database by clicking Clear Image.
Note: We recommend that you print some sample checks to verify that your images print correctly.
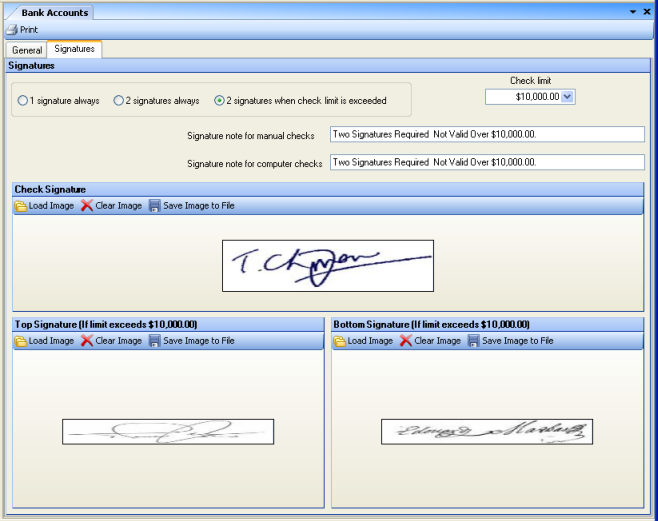
This tab allows you to upload check signatures and specify other signature-related options.
![]() Click to view/hide picture.
Click to view/hide picture.
Signatures Specify whether a single or dual signature should be used on checks, or whether a dual signature should be required only on checks above a certain amount (the Check limit amount specified).
Check Limit If you selected "2 signatures when check limit is exceeded" above to require two signatures on checks above a certain amount, specify that amount here.
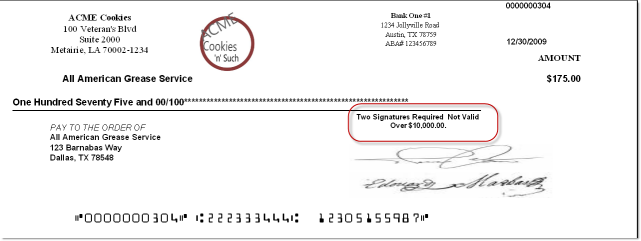
Signature Notes (optional) Enter text to appear above the signatures line on printed checks. This text does not display on pre-printed checks.
![]() Click
to view/hide example.
Click
to view/hide example.
This section allows you to upload a signature image to appear on printed computer checks.
Signature graphics will be printed in the signature area of the check, and should be approximately 0.68" high and 2.8" wide. If nothing is specified and checks print on blank stock, Compeat automatically sets it to a blank signature line.
A resolution of 300 dpi is recommended for signature images. Compeat will accept most common image formats, but will save the image in JPEG format to optimize file size.
To add an image, click Load Image and browse to the image file you would like to load.
Compeat also allows you to retrieve images from the database and save them in a new location, incase you need to modify or share the image and don't have access to the original. To do this, simply click the Save Image to File button and specify where you would like to save it.
You can remove an image from the database by clicking Clear Image.
Note: We recommend that you print some sample checks to verify that your images print correctly.
![]() Click to view/hide picture.
Click to view/hide picture.
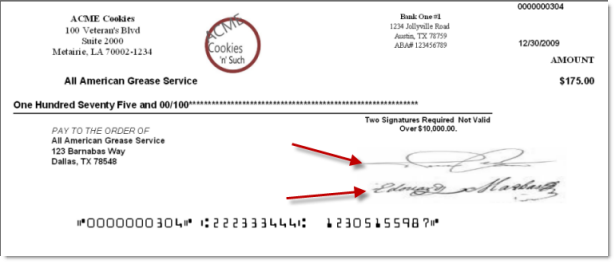
This section allows you to upload images for two signatures to appear on printed computer checks. Either "2 signatures always" or "2 signatures when check limit is exceeded" must be selected in the Signatures section in order to enable this feature.
Checks can be printed using either blank or pre-printed check stock; which method is used is determined by the Use Pre-printed Checks check box on the Setup menu > Other Definitions screen > Invoice & Checks Settings tab.
Note: NELCO forms has these, and many other forms compatible with Compeat on their website (www.nelcosolutions.com) linked to the Compeat name.
On blank check stock Use blank checks from G7 Productivity Systems, style #1000. You can order or purchase checks of this type from many office supply stores, or you can contact G7 Productivity Systems at www.versacheck.com, or 844-308-5350.
Note: In order to print checks on blank check stock,
you must have a laser printer (ink jets, dot matrix, and other printer
types will not work). It may be necessary to use a special magnetic ink
cartridge. Check with your bank as to whether you need a magnetic ink
cartridge.
Be sure the top of the MICR codes
are located not more than 7/16 of an inch from the bottom of the check
and the bottom of the MICR codes is not less than 3/16 of an inch from
the bottom of the check. Use vertical alignment to adjust the position
up or down. See Computer
Checks Printer Setup.
On pre-printed check stock Use either Nebs or Intuit three-part (one check with two stubs) laser computer check stock. You can contact Nebs at www.nebs.com or Intuit at www.intuitmarket.com.
Note: Regardless of the check type you use, before printing checks for distribution to vendors, you should print some sample checks and submit them to your financial institution to verify that your settings are correct.