
Use the Reconcile Bank Statements screen to check your records against a bank statement. This allows you to note which checks have cleared, check for errors, and make adjustments.
Note: It is possible to import an electronic bank statement for reconciliation purposes (see Bank Import). When you import a bank file, the system will automatically compare the records in Compeat to the bank statement, leaving only any non-matching records to be reconciled manually.
To access the Reconcile Bank Statements screen, go to Transactions > Reconcile Bank Statements.
Enter the following information:
Bank Code Select the bank account to be reconciled.
Bank Statement Ending Balance Enter the ending balance from your bank statement.
Last Bank Statement Enter the date of your previous bank statement. This field will autofill after the first use.
Bank Statement Ending Date Enter the ending date from your current bank statement.
Click Proceed to continue.
The Compeat records associated with the selected account will be displayed for the specified date range. Credits and debits are displayed separately.
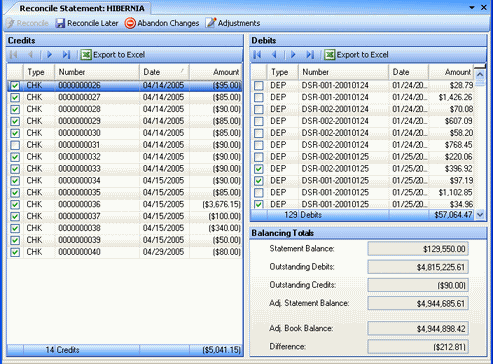
Compare these records to your bank statement and check-off each credit and debit that has cleared, as indicated on your bank statement. You will see that the totals in the bottom right-hand corner will change as each item is selected.
Note: There is a field chooser on the top left corner of the Credit and Debits screen that has options to include some hidden columns: Vendor & Doc #’s on the Credits side, and JE Description on the Debits side. This can be checked to show in the grids.
Verify that the following fields on the screen are correct:
Credits Each credit that is displayed is one entered as of the bank statement date. Select each that is included on the bank statement. These will include checks that you wrote, and any journal entries that were credits to the cash account associated with this bank code. For example, if you use the Payroll JE feature, the credit to cash that accounts for the payroll checks that you wrote will appear in the bank reconciliation Credits section. The View Report button at the top of the grid will print the associated report for any transaction highlighted in the grid. This may be used to help research a transaction.
Note: Posted manual check transactions appear by their apply date, not document date.
Debits Each debit that is displayed is one entered as of the bank statement date. Select each that is included on the bank statement. These will include deposits that you made (typically recorded via the DSR feature), and any journal entries that were debits to the cash account associated with this bank code. For example, if you had to adjust the bank deposit amount after the DSR was posted, you might have an adjusting debit to your Cash account; this will appear in the bank reconciliation Debits section. The View Report button at the top of the grid will print the associated report for any transaction highlighted in the grid. This may be used to help research a transaction.
Statement Balance Displays the ending balance of your bank statement as entered on the introductory screen.
Outstanding Debits Displays the totals of all of the displayed debits that have not been selected. This is the total of the deposits that have not cleared the bank as of this bank statement.
Outstanding Credits Displays the totals of all of the displayed credits that have not been selected. This is the total of the checks that have not cleared the bank as of this bank statement.
Adjusted Statement Balance Displays the statement balance plus all of the outstanding deposits, minus all of the outstanding checks.
Book Balance Displays the balance of the GL account associated with this bank account code as of the ending bank statement date that you entered.
Difference Displays the amount your reconciliation is out of balance. To complete your reconciliation, this value must be zero.
If you need to make new journal entries to adjust the account balance for such things as interest, bank charges, and check charges, click the Adjustments button.
A screen similar to the following will appear:
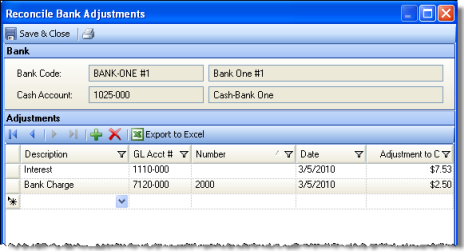
Enter the following information:
Description/GL Acct# Select an account for the adjustment from the drop-down list in the Description column (the list consists of those accounts defined in Bank Adjustments).
Number (Optional) Enter a reference or transaction number.
Date Enter the transaction date (i.e., the date that your account was debited or credited). The date must be within the current statement and in the current period.
Adjustment Amount Enter the amount of the adjustment.
Note: Credits to a cash account should be entered as negative numbers. For example, if entering a service charge, remember it is a credit to cash, so enter the dollar amount as a negative (e.g., "– 50.00").
When you are done making adjustments, click Save & Close.
Once your reconciliation is complete, click Reconcile;
Compeat records the adjustment journal entries on the financial statements
using the adjustments descriptions in the reference field. This causes
multiple bank adjustments on the same date with different descriptions
but the same GL account to be listed separately. The report generators
for reconciliation detail and journal entry will open to give you the
option to print a report of the reconciliation
Additionally, any checks that were selected in the reconciliation will
now have a Cleared status on
check registers (otherwise their status would be Marked
or blank to indicate open).
If you want to stop temporarily and resume your work later, click Reconcile Later. Any changes made
will be saved and the screen will close. When you return to the Bank Reconciliation
screen, simply enter your bank code to continue.
To close the window and discard any changes you made (for example, if you
have discovered a major error and would like to start over), click Abandon.