If you will be printing checks using Compeat, you may need to set margins for the printed area. By default, the margins are set to one-quarter inch (0.25"). Depending on the printer you use, you may need to change these so that checks print correctly.
Note: You must first decide whether you will be printing checks on blank stock or on preprinted stock. See the Check Printing discussion in the Bank Accounts Setup help topic.
Access the computer checks printer setup screen by selecting File > Printer Setup > Computer Checks Printer Setup:

If you are printing on pre-printed check stock, the margin settings will allow you to better align the printed information with the lines on the pre-printed stock.
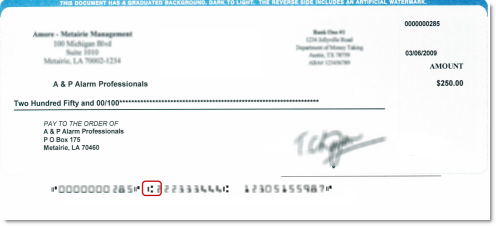
If you are printing on blank check stock, it is important that the MICR codes are printed in the correct position (vertically and horizontally) on the check stock. Blank stock should have a small watermark box at the bottom of the check. This box may include a representation of the transit symbol (three dots), depending on the check stock. It is important that the transit symbol (circled in red in the example below) printed by Compeat fall within the watermarked box of the check stock. The transit symbol can be located slightly to the left, right, top, or bottom of the box but otherwise must be in the area of the box.

Use the Top Margin setting to move the printed information up or down the page. Increase the Top Margin to move the printed information down and decrease the margin to move the printed information up on the page.
Use the Left Margin setting to move the printed information left or right on the page. Increase the Left Margin to move the printed information to the right and decrease the Left Margin to move the information left on the page.
Set the margins as needed, then select Print Sample Check to see if the checks print correctly. You can change the margins and print as many sample checks as needed.
Note: The margins for computer check printing must be set up for each entity.