Compeat is a standard Microsoft .NET-type application and uses standard .NET navigation. Here, we will cover some of the basic interface elements of the software and how to best use them.
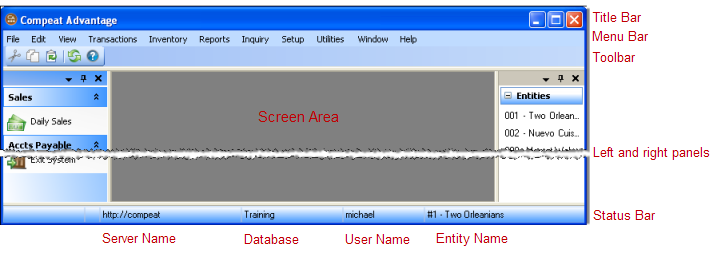
The Compeat window has the following areas:
The title bar displays the name of the application and contains buttons for closing the application, minimizing the window, and maximizing the window. Click and drag the title bar to move the window.
The menu bar provides access to all of the screens and commands available in Compeat. Many screens are accessed through submenus under a main menu topic.
In this help system, menu paths (the steps needed to access a given item) are often written with a greater-than symbol between menu and submenu. For example, to access bar code information, you must go to the Inventory menu, choose the Restaurant Inventory Items submenu, select the Restaurant Inventory Items screen, and then go to the Bar Codes tab. This path might be written as Inventory > Restaurant Inventory Items > Restaurant Inventory Items > Bar Codes.
General Tools The basic toolbar lets you Cut, Copy, Paste, Refresh, or access Help with any part of the Compeat window that is highlighted at the time an icon is selected.
![]()
Screen Tools When a screen is
open, new tools will become available, such as shown below:
![]()
Screen tools generally include the following:
"VCR" buttons Use the arrows to move to the First or Last record; the Arrow icons to move to the Previous and Next records; the number of available records and where you are in the list of records is displayed between the buttons.
![]()
![]() Add New Click the plus icon to create a new record.
Add New Click the plus icon to create a new record.
![]() Delete Click
the X icon to delete the current record.
Delete Click
the X icon to delete the current record.
![]() Save
Click the diskette icon to save the current record.
Save
Click the diskette icon to save the current record.
![]() Undo Click the reverse-arrow icon to undo your previous action.
Undo Click the reverse-arrow icon to undo your previous action.
![]() Search Use the type
here to search box to search for a specific term. you can use truncated
terms, (i.e., a partial word), then when you press Enter, a list of items
containing those letters appears in the Choose Record screen.
Search Use the type
here to search box to search for a specific term. you can use truncated
terms, (i.e., a partial word), then when you press Enter, a list of items
containing those letters appears in the Choose Record screen.
Example:
If you type "de" in the box on the Master Inventory Items screen,
the following screen appears, where you can choose a record:

![]() Advanced Search The advanced search feature allows you greater
control over how records are searched. See Finding
Items for more information.
Advanced Search The advanced search feature allows you greater
control over how records are searched. See Finding
Items for more information.
![]() Remove Filter
If you have used a search filter in the Find Records screen, and want
to remove it, click the Filter icon.
Remove Filter
If you have used a search filter in the Find Records screen, and want
to remove it, click the Filter icon.
For either the Quick Command panel on the left, or the Entity panel
on the right, you can customize your screen using these panel icons: ![]() . You can Restore Default Layout
under the View menu.
. You can Restore Default Layout
under the View menu.
Menu Click on the downward arrow, then select either Dockable, Hide, Floating, or Auto Hide to change the panel's appearance and behavior to suit your individual preferences.
Auto Hide Click on the pin icon to hide the panel and reveal it on mouseover.
Close Click the X to remove the panel. You can restore the panel by selecting Restore Default Layout from the View menu.
The Status Bar at the bottom of the screen provides the following information:
Server Name The name of the current server.
Database Name The name of the current database.
User Name The name of the current user.
Entity Name The name of the current entity.
![]()
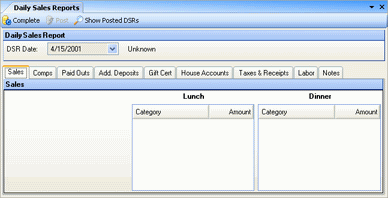
A series of tools
stretches across the top of most screens. These vary, depending on the
screen, but often include Print (![]() ), Complete
), Complete
![]() , and Post
, and Post
![]() .
.
Fields are blank spaces where the system accepts any user-input.
Quick Tip: You can use the Tab or Enter keys to move between screen fields; there is a tabbing order to each screen set by the application. Alternatively, you can use the mouse to move from field to field within a screen.
Tabs allow you to switch between different section of a screen or different screens.
Quick Tip: When multiple screens are open, they are represented as tab; you can move from one tab to another using the keyboard shortcut Ctrl + Tab. For screens with multiple tabs, you can move among the tabs using the Left Arrow and Right Arrow keys. For example, you might use Ctrl + Tab to change from the DSR Comps tab to the DSR Additional Deposits tab.
The detail area often includes a grid, or table of information, with each row representing a different item and each column representing a different data-type.
Quick Tip: Use the Tab key to move to the next column to the right; the Shift + Tab combination will move back to the left.
To add a line item, simply click in the bottom template row and make your entry. When an entry has been made in the template row, a new template row will become available.
To delete a line item, select
the row you wish to delete, and then click the Delete
button ![]() .
.
Left margin symbols:
|
Selected row. This symbol indicates that a row is selected. The contents of the row will also appear highlighted in blue. |
|
Modified row. |
* |
The bottom row of a table will have a template row marked with an asterisk in which data can be entered to create a new row. |
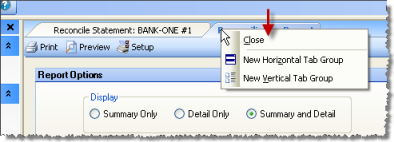
When multiple screens are open, they are displayed as tabs within the window (shown below).
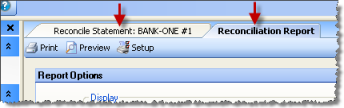
At times you may wish to view two screens together, side by side. You can do this by right-clicking on the tab portion of either screen (shown below), and selecting either "New Horizontal Tab Group" or "New Vertical Tab Group" from the pop-up menu.