
Use Print Checks/Post Batch to print checks and post the payment batches selected in Payment Selection (if you are set up to use this feature).
The screen appears similar to the following:
Note: Before you print checks, make sure that you have the printer loaded with check-stock and any special print cartridge that may be required. For more information see Check Printing.
Follow the steps on the screen to print checks and post the payments. You must perform the steps in order; however, you can skip steps 2, 3, and 4.
Begin by selecting the batch # for the batch you wish to pay and post.
Note: In order for the address information to properly display in an address window, 3 7/8'' x 8 7/8'' envelopes should be used.
Select Print in Step 1; a screen similar to the following appears:
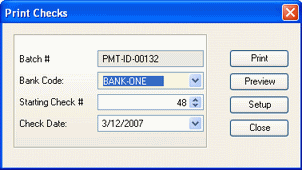
Note: If you print checks to a bank code that has Positive Pay export file definitions set up, Compeat will automatically prompt you to create a positive pay file for that payment batch.
If needed, you can change the starting check number and the date you would like printed on the check; when these options are correct, click Print. Compeat will verify that the check number specified has not already been used; this includes both the starting check number and all the checks that will be in the batch; if any of the check numbers have been used, you will be warned.
If any checks did not print correctly, select Reprint in Step 2. Checks with errors that need to be reprinted are termed spoiled checks. You can void damaged checks using the Void Missing Checks utility.
If using blank checks, you need to indicate the range of check numbers that you will be reprinting. Compeat always reuses the same check number for reprinted checks. For example, assume you originally printed checks 100 through 125, and checks 120 through 125 were spoiled checks. You would enter 120 as the starting check number, and 125 as the ending check number. Compeat will reprint these checks reusing the same check numbers (120 – 125).
If using preprinted checks, you need to indicate the range of check numbers that you will be reprinting. You will also need to indicate the check number that reprinting will start on. For example, assume you originally printed checks 100 through 125, and checks 120 through 125 were spoiled checks. You would enter the 120 as the old starting check number, 125 as the old ending check number, and 126 as the new starting check #. In this example, Compeat will default the new starting check # to 126. There will be no record in Compeat of the spoiled checks.
Note: Compeat will verify that the reprint check numbers that you specify are not duplicates of existing or spoiled checks.
After you have specified the information on the Reprint Checks screen, select Print to reprint the checks.
Important: When you reprint checks, it is important to destroy the spoiled checks so they are not accidentally sent to vendors. You can reprint checks as many times as needed.
Select Print in Step 3 to print a Check Register; a print setup screen appears to let you select the printer that will be used, number of copies, and so on. Select OK when you are ready to print the register. This step is optional.
When your reports have printed, you are returned to the Print Checks/Post Batch screen where steps 1, 2, and 3 are now marked with green checkmarks indicating they have been completed.
Select the Print button in Step 4 to print a Payment Apply-To Report; a print screen appears to let you select the printer that will be used, number of copies, and so on. Select OK when you are ready to print the apply-to report. This step is optional.
After the apply-to report has been printed, you are returned to the Print Checks/Post Batch screen where steps 1, 2, 3, and 4 are now marked with green checkmarks indicating they have been completed; similar to the following:

Note: You can reprint both the check register and the apply-to report as many times as needed.
Select the Post button in Step 5. Your payments will post and you will receive a message indicating that posting has successfully completed. If your payments cannot be posted, a very unusual circumstance, you will receive an error message.
When the posting is complete, the Print and Post window closes. You will be prompted to print a GL report of the posting.
If you attempt to exit the Print Checks/Post Batch screen before completing the entire process, you will receive a warning you to destroy printed checks. Depending on your situation, you may wish to stop the processing and destroy the checks, or continue posting the payments.