The Load Open Items utility under the Accounts Payable menu allows you to transfer open invoice information from another accounting system when going live in Compeat. If you have invoices posted in another accounting system but would like to pay those invoices out of Compeat, you can use Load Open Items to enter the invoice header information but not affect the general ledger. When you import AP open items you must go to the AP Invoice screen to post the batch. This will create a journal entry but only a debit and credit to the same AP liability account number. The invoice will then be available to pay with a computer check or manual payment out of Compeat. The other options for payables when switching from another accounting are to pay all bills out of the other system and not bring over an accounts payable liability into Compeat’s general ledger, or continue to pay bills out of the old system and make journal entries in Compeat to debit accounts payable and credit cash.
This feature allows you to import data into Compeat from a spreadsheet. There are several variations of the Load Open Items feature, but they all use the same basic approach.
Note: For this utility to work, you must have Microsoft Excel installed on your computer.
To successfully import, you must consider a few minor formatting details.
Files must be in either .xls or .xlsx file format. These are the standard Excel file extensions.
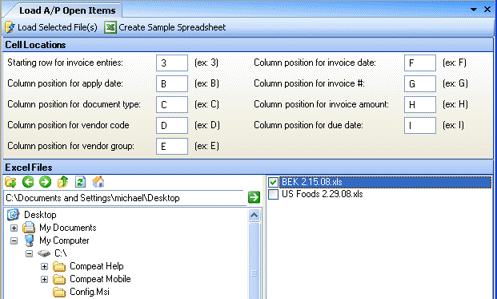
The basis of the import process is simply to indicate where each piece of data in your spreadsheet is located. You do this by entering the cell reference for your data in the Cell Locations fields.
You can view a sample spreadsheet to see how your data should look like by clicking Create Sample Spreadsheet. The data arrangement in the sample spreadsheet corresponds to the example cell references shown next to each Cell Location field in Compeat. In some cases, it may be easiest to rearrange your data to match the sample data.
Do not leave any blank lines between budget data; when Compeat encounters a blank line, it will stop importing.
Your data must be in the first worksheet of the Excel workbook.
Note: Typically in Excel, when you create a new spreadsheet you will actually be creating a workbook with 3 worksheets; Compeat can only access budget information from the first sheet (named Sheet 1 by default). You can rename the sheet, as long as it remains the first worksheet in the book (worksheets within a book can easily be dragged to change their order).
You must have data in each cell defined in Cell Locations.
The imported codes must match those already defined in Compeat.
Quick Tips: It is a good idea to place all of your vendor files in a single folder dedicated to only vendor spreadsheet files. This will make it easier to find the correct files.
The screen appears similar to the following:
After you have properly formatted your data in Excel, you can import into Compeat. Define the cell locations for all data fields.
Note: Next to each field is an example cell reference that corresponds to the cell in the sample spreadsheet. If your data matches the organization of the sample spreadsheet, simply use this cell reference.
After filling in the cell locations, select the files that you want to import. Use the directory tree (in the lower left section of the screen) to navigate to the folder containing your Excel files. When a folder is selected that contains Excel files, the Excel files will be displayed in the right-hand panel; check next to the file(s) that you want to import. Click Import Selected File(s) to import.