This screen is where you define certain setup options that apply to your entire enterprise (all entities).
Description of fields:
Report Server
URL Enter the URL of the server that hosts your Compeat reports.
You can enter a primary and alternative address. When Compeat starts
up, it will check the primary address first, and then, if that fails,
try the alternative.
If your organization has a firewall in place, you may need to provide
private and public IPs for access from behind the firewall and access
from outside the firewall.
Report Server User/Password Enter the username and password for the report server.
Application
Server URL Enter the URL of the server that hosts your Compeat
application. You can enter a primary and alternative address. When
Compeat starts up, it will check the primary address first, and then,
if that fails, try the alternative.
If your organization has a firewall in place, you may need to provide
addresses for private and public IPs for access from behind the firewall
and access from outside the firewall.
Application Server User/Password Enter the username and password for the application server.
Portal Server URL If you wish to use the Portal in Compeat, enter the URL that you wish to display through the portal.
Hosted Administrative User This is a high-level user role, used only with Compeat Hosting Services. When Compeat is hosted, certain features are disabled for all users except the Hosted Administrator. Only this user has access to many of the Enterprise Definitions features.
Max Image Size Use this to limit the size of imported images. This can be important in keeping your database from getting too large. When Lock is checked, Compeat will prohibit images larger than the set size from being imported; if unchecked, Compeat will warn you, but still allow importing larger images. Hosted Compeat customers are unable to change this setting.
User Password Expiration To increase security, you may want to force your staff to change their passwords on a regular basis. If so, you can set the time interval for password expiration in this field. Users will be prompted to change their passwords the first time they login after the expiration period. Leave blank for no expiration date.
Number of days to search back for orders When you create a new order, the detail area of the Orders screen fills in with all the items and amounts purchased from the specified vendor within the last 90 days. You can change this number of days by changing the number in this box.
Inv. Count Snapshot History (days) Used in conjunction with the ‘Snapshot Inv. Count Changes’ feature, this setting records how much history of inventory count changes will be retained in the database.
Owner's Equity Categories This will allow you to define a category for the GL accounts that will be used for owner's equity on the Balance Sheet report.
Foreign Currency Gain/Loss Acct If multi-currency consolidation will be used, this account records the difference that occurs due to differences between the Average Rate and End of Period Rate in the Currency Exchange Rate setup.
PO Bill To Entity If you wish to have purchase orders billed to an entity other than the receiving entity, select an alternative entity. This can be useful, for example, if you have a corporate office that pays bills for the enterprise. If a "Bill To" entity is specified, purchase orders will include a note to bill to the specified entity along with the address of the entity. See example.
Lock Image Size This must be checked to enforce the max image size for scanning into Compeat.
Force all characters to uppercase Check this box if you want all the text you enter into the system to be in uppercase characters (capital letters).
Encrypt Tax IDs Check to encrypt federal and state tax ID information in Compeat. When checked, vendor tax ID numbers will not be displayed in the application. The information will only be displayed in IRS export files. The tax ID entry fields will be replaced by "Set ID" buttons that will prompt for tax ID.
Snapshot Inv. Count Changes Check to enable inventory count entry logging in Compeat, which will populate the Inventory Count History Report.
Show Repolled DSR Notification Check to enable a pop-up message that alerts you when a DSR you have repolled is available in the DSR screen.
Activate New Menu Items for All Entities When checked, anytime a Menu Item is entered in one entity, it becomes active in all entities.
Disable modifications when receiving IST Prevents a receiving store from modifying an inter-store transfer. Upon converting the IST into an invoice, the user may now fully accept or reject the IST by selecting the Reject button in AP Invoices. See Inter-Store Transfers for more information on this feature.
The user defined fields include Store Groups, Customer Groups, and Inventory Levels. You can use these to customize and extend Compeat's functionalities. If you choose not to use them, leave the fields blank and the items will not be shown on your menus.
You can define up to two company-wide grouping categories for your restaurants and customers. These grouping categories then become menu items themselves on the Entities submenu and Accounts Receivable submenu of the Setup menu.
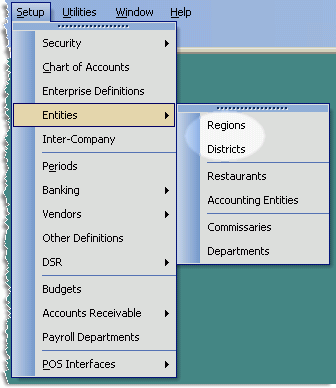
Suppose you have restaurants located all across the country. You could define a category to represent a mega-grouping, such as Regions, and another to represent sub-categories of the mega-grouping, such as Districts:
When you enter text in the fields Store Group #1 and Store Group #2 ("Regions" and "Districts" in this example), that text will appear as the first two items of the Setup menu > Entities submenu the next time you restart Compeat. These items, in turn, allow you to define categories of the groupings to which you can then assign your entities when you define them.

In the above example, the menu choices Regions and Districts open screens where you can maintain descriptive sub-groupings that will populate the Regions and Districts drop-down lists of the entity definition screens, so that any sub-grouping can be associated with any entity.
Example
You might want to define "East" and "West" as two categories
of Regions, and "Northwest,"
"Southwest," "Northeast," and "Southeast"
as categories of Districts. Then,
for a New York entity, you could choose East
as the Region and Northeast as
the District in its entity definition screen.
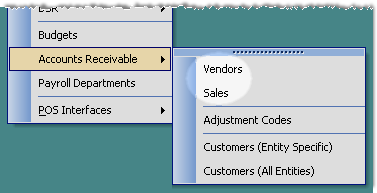
The same methodology applies to using customer groups. If you enter, for example, the text Vendors and Sales for Customer Groups #1 and #2 respectively, the Accounts Receivable submenu, a little further down the Setup menu, will appear as follows:

This is where you can determine the settings for Daily Report Subscriptions, a feature where Compeat will auto-generate an email to subscribed users with an Entities Daily Sales, General Notes and Maintenance Notes.
Sale Account Filters Choose the GL Account Filter you would like to use for the Sales Figures included in the Daily Email.
Note: We recommend that you create a new GL Account Filter called Total Sales. See GL Account Filters for more information.