Compeat allows you to import bank statements to automatically clear transactions that match up to the Compeat items in the Reconcile Bank Statements screen. This screen allows you to setup configurations for importing bank files. Your financial institution should provide you with the necessary specifications to configure this screen. If they do not, it can be determined by manually inspecting a file in NotePad.
Once you have configured Compeat for bank import for a financial institution, you can import bank files using the Import Bank File utility.
Tips and Tricks
Although this screen stores file layouts for each different bank code,
there is also a way to use one file layout to clear entries in all of
your bank codes.
If you select Account Number as a field to be imported, this number will
be matched up against the On Us #
defined for your banks in the Bank Accounts
screen. Using this number, you could receive a single file with entries
in it for multiple bank accounts—
in this scenario, Compeat will use the Account Number field to match up
each entry to the appropriate bank account.
If an account number is not imported in the bank file, all entries will
go to the bank code selected when you import the bank file.
![]() Click to view/hide picture.
Click to view/hide picture.
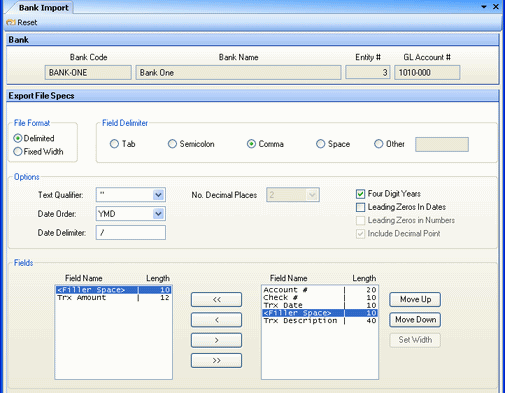
To create a new bank import definition, you must first select the bank that it will be used for. When you select Bank Import from the menu, you will be presented with a list of banks (defined in Bank Accounts). Select a bank from the list to proceed. The bank information will be displayed in the top of the screen.
Use the following options to define your export specifications:
Specify the format used in the source file.
Delimited In a delimited format, data cells (fields) are separated by punctuation (e.g., comma, tab, space) and rows are indicated by lines (carriage return).
Fixed Width In fixed width format, data cells (fields) are indicated by a specified number of characters and rows are indicated by lines (carriage return).
For delimited files, specify the delimiter used, that is the thing used to separate one data field from another.
Tab Select if your source data is in tab delimited form.
Semicolon Select if your source data is in semicolon delimited form.
Comma Select if your source data is in comma delimited form.
Space Select if your source data is in space delimited form.
Other Select Other if your data is in a form other than tab, semicolon, comma, or space delimited. Enter the type of limiter in the provided field (e.g., "/").
Text Qualifier (delimited file format only) Select the text character used in your source file as a text qualifier.
Note: Text qualifiers are used with delimited data to indicate when punctuation (e.g., space, comma) is used as text rather than as a delimiter.
Date Order Specify the format used for dates in your source data (i.e., the order in which month (M), day (D), and year (Y) are written).
Date Delimiter Specify the delimiter used for dates in your source data. For example, select "/" if dates are in the format, 2/28/09.
No. Decimal Places (fixed width only) Enter the number of decimal places used in your source data.
Header Rows to Skip Most data files will have one or two header rows with column names. These should not be included in the bank import. Specify the number of header rows in your data file, and Compeat will remove this number of rows from the imported data.
Four Digit Years Check this checkbox if complete years are used in your source data (e.g., 2009). If abbreviated forms are used (e.g., '09), leave unchecked.
Leading Zeros in Dates Check this checkbox if leading zeros are used for dates in your source data (e.g., 05/30/09). If leading zeros are not used (e.g., 5/30/09), leave unchecked.
Leading Zeros in Numbers (fixed width only) Check if leading zeros are used in numbers (e.g., "0.5" as opposed to ".5").
Include Decimal Point (fixed width only) Check this checkbox if decimal points are used in your source data (e.g., some systems will omit decimals, resulting in "5.5 hrs" being written as "55 hrs").
Select field names or "Filler Space" from the left-hand frame and move them to the right-hand frame using the arrow buttons to build a conversion for your spreadsheet. Each field name represents a column of the source data that should be imported, and filler space represents a column in the source that should not be imported. Use the up/down arrow on the right to move a selected item within the list. If you are importing fixed width data, once you add an item to the right frame, you can change the field length by clicking the Set Width button.