The Import Journal Entries utility allows you to import journal entries from an Excel spreadsheet. You might, for example, want to create spreadsheets to import recurring journal entries, such as realizing a monthly insurance expense.
To successfully import, you must consider a few minor formatting details.
Files must be in .xlsx or.xls file format. These are standard Microsoft Excel formats.
The basis of the import process is simply to indicate to Compeat where each piece of data in your spreadsheet is located. You do this by entering the cell references for your data in the Cell Locations fields.
You can view a sample spreadsheet by clicking Create Sample Spreadsheet. The data arrangement in the sample spreadsheet corresponds to the example cell references shown next to each field in Compeat. In some cases it may be easiest to rearrange your data to match the sample arrangement.
Do not leave any blank lines between data; when Compeat encounters a blank line, it will stop importing.
Your data must be in the first worksheet of the Excel workbook.
Note: Typically in Excel, when you create a new spreadsheet you will actually be creating a workbook with 3 worksheets; Compeat can only access information from the first sheet (named "Sheet 1" by default). You can rename the sheet, as long as it remains the first worksheet in the book (worksheets within a book can easily be dragged and dropped to change their order).
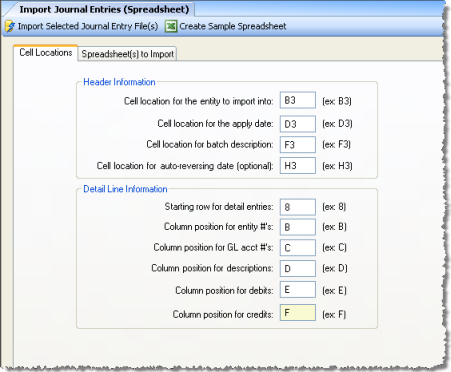
Use the Cell Locations tab to define a correlation between the data in your spreadsheet and Compeat. The tab appears similar to the following:
Define the position of the following information:
Note: Next to each field is an example cell reference that corresponds to the cell in the sample spreadsheet. If your data matches the organization of the sample spreadsheet, simply use this cell reference.
Cell location for the entity to import into Enter the cell-reference for the cell containing the entity to which the journal entries apply.
Cell location for the apply date Enter the cell-reference for the cell containing the apply date for the journal entries; if you will be importing this journal entry each month, you will need to update the apply date before each time you import.
Cell location for the batch description Enter the cell-reference for the cell containing the description that will be the reference text for the batch.
Cell location for auto-reversing date (optional) Enter the cell-reference for the cell containing the auto-reversing date for the journal entry, if any.
Starting row for detail entries Enter the number of the first row of your detailed entries.
Column position for entity #’s Enter the column containing the entity numbers.
Column position for GL acct #’s Enter the column containing the GL account numbers.
Column position for descriptions Enter the column containing the descriptions for each part of the journal entry.
Column positions for debits Enter the column containing the debits for the journal entry.
Column positions for credits Enter the column containing the credits for the journal entry.
Note: Compeat will remember the locations that you specified; if you make all of your journal entry spreadsheets from a template, this will save you from retyping the positions each time you import a journal entry spreadsheet.
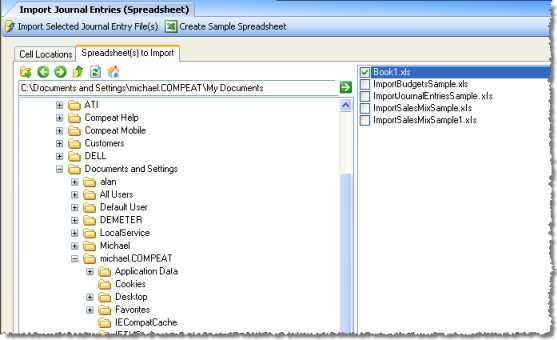
Use the Spreadsheet(s) to Import tab to select spreadsheet(s) that you want to import; you can import one or more spreadsheets at a time. This tab displays a standard Windows Explorer-type directory tree. From the directory tree, select the directory where your journal entry spreadsheet files are located.
The tab appears similar to the following:
Note: It is a good idea to place all of your journal entries in a single folder dedicated to only journal entry spreadsheet files. This will make it easier to find the correct files.
When a folder is selected, you will see all of the Excel files in that folder displayed on the right side of the screen. Check each journal entry file that you wish to import.
After you have selected the journal entry files that you wish to import, click Import Selected Journal Entry File(s).
If there is a problem with the files, Compeat will display an error while importing the file. The import will not be completed if a files has an error. For example, if you have entered an account in the Excel journal entry file that does not exist in the Compeat chart of accounts, you will get a message telling you to define the account before importing the file.
Another possible error is specifying an invalid date, such as February 30, 2010, or specifying the wrong position for the date field. In these instances, Compeat will inform you of the bad cell references so you can fix the problem and re-import. Compeat will also perform the same date validations as with any other transaction date.
Additionally, you could get an error if trying to perform an inter-company journal entry, and not specifying the accounting entity in the "Cell location for the entity to import into". Again, Compeat will tell you where in the spreadsheet the error occurred.
Once you have imported a journal, you can then view, modify, or delete the journal entries using the General Journals feature under the Transactions menu. When you are sure each journal entry is correct, you can post it.